How to 10x Productivity With ClickUp Templates

Using templates in ClickUp is one of the most powerful ways to standardize processes, boost productivity, and scale your marketing agency.
In fact, by simply documenting processes and saving them as ClickUp templates, Seaworthy Strategy was able to increase their agency’s productivity by over 400%.
Not bad for a few weeks of work.
The ClickUp Template Center offers the ability to create reusable templates for tasks, lists, folders, documents, views, and more.
But how can agencies best leverage the ClickUp Template Center to actually 10x their productivity?
Let’s discuss…
The Power of ClickUp Templates
In my experience, I’ve seen hundreds of agencies operate in ClickUp without a single template saved.
They’re leaving massive productivity gains on the table!
And besides just productivity gains, leveraging templates has plenty of benefits:
- Your team will follow your process - providing better results for your clients.
- Your team will develop better habits in your project management system (and actually enjoy using it!)
- You’ll have a better view of project progress across all of your clients.
- You’ll have a much more accurate view of workload - helping you better utilize your team.
- And you’ll have a much more accurate view of profitability - helping you make better decisions to improve profitability.
If you want your project management system to serve you well (ClickUp in this case), there’s three things you need to do right now:
- Prioritize your processes.
- Build your processes.
- And save them as templates.
This is how the most successful agencies have scaled beyond 8 and 9-figures.
If you’re not sold on utilizing templates, I recommend you try it out and see if it helps your team. You can start by leveraging our Agency Client Onboarding Template.
This template is built directly in ClickUp and comes with tasks, email templates, checklists, and task instructions to help your team do better work, faster.
Client Onboarding ClickUp Template
Access our pre-built Client Onboarding ClickUp template, 100% free.
Get My Template →Now that I’m done with my quick sales pitch on why you should leverage templates, let’s take a look at all the different types of templates in ClickUp, how to use them, and the ones you’ll need to leverage.
What are the Different Types of ClickUp Templates?
As mentioned, ClickUp is extremely powerful and you can template almost anything you want.
In fact, you can create a template at every level of the ClickUp Hierarchy.
1) Checklist Templates
At ZenPilot, we use checklists to serve as reminders for seasoned users when they’re completing a task. They tell someone, “hey, I know you’ve done this 100 times, but please don’t forget to do this and that.”
From my personal experience, checklists help a ton. There’s those small details on every task that make a big difference. Checklists make sure you don’t forget to do them.
And though checklists are great, they aren’t a popular template in ClickUp. They can be used sparingly, but checklists can be saved directly in your task, list, folder, and space templates. I’d rely on your other templates to save checklists.
What’s included in Checklist templates?
Checklist templates only bring the checklist and the assignee of that checklist item.
2) Task Templates
Task templates are my favorite.
Task templates are best used for deliverables like blog posts, landing pages, email campaigns, podcast episodes, etc.
We refer to task templates as “tools in your toolbox”. They work best to represent your agency’s services that you deliver frequently.
What’s included?
Task templates include the parent task, subtasks, and task details like due dates, assignees, checklists, descriptions, dependencies, and custom fields.
3) List Templates
List templates expand beyond a single parent task and contain multiple layered parent & subtasks together.
They work well for bigger projects like website builds, client onboardings, HubSpot implementations, brand redesigns, etc.
List templates allow you to effectively bundle together groups of predefined tasks that logically build upon each other. Think milestones, phases, etc.
Task templates represent your smaller deliverables that may take from 1 day to 1 month to complete, where list templates represent larger projects that may take 1 month to 6 months to complete.
What’s included in List templates?
List templates will bring together everything that task templates include - tasks, subtasks, task details, and dependencies - but they also bring all of the views and list settings within that list. Think automations, views, docs, forms, etc.
4) Folder Templates
Folder templates are where you really start to bring standardization to your workspace.
If you follow our ClickUp Hierarchy for Agencies and your client work all happens within a client folder (within a Delivery space), you’ll leverage Folder Templates when you bring on a new client and need a new client folder.
Folder templates are a game changer when it comes to onboarding new clients.
I’ll discuss this in more detail later in this guide, but teams like Commence Studio have significantly improved their onboarding process when leveraging folder templates.
What’s included in Folder templates?
Folder templates include everything that both task and list templates bring, but they also bring all of the folder settings with it as well. Think automations, views, docs, forms, etc.
This allows you to create a standardized list structure (with standard views built in to each list), bring onboarding tasks directly with the folder template, and have standard client documents and meeting notes already set up within the folder.
5) Space Templates
Space templates are the largest templates available within ClickUp, but I wouldn’t recommend leveraging space templates often.
They may help with your initial ClickUp implementation, but you won’t use them much post launch in ClickUp.
Space templates allow you to easily duplicate a space if you like the structure, views, settings, statuses, etc.
To be honest, space templates work best by helping teams pass large assets from one team to another.
I can create a space in ClickUp and share it with you via a public link.
Here’s an example. Our Agency Client Health Tracker is a pre-built space template you can purchase and deploy in your own workspace. This is similar to a CRM system. It helps you store client data in one place.
Pre-Built Client Tracker
Track the health of your customer relationships, account details, and more with this customizable ClickUp template.
Buy the Template →What’s included in Space templates?
A space template includes everything that your task, list, and folder templates bring, but it can also include Space level settings for things like ClickApps, default view settings, custom task IDs, and more.
6) Document Templates
I love the ability to create doc templates.
Document templates help you standardize your documents and save time creating documents for SOPs, meeting agendas, training materials, etc.
Documents can be saved into space, folder, and list templates (which is where I use them most), but it can also be helpful to save them as individual templates.
Saving them as individual templates gives you a bit more flexibility when deploying them. For example, if you enjoy using slash commands, you can type “/template” in a document and deploy a fresh new template.
Related: How to Use ClickUp Docs
You can also use ClickUp AI to speed up template creation and documentation - especially helpful when building out descriptions and SOPs for your process library. ClickUp Brain 2 can draft SOP docs and task descriptions by pulling context from your workspace, which takes a lot of the grunt work out of building doc templates.
7) View Templates
Views are one of my favorite features in ClickUp. Right behind the Template Center of course.
Views allow ClickUp users to see data in just about any way imaginable.
But with great power comes great responsibility.
Views can also be one of ClickUp’s most daunting features if they aren’t used correctly.
Views need to be standardized across your workspace, or your team will most likely get extremely confused and overwhelmed.
You’ll be able to build standardized views in your space, folder, and list templates, but it can be helpful to have views as individual view templates in case you want to deploy a view in a different location.
What’s included in View template?
View templates include the view type (board, list, table, etc.) and filters, settings, visible columns, and groupings.
Related: Everything You Need to Know About ClickUp Views
8) Whiteboard Templates
I’ll list this one out separately (because ClickUp does), but whiteboard templates will act similarly to view templates.
If you leverage whiteboards a lot for planning, you’ll be able to create a templated whiteboard and deploy it wherever you need it!
Creating a Process Library for Template Management
So yeah, there’s a ton of templates we can work with. But the amount of customization and capabilities within ClickUp can get most users a bit overwhelmed.
Instead of going crazy and creating a random assortment of templates, lets talk through some best practices and processes to make the most out of the ClickUp Template Center.
What’s step #1?
Before you dive into the deep end of the ClickUp Template Center, you need to create a “Process Library” space in ClickUp.
This will serve as a dedicated space to house all of your template source files.
Why Should You Create a ClickUp Process Library?
I’ll be honest, the biggest limitation to the ClickUp Template Center is the inability to edit templates directly in the Template Center.
Once a template is saved, you cannot edit it unless you have the source file for that template built somewhere in ClickUp - hence the reason for the Process Library.
Having these template source files on hand makes updating and maintaining templates easy.
Your templates should never be static. You’ll be updating regularly. Especially in the marketing world, things change, and this has an impact on our processes.
If you’re brand new to ClickUp, or just new to using templates, this might not mean much right now, but when you have 20, 50, or 100+ templates, you’ll realize why I’m telling you to build this out now.
Overall, invest time upfront to build your dedicated process library.
How Should Your Process Library Be Structured?
Your “Process Library” should contain a logical folder structure to organize your process templates. We suggest your templates are organized by department, work category, and template type.
-
[Folder] Delivery Task Templates
-
[Folder] Delivery List Templates
-
[Folder] Growth Task Templates
-
[Folder] Growth List Templates
-
[Folder] Operations Task Templates
-
[Folder] Operations List Templates
-
[Folder] New Client Folder Template
-
[Folder] View Templates
-
[Folder] Document Templates
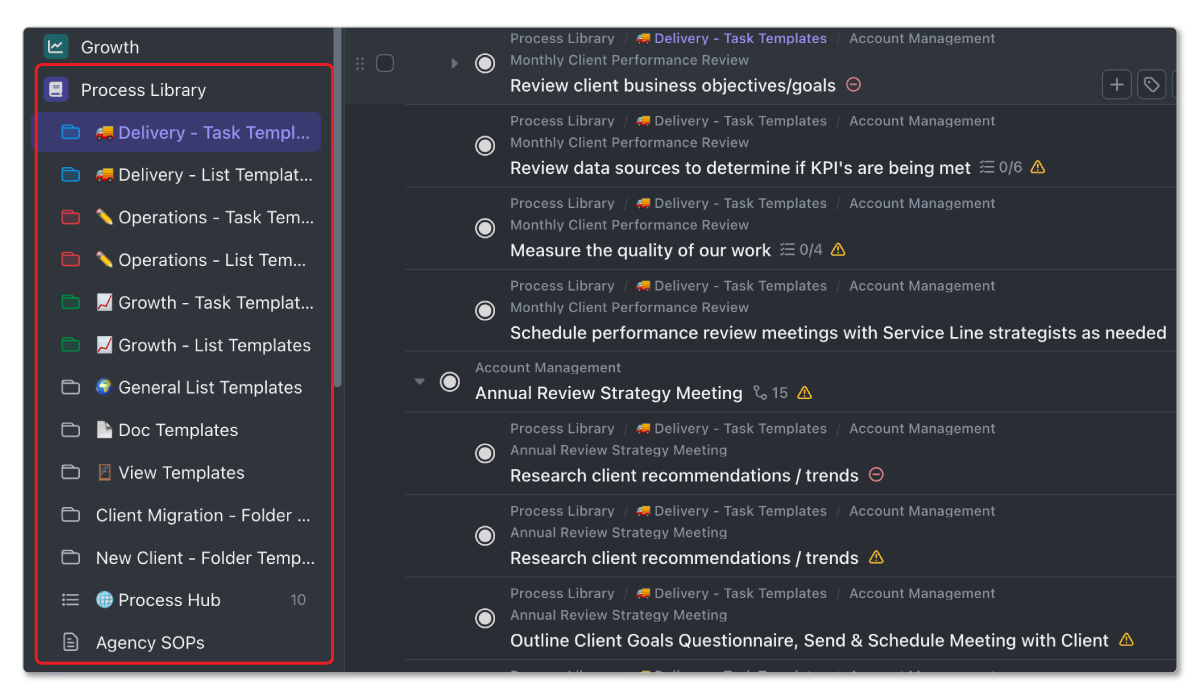
Then within those high level folders, create additional organization based on work categories or service lines for your delivery focused templates.
For example, under the “Delivery Task Templates” folder you could have:
- [List] SEO
- [List] ABM
- [List] Email
- [List] Account Management
Each one of these lists would then host all of the deliverables related to that work category or service line. Different verticals will have unique process libraries - for example, accounting firms organize around tax prep, audit, and bookkeeping workflows. Underneath the Email list, you could have:
- [Task] Newsletter
- [Task] Drip Campaign
- [Task] Promotional Email
Each of these would contain the tasks needed to complete that deliverable, but more on that later.
Prioritize Your Processes
After you’ve built your Process Library in ClickUp, you’ll want to actually prioritize the processes that you need to build.
Prioritization is always important.
You can’t build everything at once. Rome wasn’t built in a day, right?
Instead of me spending too much time on this topic, I’ll share a worksheet with you to start doing this.
Our Process Prioritization Worksheet is the exact process we’ve taken 3,100+ clients through to prioritize their processes.
This will help you determine what processes need to be built first.
After you’ve prioritized your processes, it’s time to start building these out in ClickUp and saving them as templates.
You’ll leverage three main template types to power your agency.
The Three Template Types That Will Power Your Agency
1) Task Templates - Deliverables
Task templates will be the most used template for 95% of teams.
As mentioned earlier, these will represent your deliverables or “tools in your toolbox”.
You’ll use these templates over and over and over again.
Task Template Example - Blog Post
Let’s walk through building out a polished task template using a common agency example - blog posts.
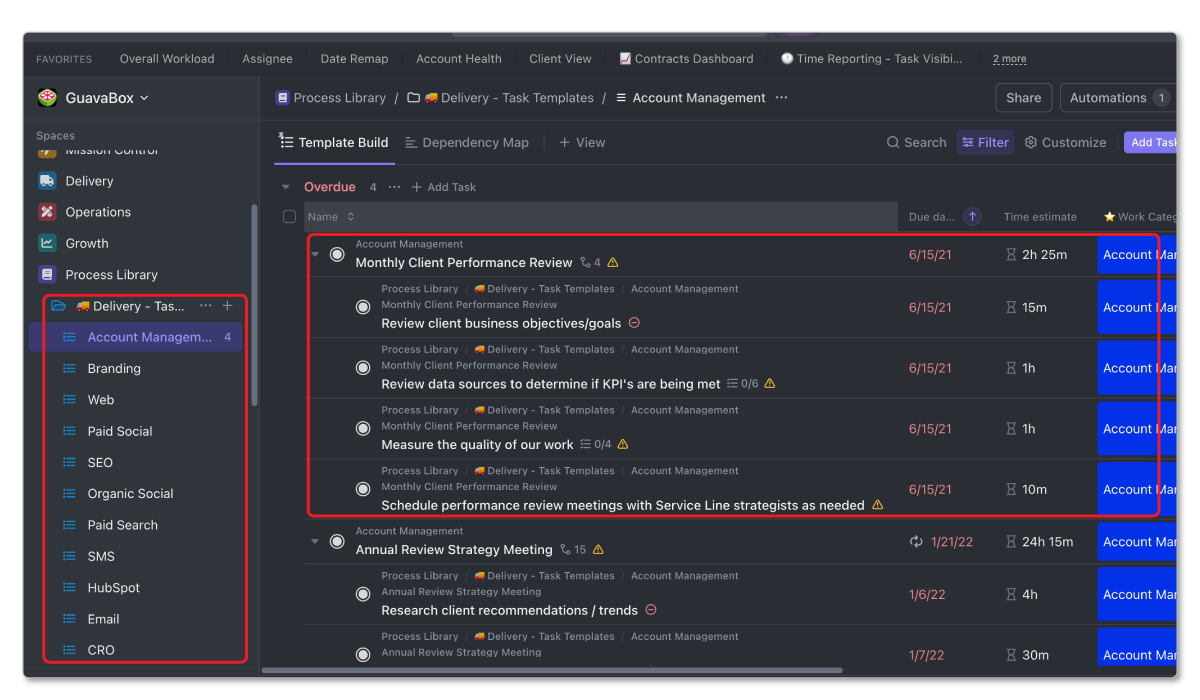
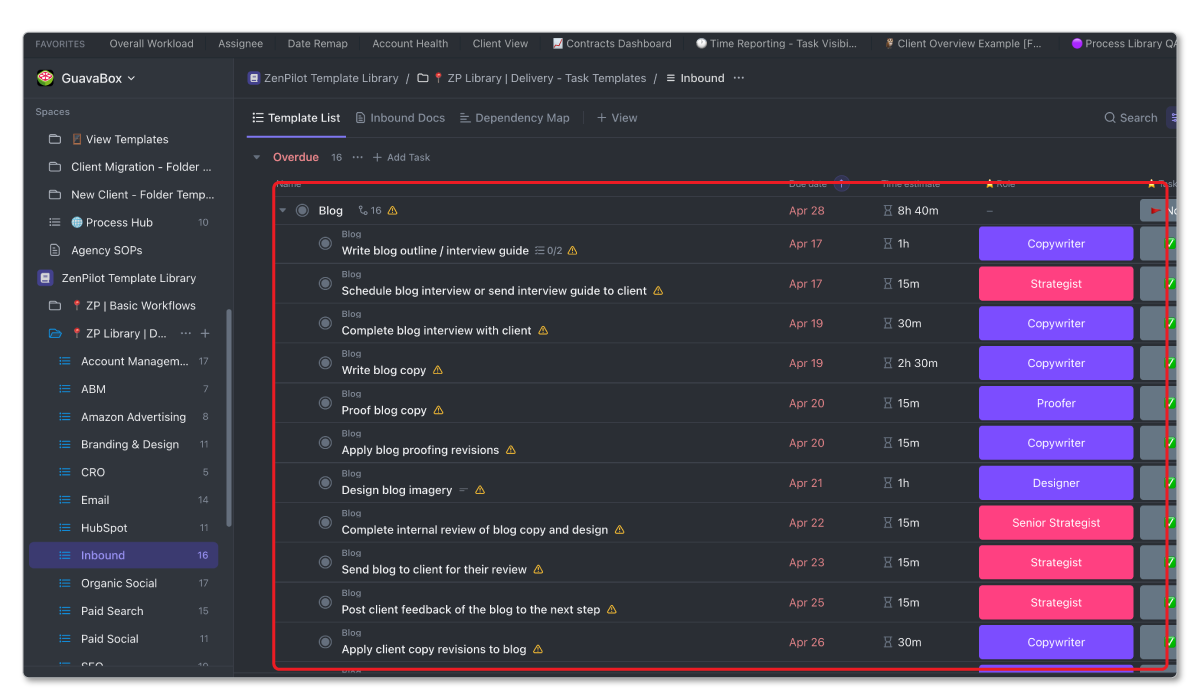
Inside your Process Library, within the “Delivery - Task Templates” folder and “Inbound” list, we’ll create a parent task called “Blog Post” with subtasks, due dates, time estimates, and instructions:
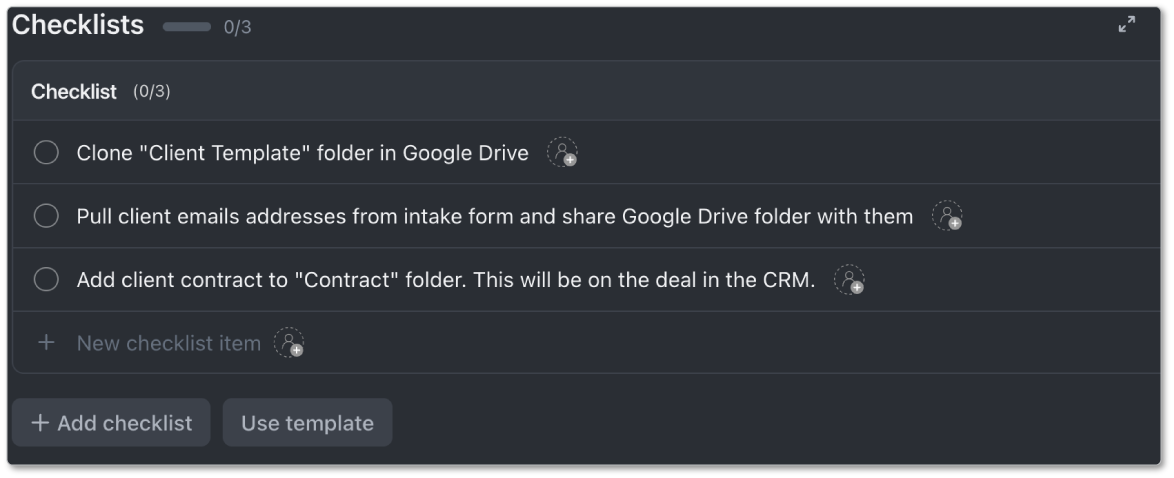
- Subtasks: These represent the actionable tasks that are needed to complete a blog post - create blog strategy, write blog, proof blog, send blog to client, receive feedback + make adjustments, publish blog. You’ll see a screenshot of what this should look like below.
- Due Dates: Due dates in your templates represent a date map. You should only care about the distance between each of the dates - not the actual date itself. Pick a date for your first task and then work from there. You can remap these due dates when you deploy the template.
- Time Estimates: Time estimates are what they sound like. How long do you think each task should take? We recommend that each of your tasks is broken up into tasks that take no longer than 4 hours. This will help you get a much more accurate workload view in ClickUp.
- Delivery Roles: Delivery roles represent who will be assigned to this task in the future. This is displayed by a drop down custom field. This makes it much easier to assign work in the future and make smarter hiring decisions. We don’t assign tasks in the Process Library because there is no guarantee that that assignee will be the assignee every time this template is deployed. We’re building these templates to scale.
- Dependencies: Link your tasks together in the Gantt view for easy date remapping in the future.
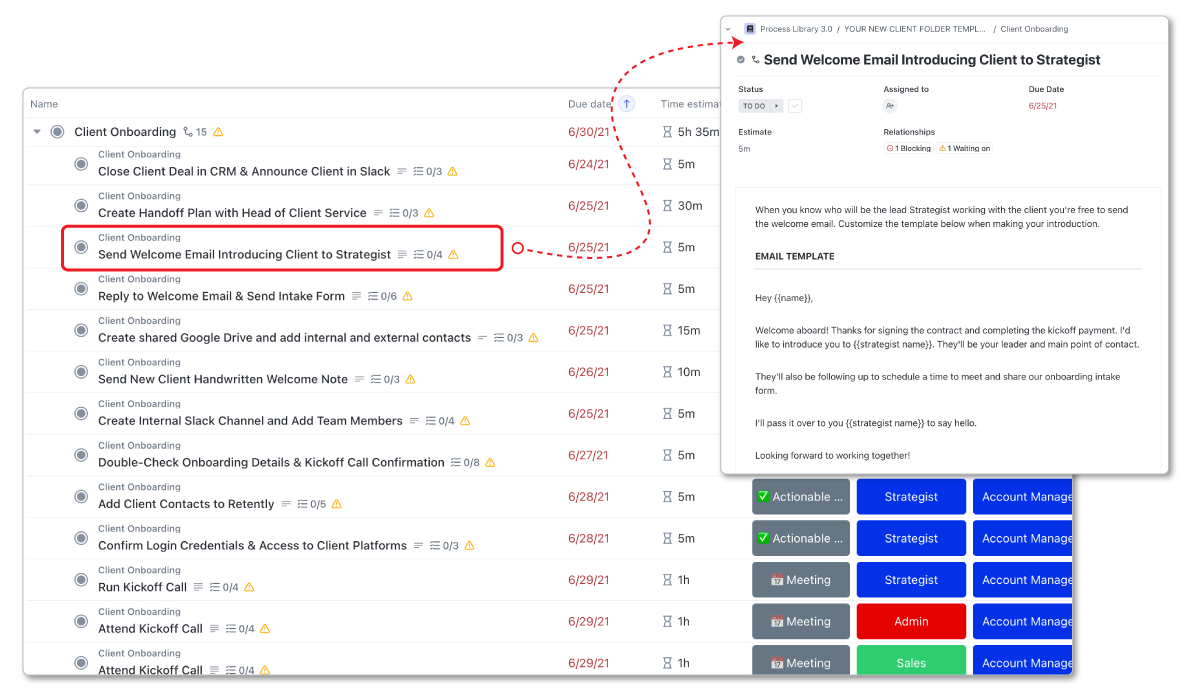
- Checklists: Add checklists to your subtasks to provide reminders for seasoned users to ensure they don’t forget to do certain things related to a task.
- Descriptions: Written or video instructions attached to each subtask to explain to someone how they can and should complete the task. Your descriptions can also be linked to an internal ClickUp wiki with SOP documents.
- Additional Custom Fields: Add in additional custom fields that you want included in your templates. We’ve leveraged “Task Type” and “Work Category” custom fields to help filter these tasks in the future.
The key to all of this is starting simple and building from there.
To save time, you can skip the checklists and task descriptions at the beginning. The basic workflow is the most important part.
But adding in the checklists and task descriptions is where you really start to unlock the power of ClickUp.
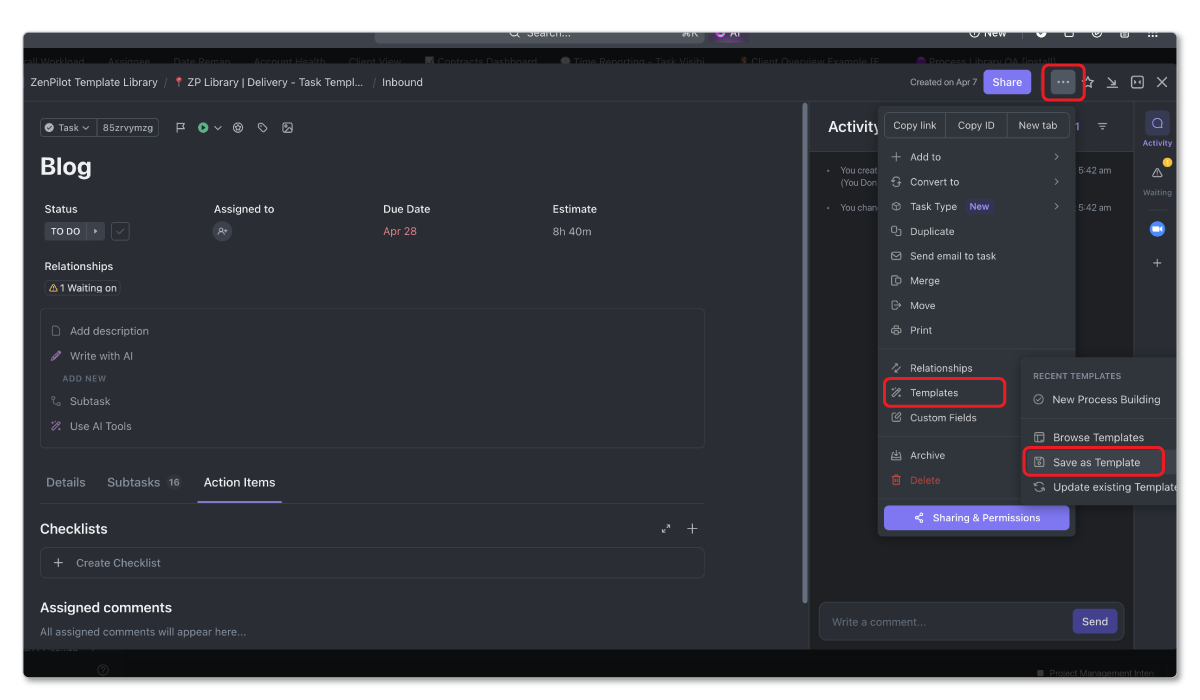
How to Save a Task Template
With your structure in place, we can now save it to the ClickUp template center.
Here’s how to do it:
- Navigate and click on the parent task
- In the task view, click on the ”…” in the top right corner (labeled as “task settings”)
- Select “Template Center” and then “Save as Template”
- Name it something like “Blog Template”
- Add relevant tags like “Inbound” for easy searching. These tags should match your work categories/service lines.
- Adjust permissions and sharing settings if relevant
- Toggle any unnecessary custom elements to exclude. You’ll want to exclude “Watchers” from this. Otherwise you’ll be a watcher on every task that’s deployed from this template and we don’t want that.
Your blog post task template now neatly appears inside the ClickUp Template Center ready for easy reuse anytime you need to write a blog for a client.
How to Update a Task Template
Now, if you make an adjustment and need to update your template, this is easy thanks to your Process Library.
Here’s how to do it:
- Go to the task in your Process Library and make whatever adjustment you need to make.
- After you’re done making changes, click on the parent task
- In the task view, click on the ”…” in the top right corner (labeled as “task settings”)
- Select “Template Center” and then “Update existing Template”
- Find your existing template and click “Next”
- Adjust any details on the next screen - name, import options, permissions settings, etc. - and then click “Save Template”.
Your template has now been updated inside of the template center. Next time someone deploys the template, it will bring your new version.
This will only impact future deployments of this template and will not have any impact on tasks that have already been deployed from this template.
How to Deploy a Task Template
After you’ve built and/or updated your templates in ClickUp, it’s time to start using them.
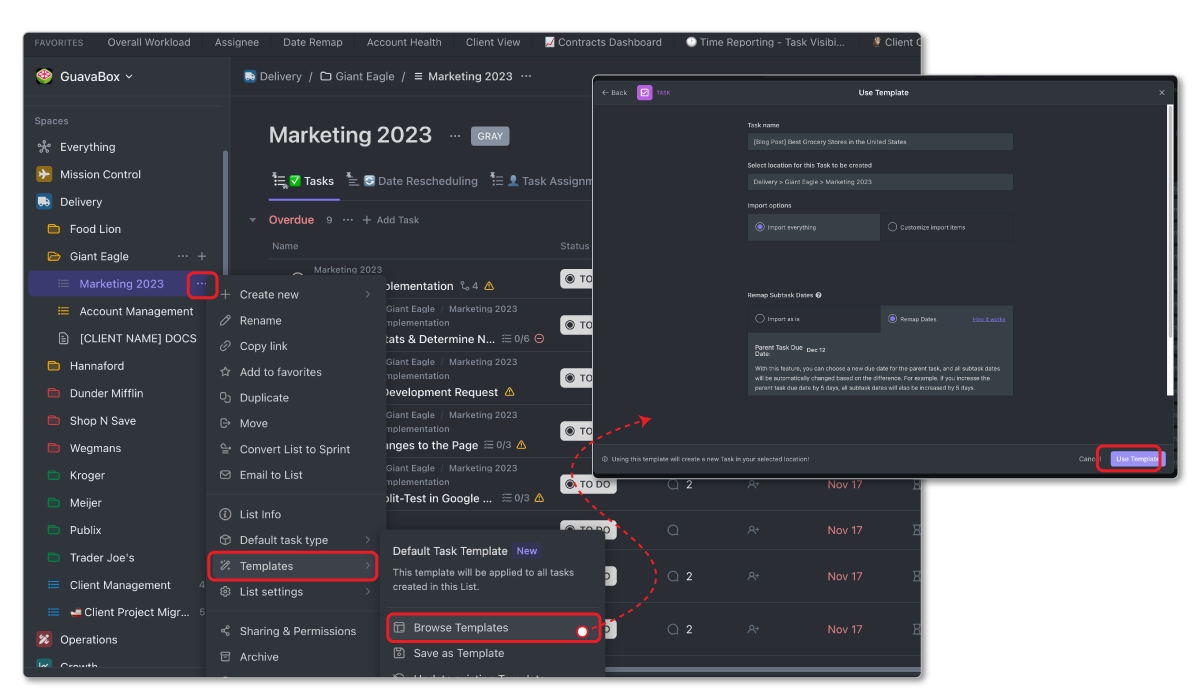
- To begin, navigate to the desired location for deploying your template. If you’re writing a blog for a client, navigate to the correct client folder and list.
- Find the list settings - represented by the ”…” on the sidebar menu - click “Templates” and “Browse Templates”
- Search for your newly created “Blog Template”. Make sure that Task Templates are toggled on.
- Confirm desired deployment destination
- Customize any last details like due dates
- Hit “Use Template”
Your task template is now deployed with all of the tasks, descriptions, fields, time estimates, etc. that you included within the template.
Adjust due dates, assignees, and clarifying instructions as needed for the specific project.
This is much faster than starting from scratch each time. For more tips on speeding up task creation, read our guide on how to create tasks faster in ClickUp.
Now your team simply needs to execute by moving through each subtask you laid out for a smooth blog creation process.
2) List Templates - Projects
List templates will be the second most used templates for agencies.
List templates make it much easier for project managers to set up and assign out larger projects like website redesigns, client onboardings, HubSpot implementations, and more.
List Template Example - Website Redesign
In this example, let’s build out a multi-phase website redesign list template.
Your list templates will act slightly different than your task templates.
For starters, parent tasks may operate slightly different in a task template. With a list template, your parent tasks are represented by milestones within a project.
Within a website redesign, your parent tasks may look something like this:
- Research & Discovery Phase
- Wireframes & Prototyping
- Content Phase
- Design Phase
- Development Phase
- Launch Phase
- User Guide
- Post Launch Phase
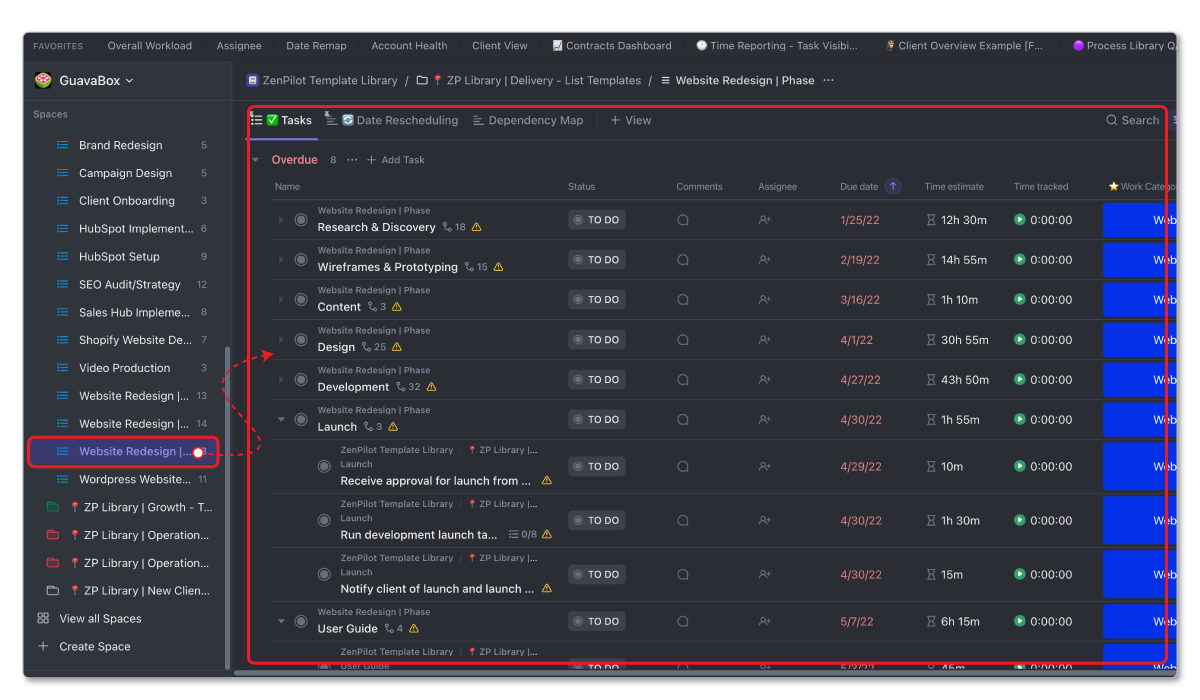
Inside of each parent task lives more granular subtasks like conducting customer interviews, writing website copy, presenting design concepts, migrating custom functions, refining page speed optimizations, etc.
These will also include any preset meetings that happen in cadence with your website phases.
Your tasks within your list template should bring the same information that your task templates brought. Refer to the checklist above.
Additionally, your list template can include additional list level settings that an ordinary task template cannot bring with it.
- Views: Includes multiple list, Gantt, timeline, and calendar views for visibility.
- Automations: Includes any ClickUp level automations that can help automatically assign custom fields, change statuses, etc.
- Documents: Includes any documents that can be useful for website page creation, strategy, and/or pro-typing
How to Save a List Template
With your structure in place, we can now save it to the ClickUp template center.
- Navigate to the list (on the left sidebar) and click on the ”…” (labeled as “list settings”)
- Select “Template Center” and then “Save as Template”
- Name it something like “Website Redesign”
- Add relevant tags like “Web” for easy searching. These tags should match your work categories/service lines.
- Adjust permissions and sharing settings if relevant
- Toggle any unnecessary custom elements to exclude. You’ll want to exclude “Watchers” from this. Otherwise you’ll be a watcher on every task that’s deployed from this template and we don’t want that.
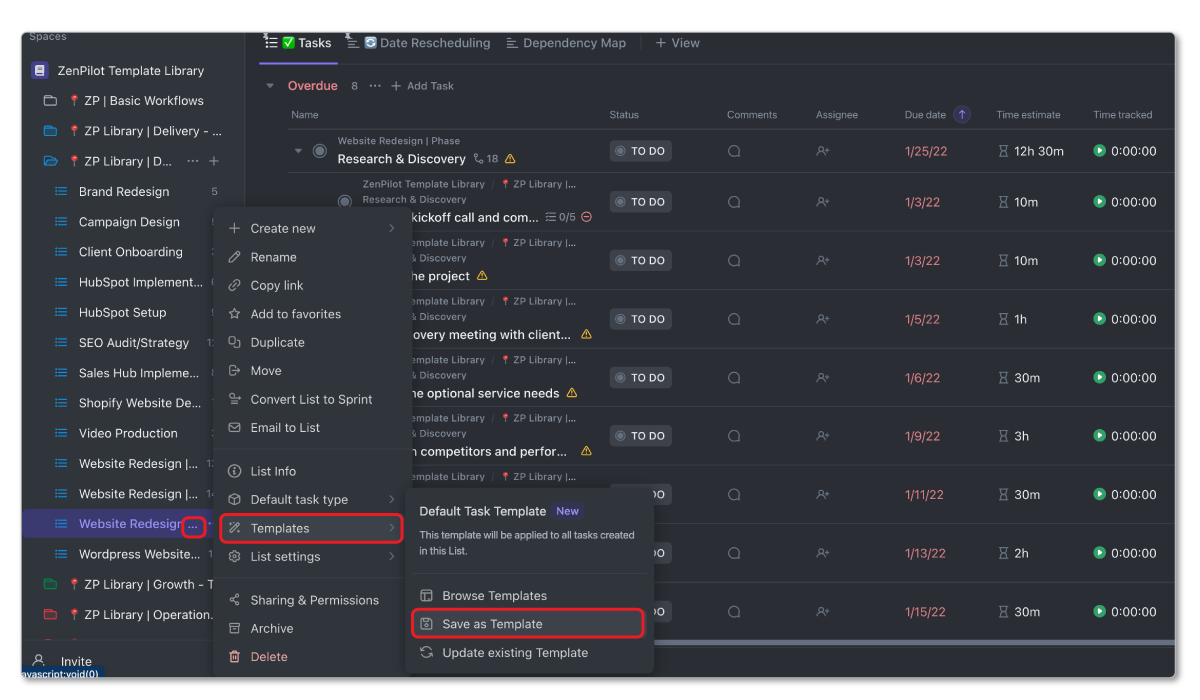
Your website redesign list template now appears inside the ClickUp Template Center ready for easy reuse anytime you need to design a website for a client.
How to Deploy a List Template
After you’ve built your templates in ClickUp, it’s time to start using them.
- To begin, navigate to the desired location for deploying your template. If you’re designing a website for a client, navigate to the correct client folder.
- Find the folder settings - represented by the ”…” on the sidebar menu - click “Templates” and “Browse Templates”
- Search for your newly created “Website Redesign” template. Make sure that List Templates are toggled on.
- Confirm desired deployment destination
- Customize any last details like due dates
- Hit “Use Template”
Your list template is now deployed with all of the tasks, descriptions, fields, time estimates, views, etc. that you included within the template.
Adjust due dates, assignees, and clarifying instructions as needed for the specific project and your team will be on their way.
Saving and deploying list templates, like your website redesign template, then allows you to kickstart new client website builds in seconds.
You can then customize dates and assignments as needed - but won’t waste time manually recreating the underlying process each time you perform a website redesign.
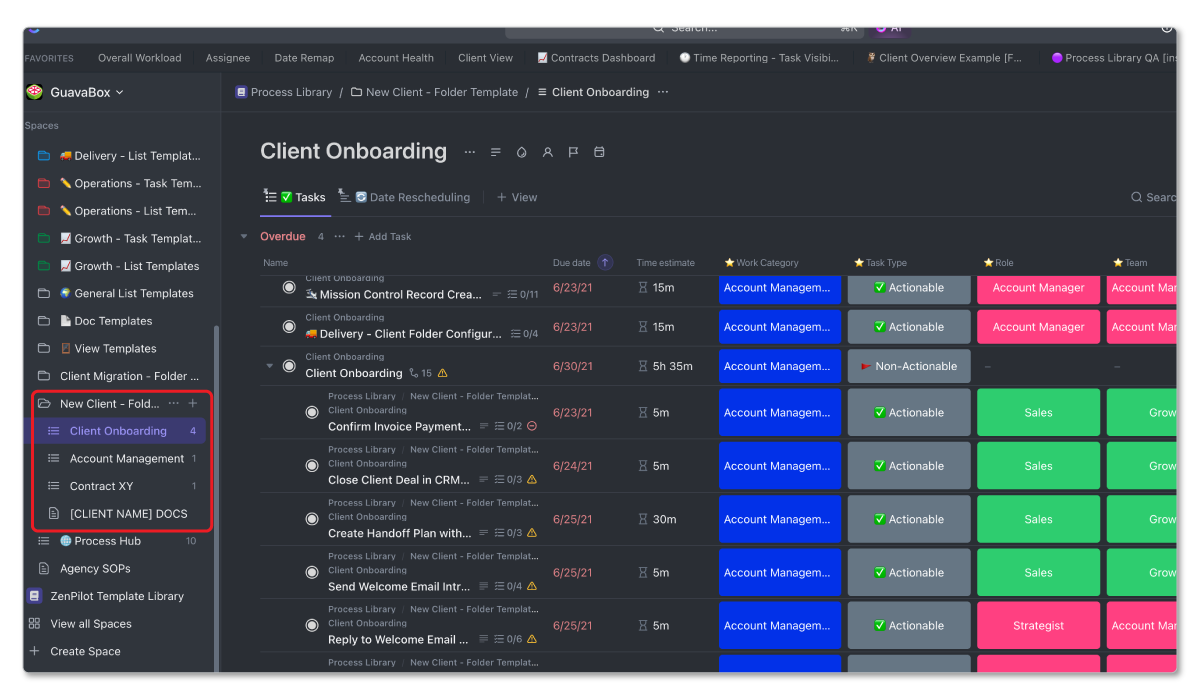
3) Folder Templates - Clients
Folder templates are the homes where your list and task templates (at least for client services) will actually be deployed in and live.
Why Use Client Folder Templates?
- Streamline onboarding - Provide onboarding tasks and assignments directly after a new client comes on board. You’ll see the folder template and this process in action in our article, Streamline Onboarding With the ClickUp + HubSpot Integration.
- Improve team ClickUp usage - When you standardize your ClickUp workspace with views, statuses, custom fields, processes, and your folder & list structures, there’s a much higher chance that your team will actually use the system correctly and not get overwhelmed.
- Centralize client data - When every client folder comes with client documents and agenda templates, you’ll find it much easier to centralize client data in one place.
Setting up folder templates will be less about the tasks, and more about the structure of your folders.
Yes, you’ll have your onboarding process built directly in the folder template, but the rest of the lists within your “Client Folder” template will most likely be blank.
How Should You Structure Your Client Folder Templates?
Here’s how you should structure your client folder template.
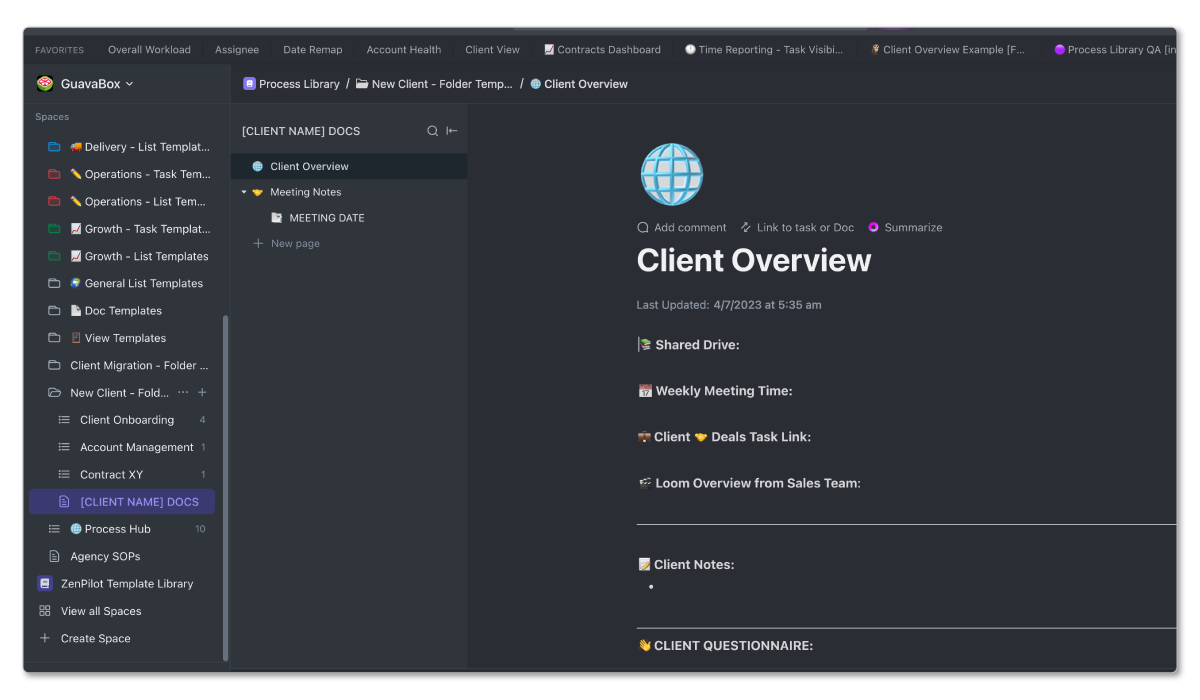
[Folder] Client Folder Template - You’ll begin with the client folder. This folder will have a few views and documents:
- Date Remap - This will be a Gantt view that allows you to easily remap due dates of projects for this client.
- To Dos - This is a basic list view that shows tasks that still need to be complete for this client.
- Deliverable Progress - This is a list view that only shows parent tasks (deliverables or milestones) and the progress of those tasks.
- Assignee - This is a list view that leverages your “Delivery Role” custom field to assign work.
- Recent Comments - This is an activity view that shows all communication happening within this specific client.
- Client Docs - This is a doc view that provides a client overview and meeting notes template to store all client info and notes in one place.
Then you’ll build these lists inside the folder:
- [List] Onboarding - You’ll build your client onboarding process directly in to your folder template. This will be a list with all of the tasks needed to onboard a new client. When a client is onboarded, this list can be archived.
- [List] Contract XY List - You’ll build an empty list that will serve as a home for all of your task templates. This list will be renamed to reflect the name of your contract with the client. All work for this contract will live in this list for easy time tracking and updates. You’ll also leverage similar views to those at the folder level and build them in to this list.
- [List] Account Management - You’ll build an empty list that will serve as a home for all of your account management related tasks. These can be tasks associated with the client, but not a particular contract or project. Similar to the Contract List, you’ll leverage similar views to those at the folder level and build them in to this list.
- [List] Shared Client List - This list is not required, but offers an easy way to communicate with clients in ClickUp. If you prefer to create a list that you share with clients to communicate with them and show them what you’ve done, you can use a Shared Client List that can be brought with a template.
When Should You Use Client Folder Templates?
These templates will be used whenever a new client is being brought on board.
You’ll want to follow the process I walk through in our Streamline Onboarding with the ClickUp + HubSpot Integration article and video tutorial.
Even if you don’t have HubSpot, this tutorial discusses how you can best onboard new clients with your Client Folder Template.
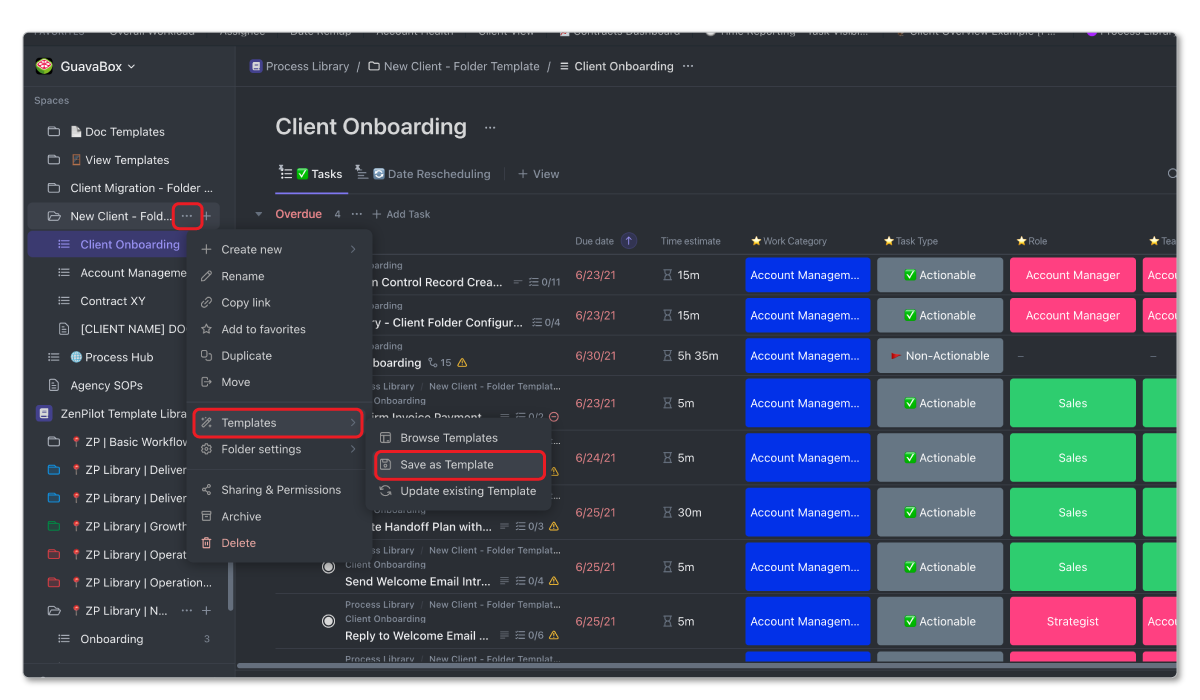
How to Save and Deploy a Folder Template?
Saving a folder template follows the exact same process as saving task and list templates. The only difference is you’ll be accessing the folder level settings instead.
When you deploy a folder template, you’ll follow the same instructions as your task and list template deployment, but you’ll need to access the template center from the Space level settings. This will enable you to deploy the folder in to that space.
You’ll deploy the folder, assign out the onboarding tasks, customize the docs, and be on your way!
This streamlined process makes onboarding a breeze.
Process Prioritization Worksheet
Get the exact Process Prioritization Framework we’ve used to help 3,100+ clients prioritize and organize their processes.
Download the Worksheet →Level Up Agency Operations With Templates
Hopefully you now grasp the end-to-end power of tapping into templates within ClickUp for your agency.
From individual tasks to complex projects, your ability to not have to create tasks from scratch does way more than save you time.
Think about how much smoother your agency would operate if you had a process template - complete with instructions, SOPs, checklists, and time estimates - for everything you do.
This is how you unlock the simplicity that your team needs to do better work faster, and how you unlock the visibility and insights that your leadership team needs to run and scale the business.
Templates are the missing piece in most agency businesses.
We’ve seen thousands of agency transformations with a simple introduction of process templates.
And remember that templates don’t live in a vacuum. Use your Process Library to continuously update them - fixing issues, upgrading instructions, and appending new strategies and learnings.
And if you need a trusted partner to lead you through this process, book a call with one of our experts.
Whether looking to boost team productivity, improve operational efficiency, increase profits, or build a system that runs without you - we are here to help.
Taking your operations seriously will change your life. And I want you to experience this life-changing impact.
Free Agency ClickUp Templates
Because you asked and are in need of some free agency ClickUp templates to get you started, I’ll point you in the right direction. Here are a few:
- Agency Client Onboarding - Task Template
- Level 10™ Meeting Agenda Template - Doc Template
- HubSpot Setup - List Template
Premium ClickUp Templates
If you want the pre-built systems we deploy with clients, these are paid and worth it:
- Agency Client Health Tracker - Space Template - track client health scores, relationship signals, and renewal risk in one space
- ClickUp for Agencies Playbook - our full template library, packed with 140+ agency templates
Frequently Asked Questions
What are ClickUp templates?
ClickUp templates are reusable blueprints that capture your tasks, subtasks, due date maps, time estimates, descriptions, checklists, custom fields, views, and automations - so you can deploy a consistent process with the click of a button. They eliminate the need to build projects from scratch every time and ensure your team follows your proven workflows.
Can you share ClickUp templates with other workspaces?
Yes. ClickUp allows you to share templates with other workspaces via a public link in the Template Center. Space templates are the most common way to share large structures between workspaces. This is how teams distribute pre-built systems - like our free Agency Client Onboarding template - to other ClickUp users.
What’s the difference between task templates and list templates?
Task templates represent a single deliverable (like a blog post or email campaign) with its subtasks, due dates, and instructions. List templates represent a full project (like a website redesign or client onboarding) containing multiple parent tasks, phases, views, automations, and documents. Use task templates for repeatable deliverables and list templates for larger multi-phase projects.
How many templates can you create in ClickUp?
You can create unlimited templates on all paid ClickUp plans. Free plans have a small cap, but once you’re on the Unlimited plan or above, there’s no restriction on the number of task, list, folder, doc, or view templates you can save in the Template Center.
Want Help Building Your Template System?
A good template system is the difference between a ClickUp workspace your team actually uses and one they quietly work around. But building the Process Library, prioritizing the right processes, and rolling it all out takes real time.
That’s the job at ZenPilot. We look at how your team runs ClickUp today, show you exactly what to fix, and help you roll out the fixes in a way your team will adopt instead of ignore.
If you want that kind of look at your workspace, book a free 30-minute call. Worst case, you walk away with a shorter list of things to worry about.