How to Create an Internal Wiki in ClickUp

Every company needs to have an internal wiki or knowledge base. If you’re using ClickUp, you can build one right where the work gets done. This creates a central location for your team - both new and experienced employees - to find and read more about your company history, values, goals, expectations, and how you do things.
An aside from helping educate your team, an internal wiki can make your team much more productive.
According to a recent report from Coveo, the average employee spends 3.6 hours daily searching for information. This 3.6 hours is close to 50% of the average employees work day. Think about how much more your team could accomplish by shrinking that 3.6 hours to less than 30 minutes per day.
One of our commandments at ZenPilot is: “the process needs to live where the work gets done.”
When this is your reality, your team no longer needs to spend time looking for information. All of the information is just right there in front of them when they go to complete their work. This is part of the reason Seaworthy Strategy was able to skyrocket productivity by over 400%.
Creating an internal wiki or knowledge base (while also documenting their processes) is one massive step businesses need to take to make their team more productive.
Download the Complete ClickUp for Agencies Guide
The 47-page guide includes graphics, checklists, and links to how-to videos so you can actionize your ClickUp plan.
Get Instant Access →What is an Internal Wiki?
An internal wiki is a centralized platform that documents your company’s accumulated knowledge, processes, and procedures. It serves as an easily accessible resource for employees to:
- Learn about company guidelines, values, and culture
- Reference training materials and instructions
- Find answers to common questions
- Collaborate on documenting procedures
- Onboard new employees and educate cross-functional teams
Well-designed wikis become a hub for employees to share knowledge and preserve vital institutional know-how.
What to Include in an Internal Wiki?
A robust wiki should contain:
- Company culture and values - Help new hires understand expected behaviors and mindsets. Outline your mission, traditions, leadership principles and workplace attitudes.
- Org charts and team overviews - Define roles, responsibilities, and relationships between teams. Explain what each department does and how they interact.
- Employee handbook - Cover codes of conduct, benefits, time-off policies, dress code, and other HR information.
- Standard operating procedures (SOPs) - Document step-by-step instructions for regular processes, policies, emergency protocols, and more.
- Internal tools and systems - Provide guides, manuals, and FAQs on using platforms like email, chat, project management, filesharing, and other workplace apps, and software.
- Brand style guide - Specify your brand identity, logo usage, color palettes, typography, imagery, and tone of voice.
- Data security and compliance protocols - Educate employees on cybersecurity practices, accessing sensitive data, and maintaining regulatory standards.
- Industry glossary - Define specialized terminology and commonly used lingo.
What are The Benefits of an Internal Wiki?
Besides making your team more productive, an internal wiki provides immense value by:
- Streamlining onboarding - Give new hires a reliable resource to ramp up faster. Reduce tedious questions and duplicate training.
- Enabling knowledge transfer - Allow experts to document processes and know-how before leaving the company. Future-proof your culture and methodologies.
- Breaking down silos - Teams collaborate better and align more when information is democratized.
- Providing transparency - Open access to company guidelines builds trust and engagement.
- Facilitating cross-training - Cross-functional learning prevents knowledge monopolies and bottlenecks.
Now let’s dive into best practices for structuring your wiki, driving adoption, and efficiently managing it long-term inside ClickUp.
Related: Trinity Insights used our ClickUp system to bring all of their operations together and increase resource utilization by 29%. Watch their story below:
How to Build Your Internal Wiki in ClickUp
Yes, there are many wiki software solutions out there (GetGuru is actually a great one I’d recommend - mainly because of its ClickUp embed possibilities), but building your internal wiki inside of ClickUp allows you to create it in one central location and directly tie it to the work and tasks you’re doing.
Where Should You Create Your Wiki in ClickUp?
Let’s talk about where and how to build a wiki in ClickUp.
To add documents, I’m going to use the Docs view.
If you’re new to ClickUp Docs, I’d suggest you watch our step-by-step tutorial on how to use ClickUp Docs.To add a document, go to any list or folder and create a Doc view. But where should you actually create this knowledge base?You want it in a central location where everyone can easily find it. I like to build it at the Everything level - this shows all the work across your ClickUp workspace, so it’s perfect for an internal wiki. Here’s how to add it:
- Go to the Everything level
- Click “Add a view”
- Select “Add doc view”. Make sure it’s public (not private).
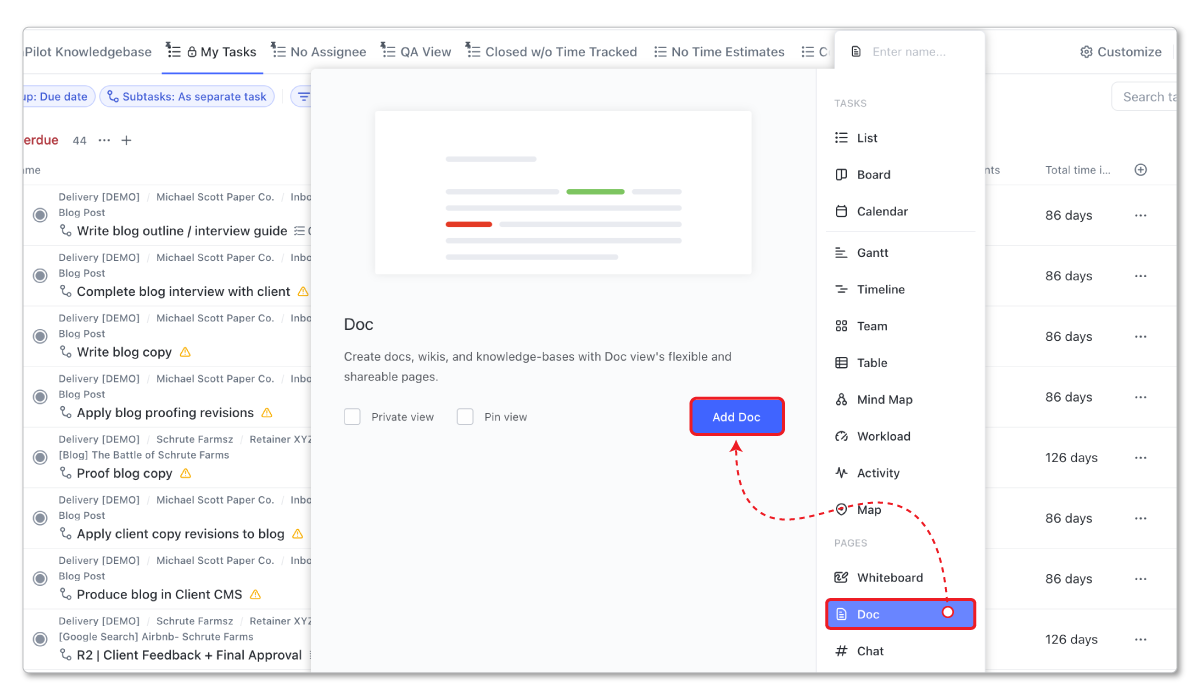
Once you have the Doc view setup, we can start building out all the documents and content inside the wiki. That’s the most important part!
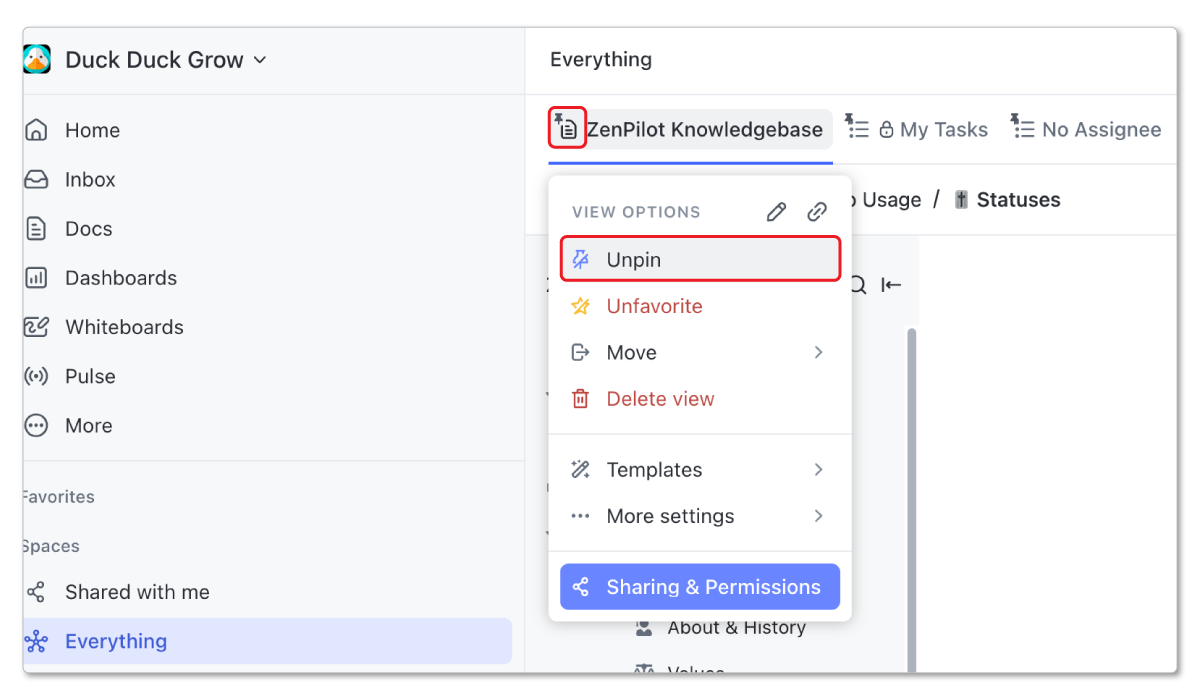
Two Tips to Make Your ClickUp Wiki More Visible
Here are some tips to make sure your team can easily find the wiki:
1) Pin the Doc View
At the Everything level, you’ll likely have lots of views. Pin the knowledge base view to put it at the top. Team members can rearrange, but pinning makes it clear this is important.
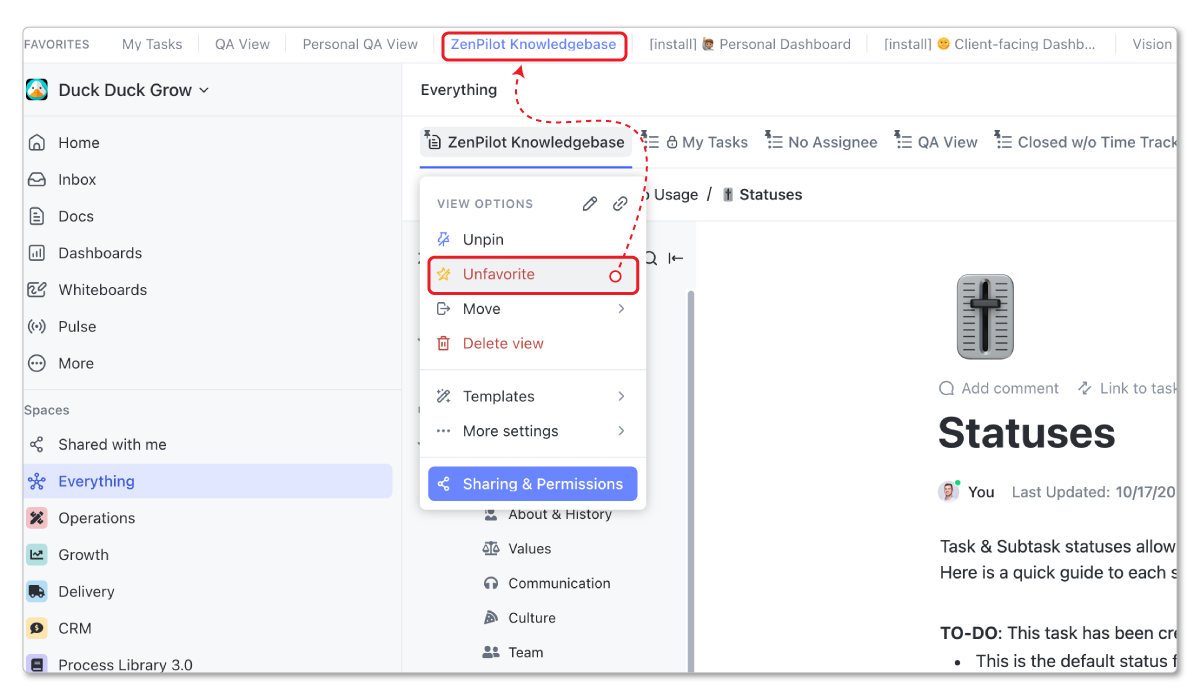
2) Favorite the View
Have everyone on your team favorite the knowledge base view. This creates a “bookmark” for them inside of ClickUp. Wherever they are in the workspace, they can quickly jump to the docs. That’s key - you want this front and center so it’s easy to find! Now let’s look at the overall structure.
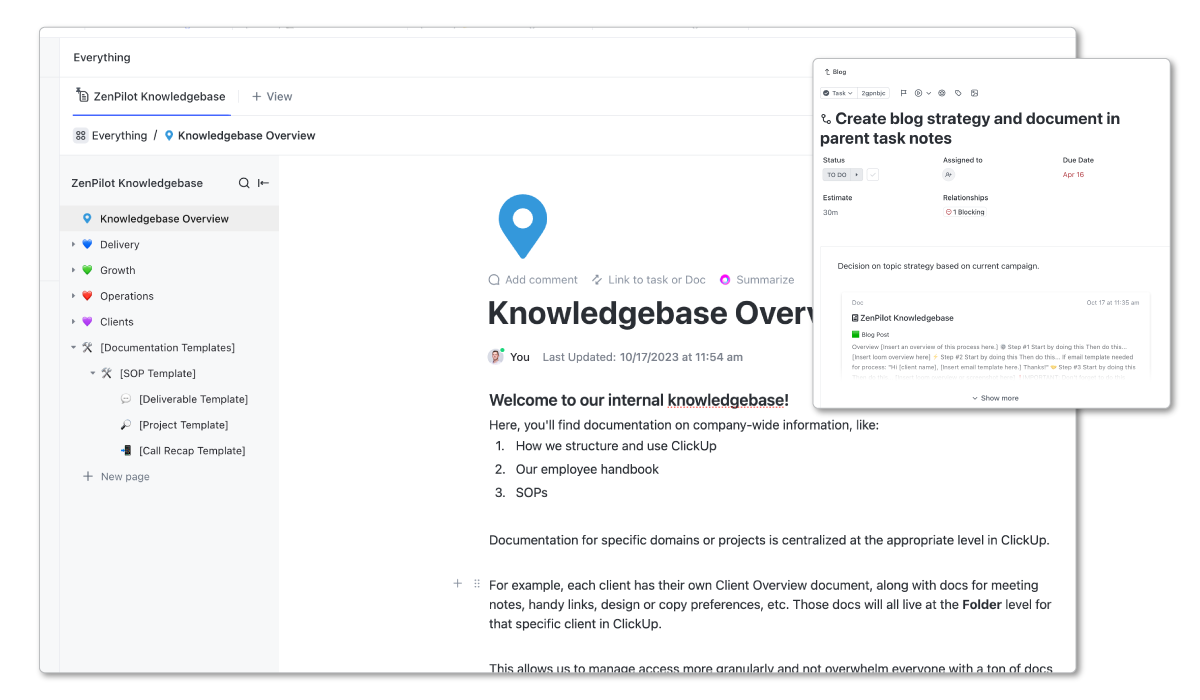
How to Structure Your Wiki in ClickUp
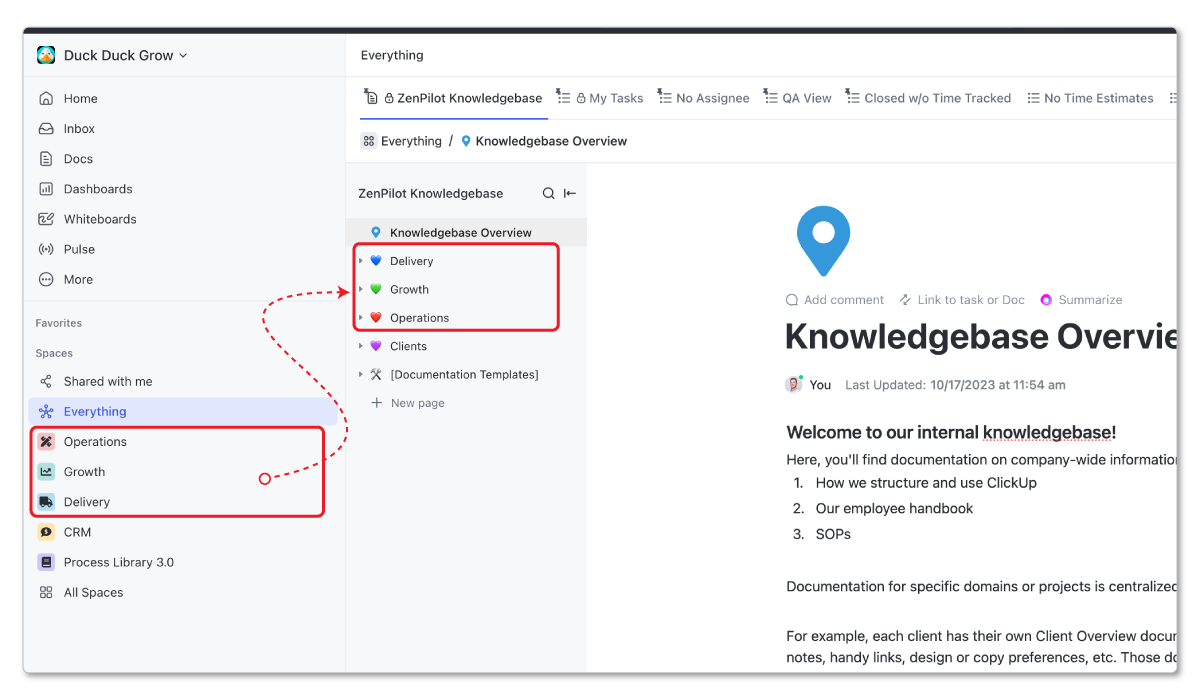
A key benefit of ClickUp Docs is the hierarchy - you can create parent pages with nested sub-pages.It’s helpful to structure it similar to your main ClickUp hierarchy. For example, I have:
- Delivery space - for all client work
- Growth space - for all sales and marketing work
- Operations space - for everything else (finance, legal, HR, recruiting, etc.)
So in my ClickUp wiki, I have:
- Parent doc for Delivery
- Parent doc for Growth
- Parent doc for Operations
Under each, I can build out sub-docs for SOPs, instructions, etc. This makes it easy to navigate and find what you need.
You can also add a parent doc for “Clients” with public info to share, like onboarding instructions.
What to Include in Your Wiki
Let’s look at what to put in the main sections:
1) Operations Documents
This will include most of your internal wiki.
Employee handbook
- Company history and overview
- Values
- Mission/Vision
- Team culture
- Tools guide
How to use ClickUp
- Slack guidelines
- Other tool documentation
Onboarding / offboarding instructions Time off request instructions Benefits information Anything related to employees Operational SOPs
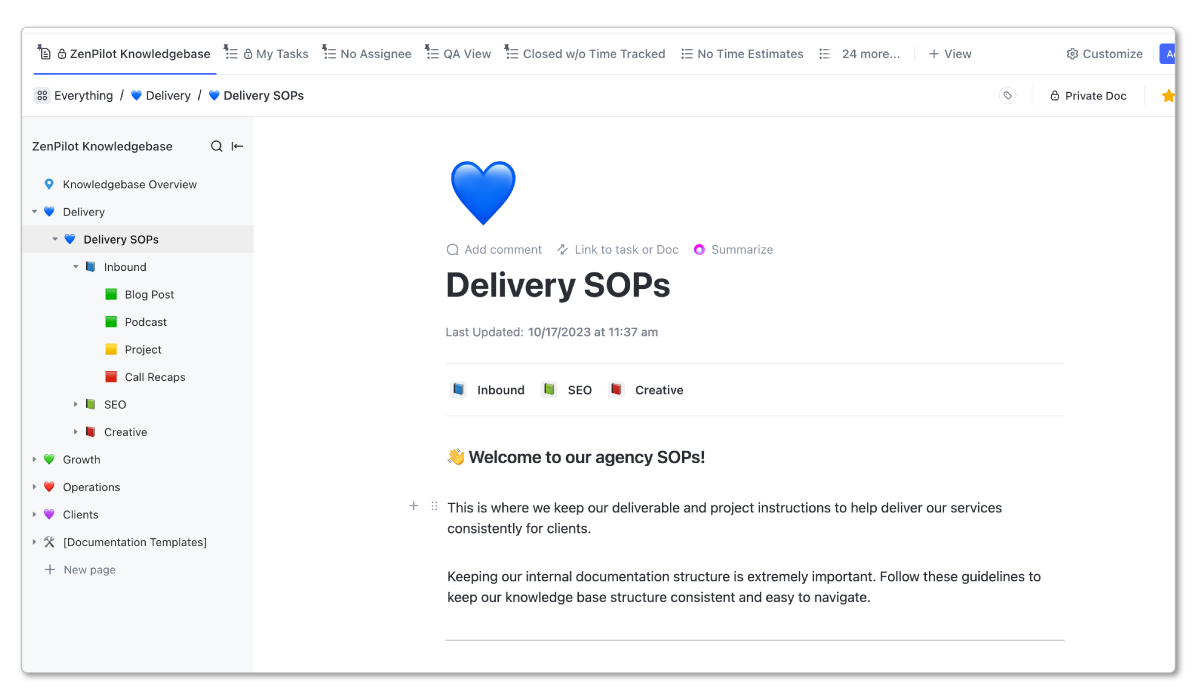
Delivery Documents
This should include all SOPs related to your client services work. These can be broken down by service line to keep everything organized (SEO, Web Design, ABM, etc.)
Growth Documents
This will include all SOPs related to your sales and marketing work. You’ll organize all of your work by departments - sales and marketing.
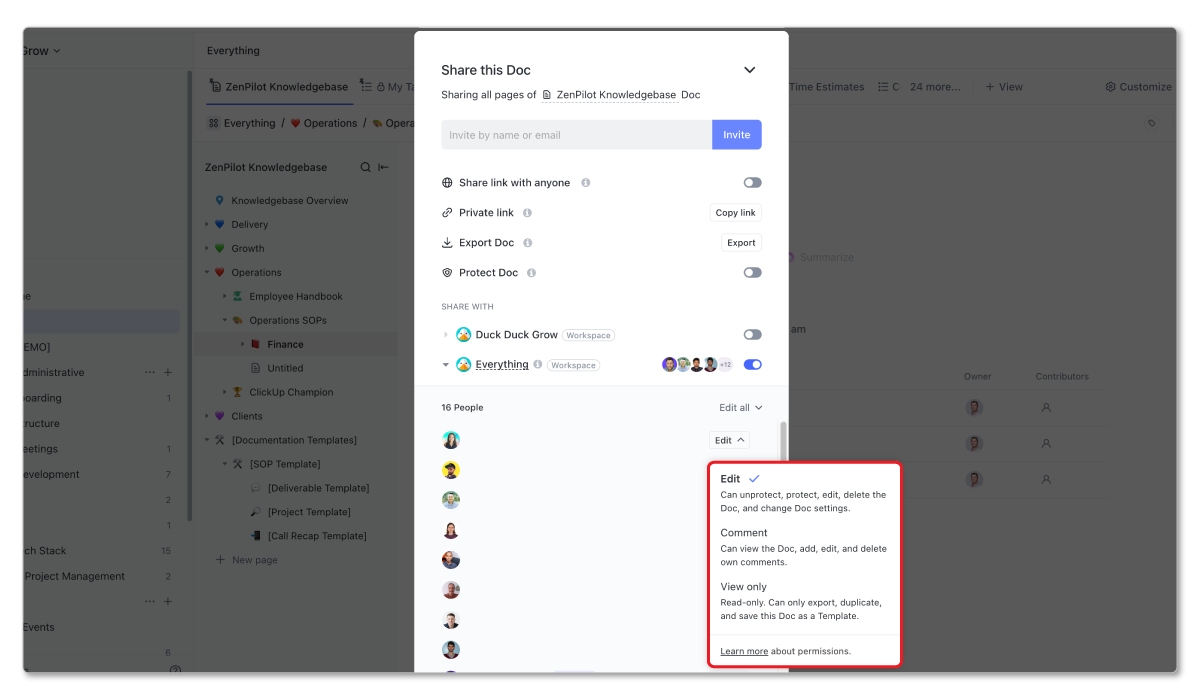
Setting Custom Permissions in Your Wiki
With ClickUp Docs, you can make certain pages private and restrict permissions. For example, keep financial SOPs limited to the finance team.Adjust the sharing settings on any parent or sub-doc to limit who can view. Just be careful - restricting a parent doc will cascade down to all sub-docs.
You can adjust the restriction settings to allow users to either view, comment, or edit a document.
How to Create SOP Documents
Now let’s discuss the overall process for building out SOPs and docs.
Step 1: Create Tasks to Manage the Process
Have a standardized process for writing, reviewing and publishing docs. Create tasks in a process documentation list to manage it. For example:
- Draft document
- Submit for review
- Make edits
- Publish
- Notify team
This makes sure changes go through proper approval.
You can build all of this as a task template in ClickUp (similar to our client onboarding task template).
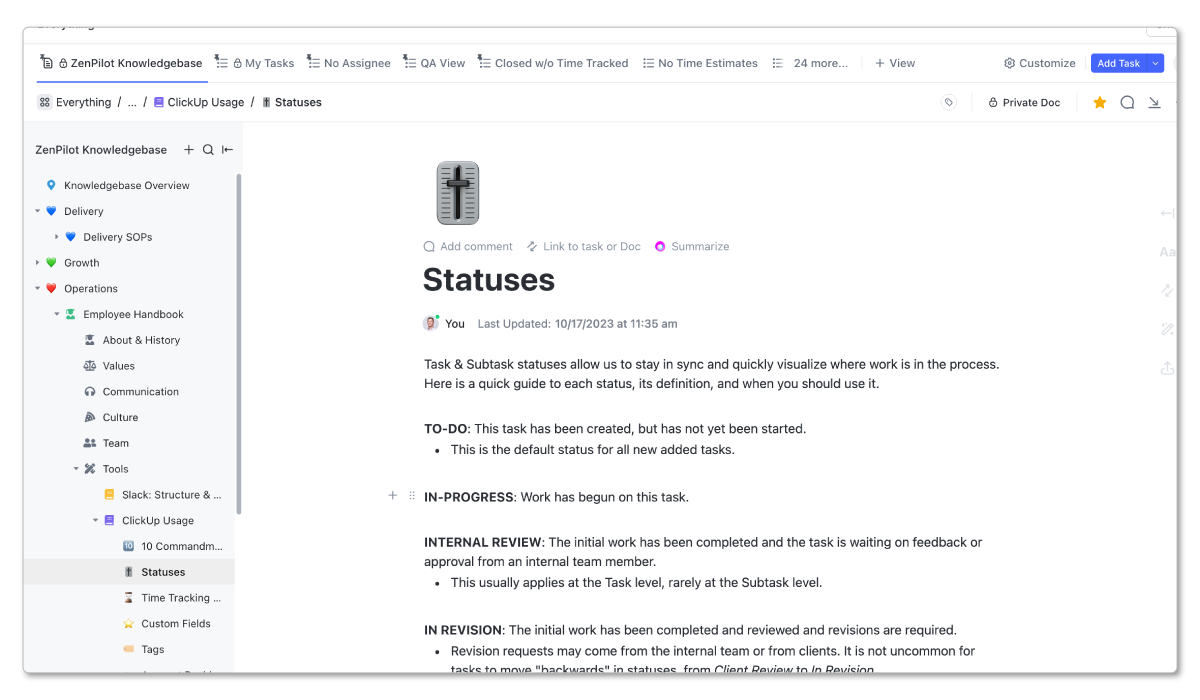
Step 2: Use Icons to Show Status
Add icons to Docs to show status - green for approved, yellow for in progress, red for needs review. This helps managers see what’s ready to publish.
Step 3: Connect SOPs to Relevant Tasks
A key benefit is connecting SOPs directly to tasks. For example, your blog writing SOP can be linked right in your Create Blog Post process. Anyone running that process will have one-click access to instructions.This scales as you reuse processes - you maintain one SOP but link it anywhere relevant.
Step 4: Allow Feedback Through Forms
Let team members suggest doc improvements through a request form. Link this at the bottom of SOP pages so people can submit feedback.You can build a process to review submissions and make approved edits. This prevents docs getting outdated.
Related: How to Use ClickUp Forms
Build a More Productive Team With an Internal Wiki in ClickUp
Building an internal wiki and SOP library in ClickUp connects your documentation directly to your work. It’s efficient to maintain, easy to find, and effortless for new hires to ramp up.With a thoughtful structure and promotion, your team will keep it updated and reference it often.
But an internal wiki is only one part in making your team more productive. To build a more productive, profitable, and healthy team in ClickUp you need to:
- Design the proper hierarchy and structure inside of ClickUp.
- Document your processes and save them as templates.
- Train your team on the software and the expectations.
- Hire a ClickUp Champion to help hold the team accountable and build healthy habits.
Taking this seriously will change your life.
