How to Set Up ClickUp for Agencies: The Complete Guide

To set up ClickUp for an agency, build your workspace around 5 core Spaces - Growth, Delivery, Operations, Process Library, and CRM. Getting the hierarchy right is the foundation for views, templates, automations, and reporting. ZenPilot has helped 3,100+ clients implement this structure as ClickUp’s #1 Solutions Partner, and this guide walks through the full setup step by step.
One of the reasons I love ClickUp so much is because of the flexible hierarchy that it provides. Compared to most project management tools, ClickUp’s Hierarchy is designed in a way that, when built correctly, can help provide clarity to everyone in your organization.
ClickUp’s Hierarchy is designed to carefully organize work by departments, teams, projects, campaigns, etc., but then gives you the ability to zoom out and see work across these different areas.
Most project management tools lack this functionality. Sure, they help you organize work, but they don’t give you the ability to see work across multiple teams or projects.
But again, as I said earlier, your Hierarchy needs to be set up correctly to serve you well. If you jump into ClickUp without any clear strategic direction on how you’ll set it up, you’ll be setting yourself up for failure. Not only will an appropriate Hierarchy set you up with fantastic views, but it’ll also help you with permission settings, automations, custom fields, and more! Let me walk you through an overview of the ClickUp Hierarchy, and then show you exactly how you need to set this up.
ClickUp Hierarchy: A Quick Overview
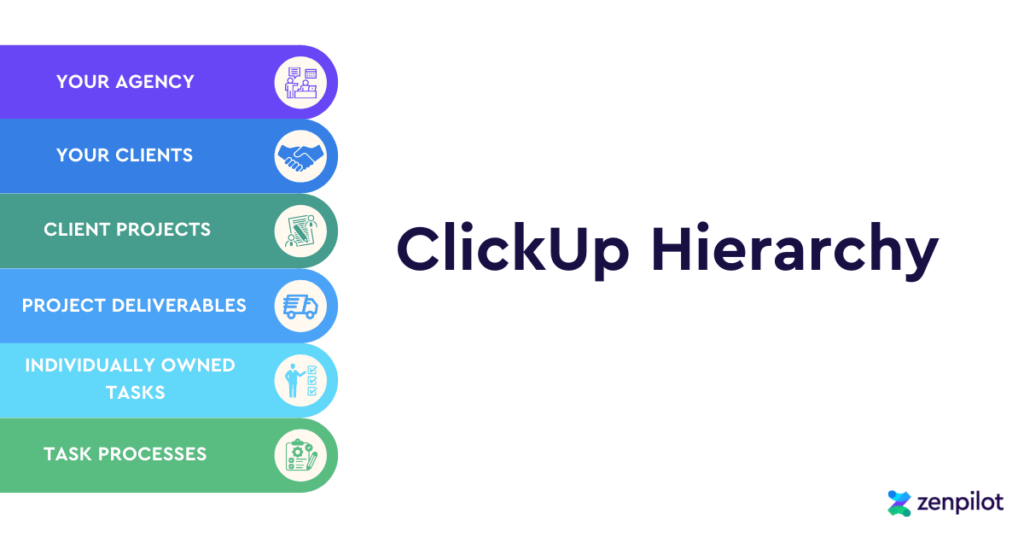
- Workspace: When you sign up for ClickUp, you create both your user account and your Workspace. The Workspace is the highest level in ClickUp’s Hierarchy. It’s typically named after your business, and all work falls into one workspace.
- Spaces: Spaces are the next highest level in the ClickUp Hierarchy. They represent different departments, teams, or areas of focus within an organization. Users can create multiple Spaces to keep their work organized.
- Folders: Folders are created within Spaces to group together Lists and Tasks. Although not necessary, Folders can be very useful to group similar work. In an agency-specific ClickUp Hierarchy, Folders are extremely helpful. For teams that need additional layers, ClickUp now supports subfolders to add depth to your structure - a feature requested since 2019 that’s now generally available. We break down the best use cases in ClickUp Weekly episode 008.
- Lists: Lists are where the work - Parent Tasks, Subtasks, and Checklists - lives. They help further break down work into categories.
- Parent and Subtasks: Tasks are the smallest unit in the ClickUp hierarchy. They’re created within lists and represent individual actions that need to be completed. Tasks are broken into parent and subtasks.
- Checklists: Checklists are the final level in the Hierarchy and can be built into any Task. They are particularly useful for ensuring that those who frequently complete a specific task don’t overlook any critical steps.
By using multiple layers in the Hierarchy, users can stay organized, easily navigate through their work, and stay on top of their tasks and projects.
Now that you know a bit about the ClickUp Hierarchy overall, let’s jump into how you should set up your ClickUp Workspace.
The ClickUp Hierarchy that Every Agency Needs to Adopt
Since 2013, we have designed thousands of hierarchies for teams of all shapes and sizes. Though we focus primarily on serving agencies, we’ve designed hierarchies for internal marketing teams, financial service companies, accounting firms, and SaaS companies.
And if I’m being honest, we didn’t always get this Hierarchy perfect.
But after 3,100+ implementations and over 500,000 human hours in ClickUp, we’ve helped teams build the structure they need to get the clarity they are looking for. If you want the full picture of what a successful implementation looks like end-to-end, check out our 5-phase ClickUp implementation framework. And if you’re specifically looking to nail the hierarchy layer, we go deep on that in our dedicated ClickUp hierarchy guide.
“The real game changer of working with ZenPilot was the visibility it gave us into our whole business. I can now feel peace knowing where projects are at, see blocks coming ahead of time so we can proactively communicate with clients, and plan out work accordingly with my team.
There is no way I could have built out all the top-tier processes we did in such a short amount of time without ZenPilot - or train my team on healthy project management habits.
ZenPilot is hands down one of the best investments we have made as a business. They help us live up to our value of excellence. If you have any doubts, leave them at the door and jump in!”
Rebecca Nash, Director of Operations, Beam Content
Don’t Overlook the Significance of Your Hierarchy
Please don’t overlook the significance of the Hierarchy when setting up your business in ClickUp. Skipping this step could lead to a world of headaches, so take the time to establish it correctly.
The ability you’ll have to report and/or build custom dashboards in ClickUp is unbelievable, BUT it’s limited by how you design your Hierarchy in the beginning.
So, if you’re either:
- Looking to move into ClickUp and set your agency up for success, or
- You’re already using ClickUp for your agency and want to get the most value out of the tool,
You’ve come to the right place. Keep reading, and let’s set you up for success.
And if at any time you want an easy button for this project, and want assistance from ClickUp’s highest-rated Solutions Partner to design your Hierarchy for you, book a call with my team here. You can also learn more about what a ClickUp consultant does and how working with one can accelerate your setup.
Okay, let’s begin…
Designing Your ClickUp Hierarchy
Before jumping into ClickUp to design your Hierarchy, you need to take a step back and make sure you understand the main parts of your business. This is important, because this is how you’ll end up designing your Spaces within ClickUp.
Thankfully, most service-based businesses have a fairly common model.
The Three Main Areas of Every Agency
There are three main areas of every agency.
- Growth
- Delivery
- Operations
Each of these should have their own Space in ClickUp (see image below).
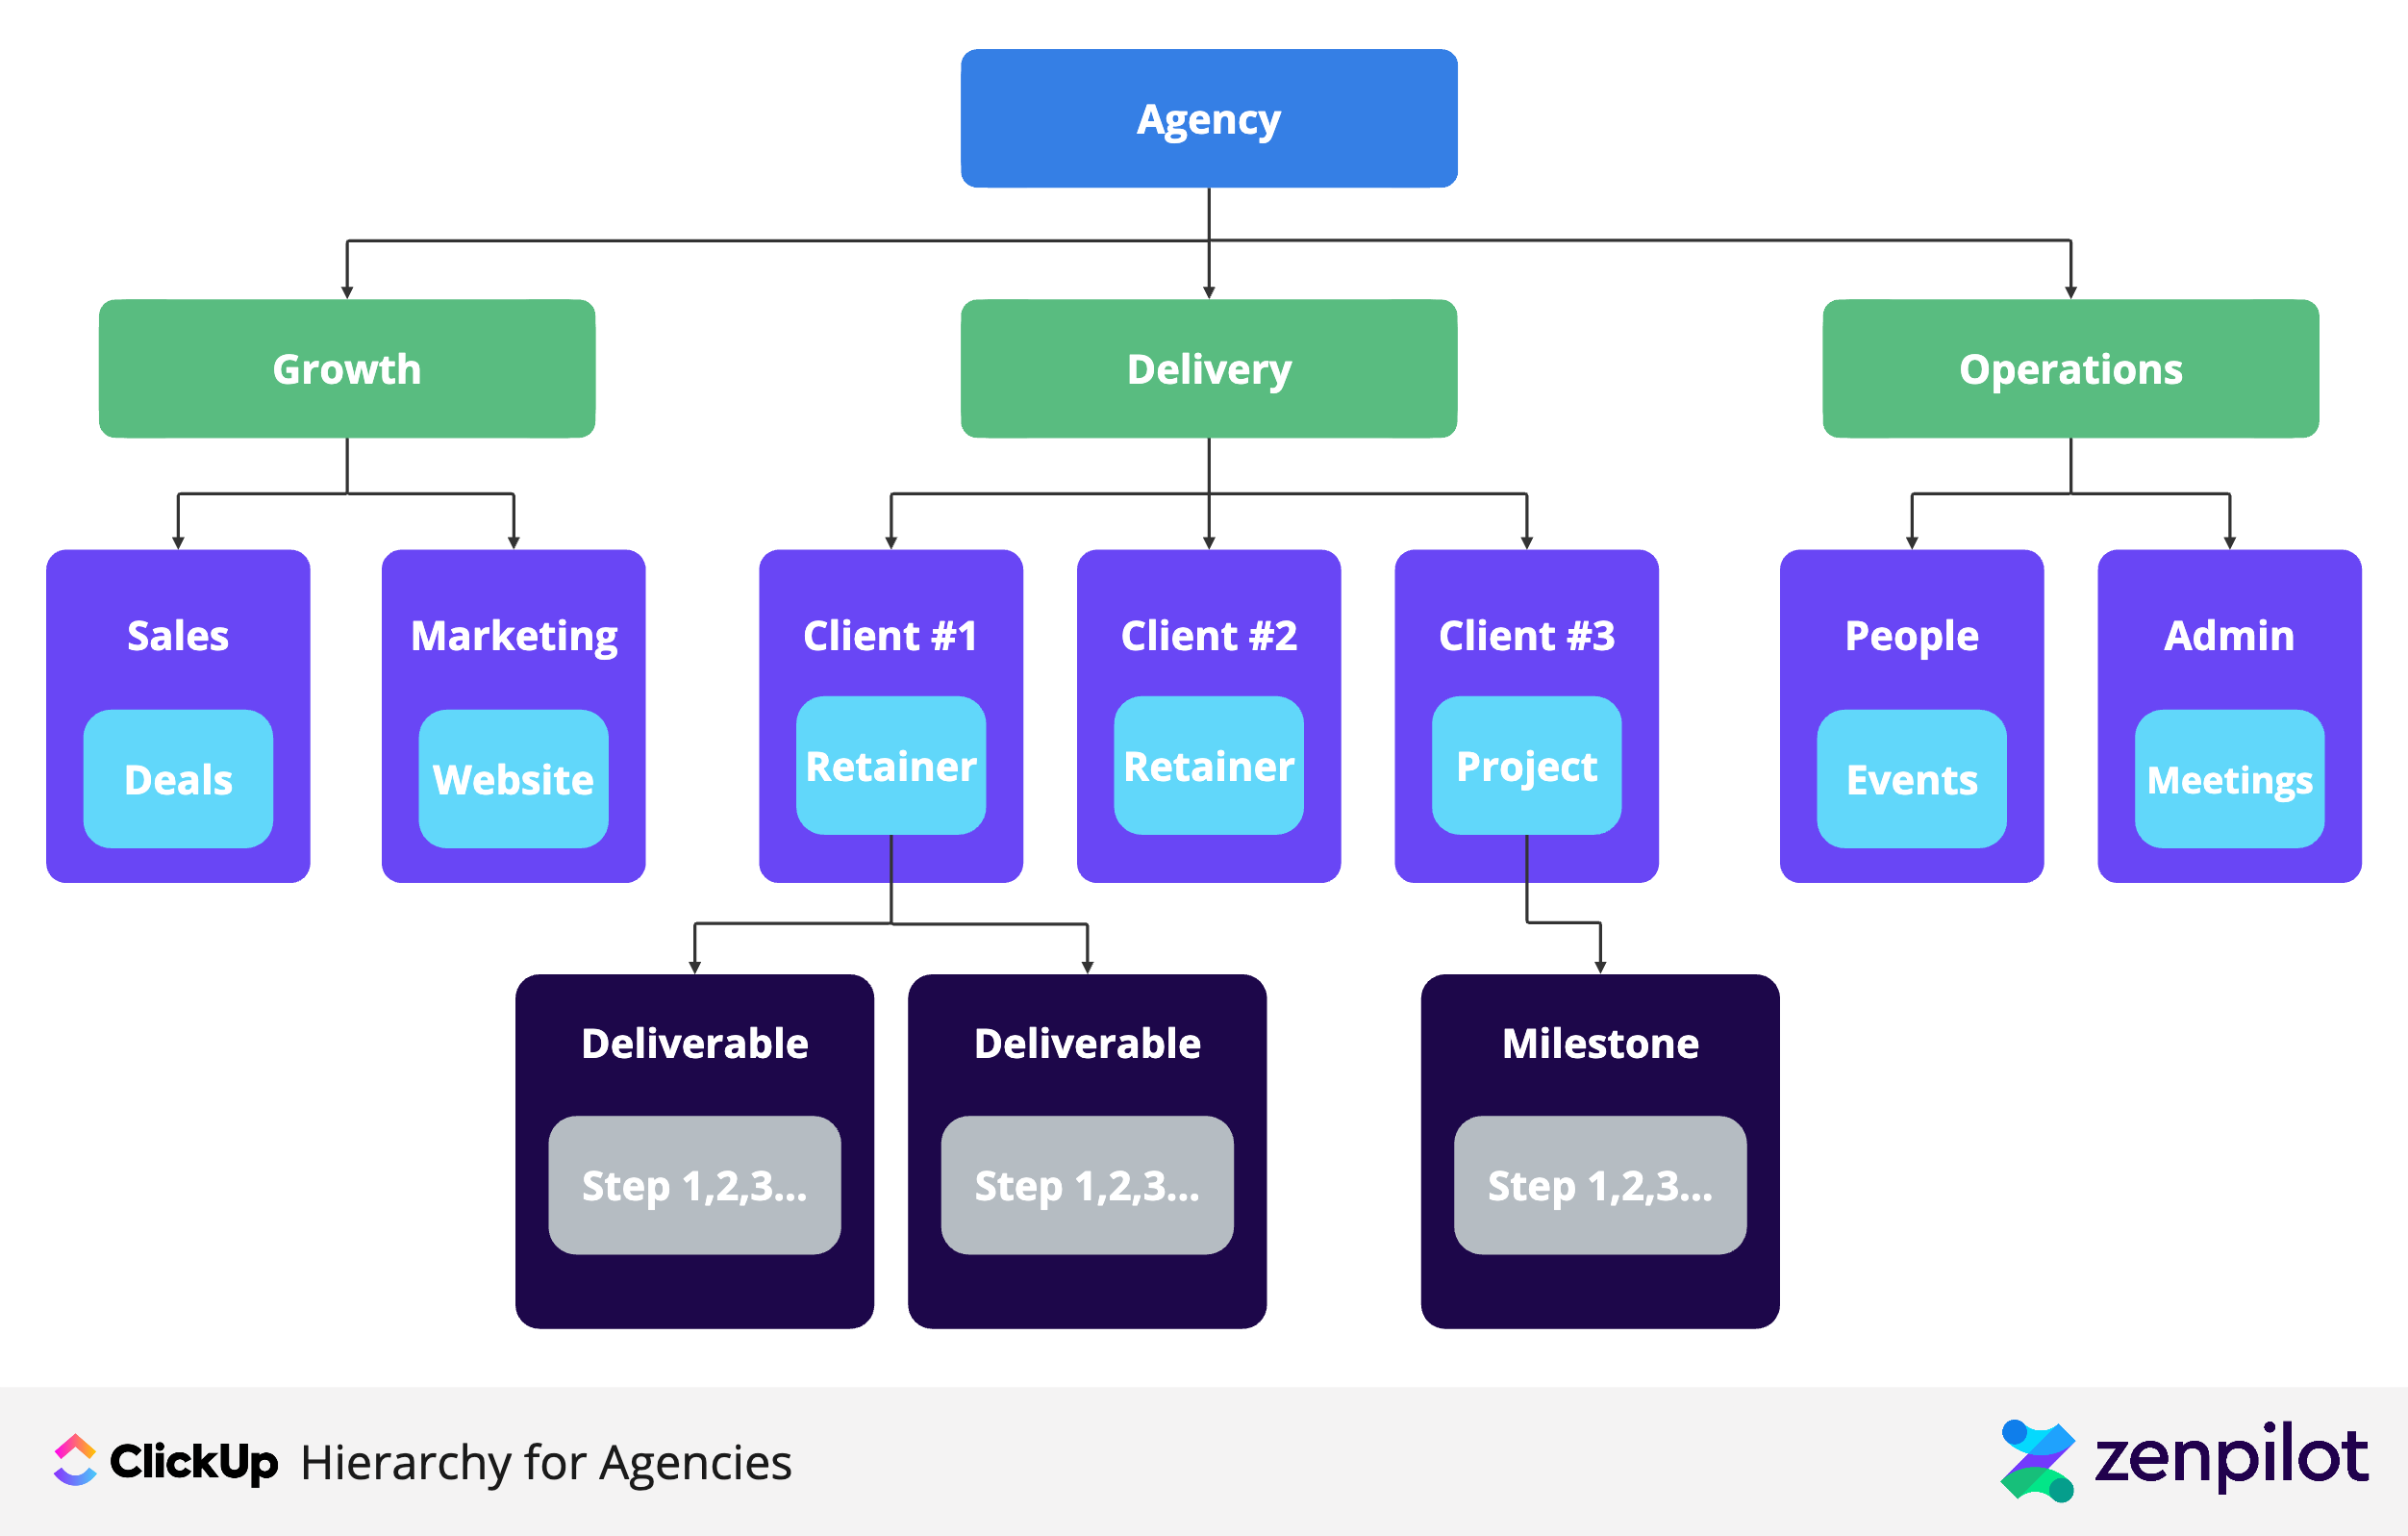
Space #1: Growth
Growth is how you grow your business - marketing, sales, partnerships, etc. This is where you make your promise.
Each of these departments underneath the growth folder will typically have a folder. (i.e. marketing will have a folder, sales will have a folder, etc.)
Pro tip: treat your agency like your best client.
At ZenPilot, we put ourselves through the same processes we put our customers through. Always practice what you preach. It’ll make your team better at delivering, and always help test out what works and what doesn’t.
Space #2: Delivery
Delivery is where you serve your clients. This is where you keep your promise.
This is where all of your work for your clients will live. If you want a good reporting structure, this space is crucial to get right. We will jump into the framework for this in a bit.
Space #3: Operations
Operations is “the biggest junk drawer in business”. This is where your people, culture, HR, finance, legal, etc. work lives.
Everything that doesn’t end up in growth or delivery ends up here.
Why Is This Important?
The structuring of these three agency buckets hold immense value. If done correctly - and paired with solid time tracking practices - it enables a smooth calculation of expenditures in growing the business, delivering services, and supporting the team. You’ll know:
- How much time, money and effort are we spending on growing your business?
- How much time, money and effort are we spending on delivering your services?
- How much time, money and effort are we spending on keeping the lights on and supporting an amazing team?
And this is just the beginning. As we move further down ClickUp’s Hierarchy, you’ll be able to get even more specific in where you’re spending time, money, and effort (i.e. how profitable were our SEO services this past quarter?).
And although reporting is not the only benefit of this Hierarchy, it makes it a lot easier when it’s done right.
Download the Complete “How to Use ClickUp” Guide
The 56-page guide from ClickUp’s #1 Solutions Partner covers everything from hierarchy design to team training.
Get Instant Access →Additional ClickUp Spaces to Consider
Your Growth, Delivery and Operations Spaces will be the most important buckets for your business.
However, there are a few additional Spaces we highly recommend for agencies to keep their business operating efficiently
Process Library
Processes are important. Without them, you’ll likely have a somewhat chaotic and unstructured client services team.
Processes help standardize what you do, and make your business, well… your business. Your processes are what makes your clients see crazy results. They are your intellectual property that make your customers choose you.
BUT, we all know that processes aren’t static and they don’t live in a vacuum. The marketing world is ever-changing, and so we are constantly updating and improving our processes. So the question now becomes, where do we store all of these?
Your Process Library is where you create and store all of your process template source files.
You should organize these into folders and lists based on work categories. (i.e. my internal content marketing process templates will go into a content marketing list within a growth folder in the process library).
For a more comprehensive guide on documenting your processes using ClickUp, check out our ClickUp for Agencies guide.
CRM
Having an organized CRM is important, right? That’s probably a no-brainer.
Having a dedicated CRM Space in ClickUp is a great use-case for agency teams. (We also sell a ready-to-deploy ClickUp CRM Template if you want a head start.) This is not meant to replace a HubSpot, Salesforce or PipeDrive, but it’s a fantastic way for your Delivery team to keep track of clients. Most agencies don’t have every client services member in their CRM.
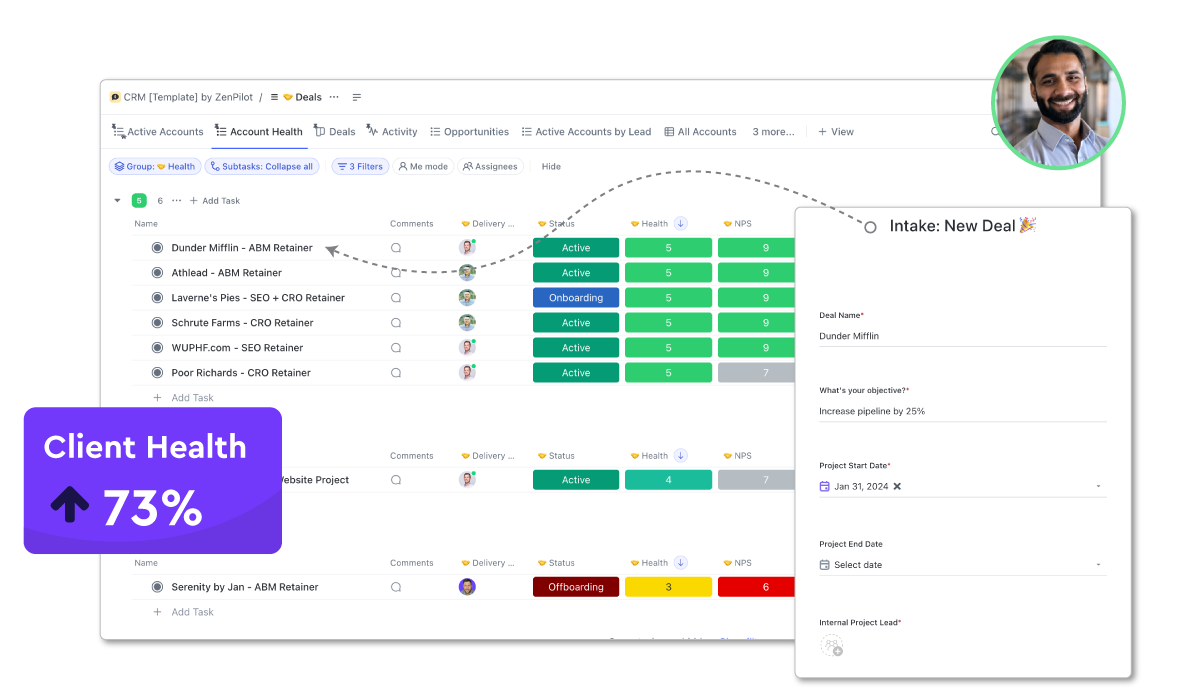
Creating a dedicated CRM Space in ClickUp gives your delivery team a dedicated place to post internal weekly updates, track client health, show project phases, etc. in one spot.
ClickUp also has an amazing rollups feature that allows you to relate deals to companies and contacts in separate lists. This is a great way to take your ClickUp CRM to the next level.
Structuring Your Folders, Lists and Tasks
For the focus of this section, we are going to focus primarily on your Delivery Space.
Folders
Your Delivery Space will be occupied with client Folders. Each client will have their own Folder where all of their work will live.
We’ve seen plenty of teams create Spaces for each client. Don’t do this.
ClickUp’s Hierarchy, combined with the power of Views and Custom Fields, helps us provide visibility for executives, account managers, project managers, individual contributors, and even public Views for clients to see. This is also what makes workload and capacity management possible at scale.
This will provide the organization, standardization, visibility, and reporting that every agency needs.
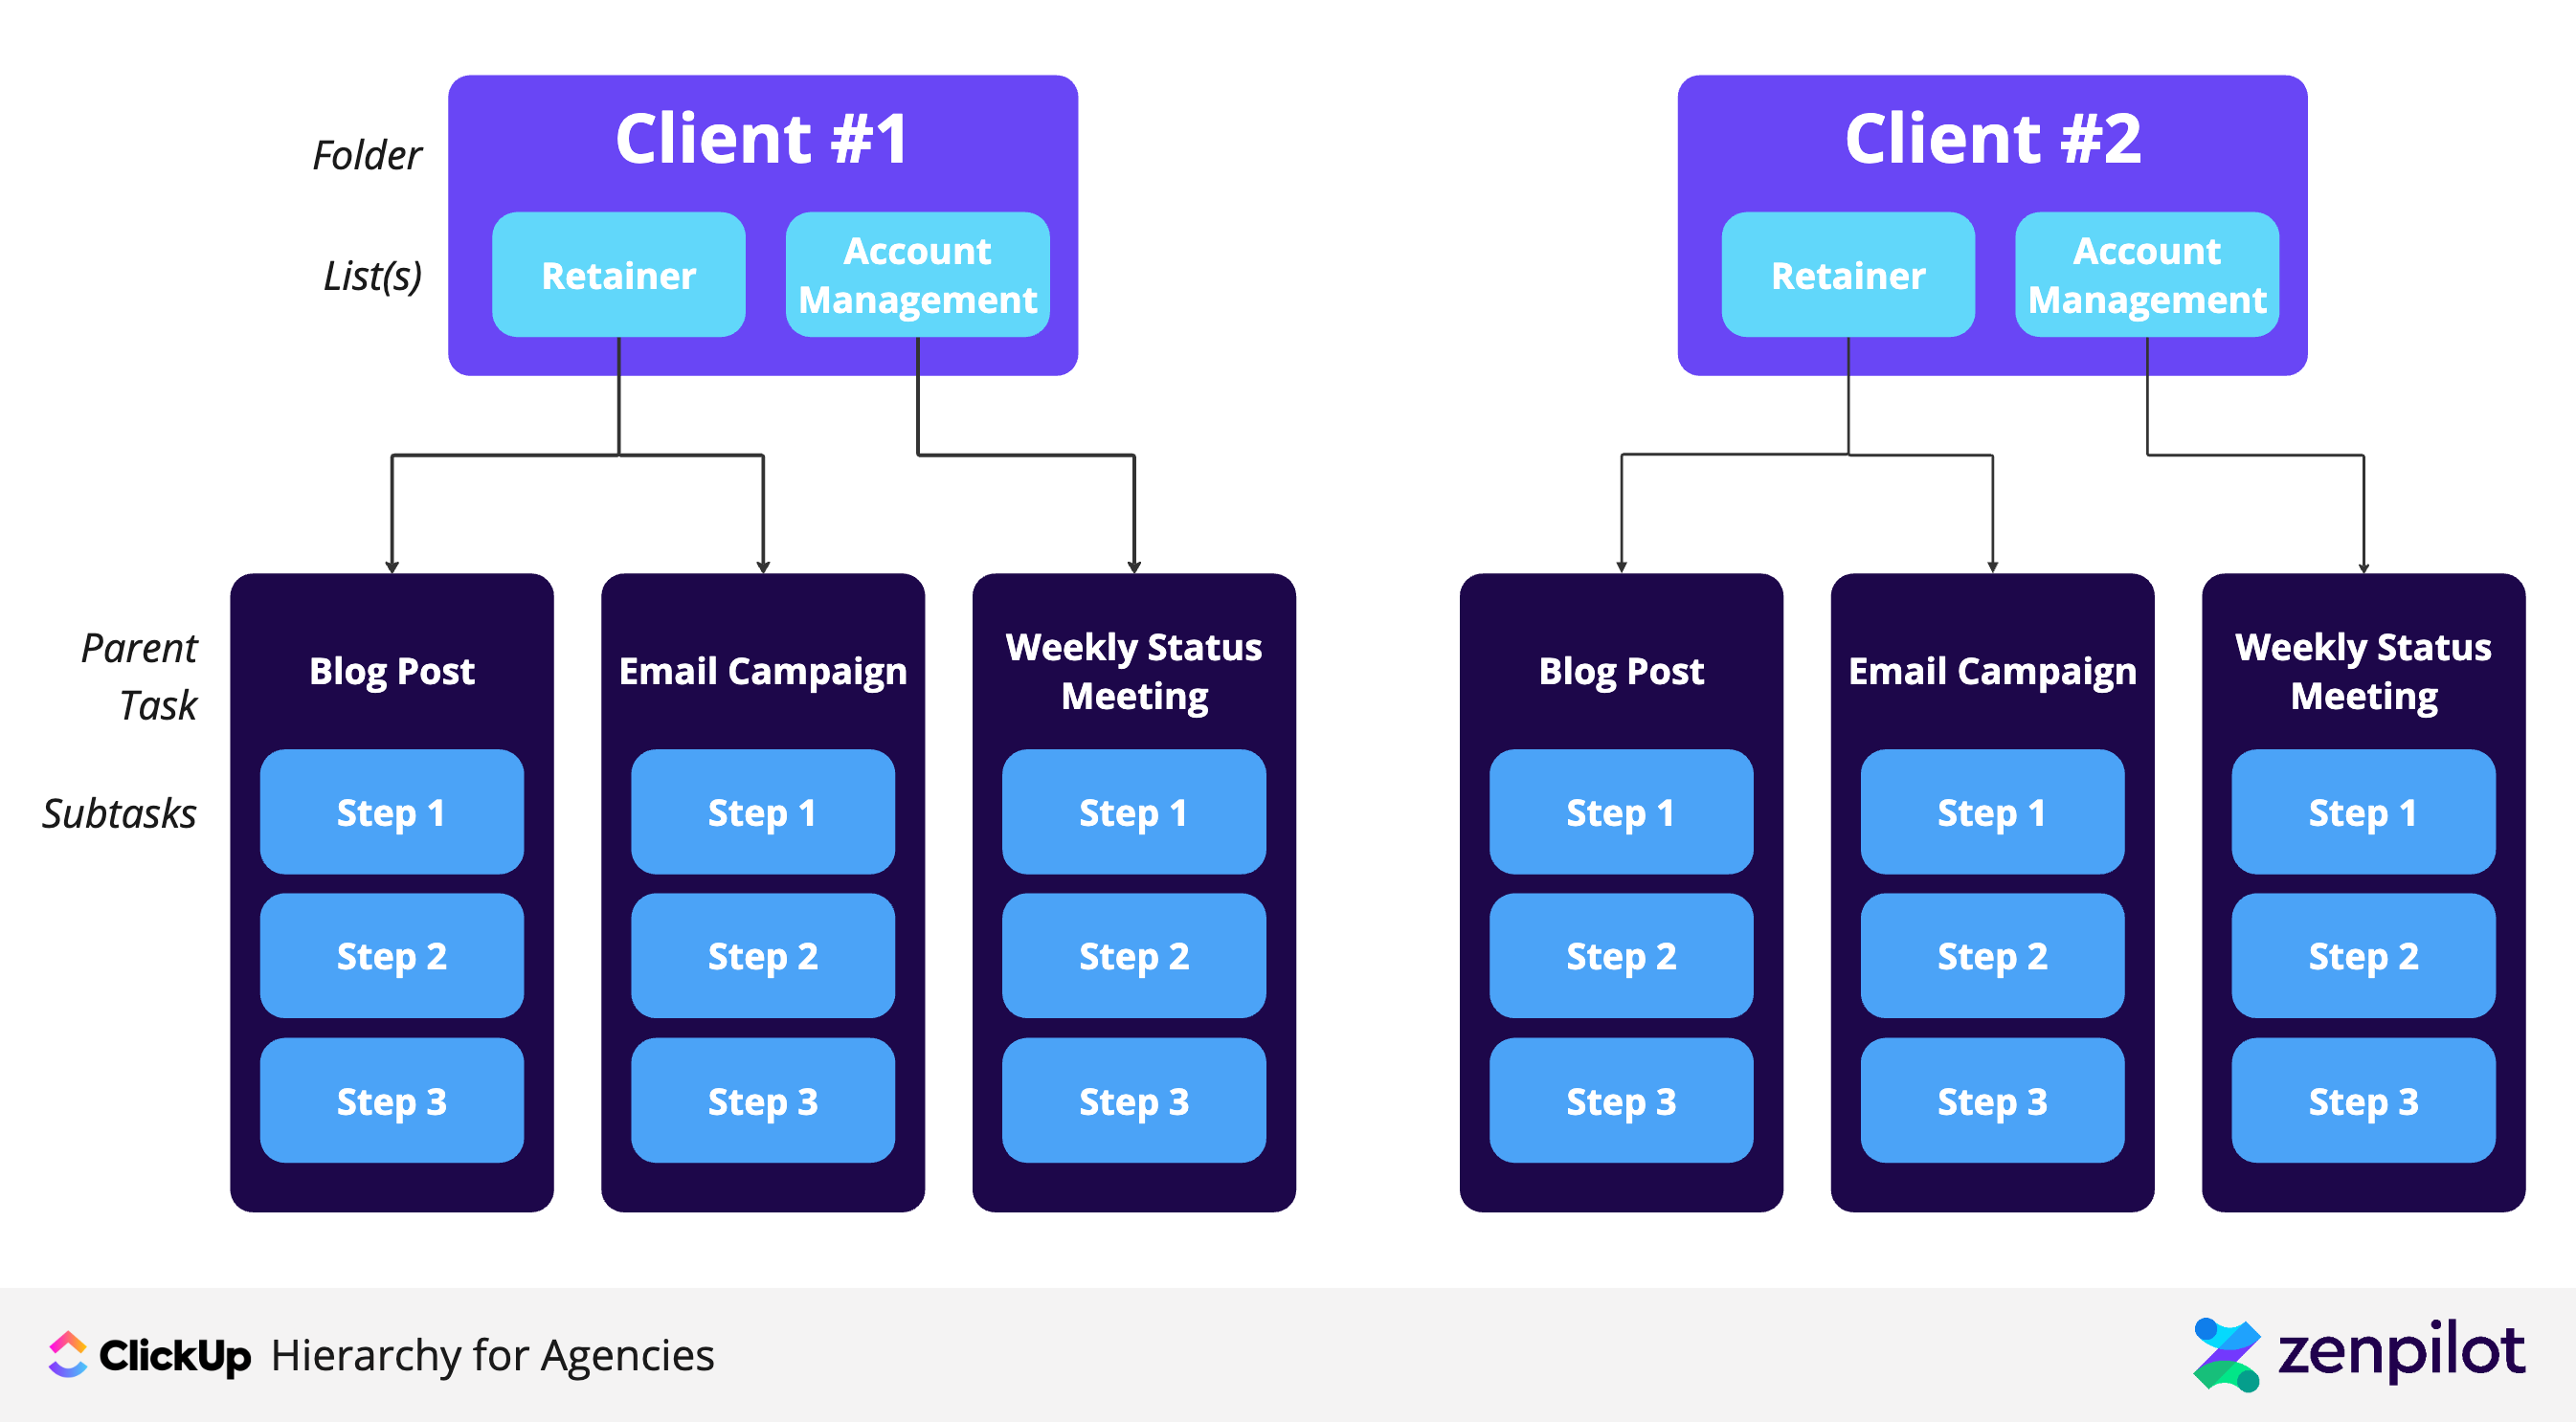
Lists
As I mentioned earlier, Lists are where the work - Parent Tasks, Subtasks and Checklists - live.
Lists have a bit more flexibility in how they can be used. It all depends on the visibility that you need as an agency owner.
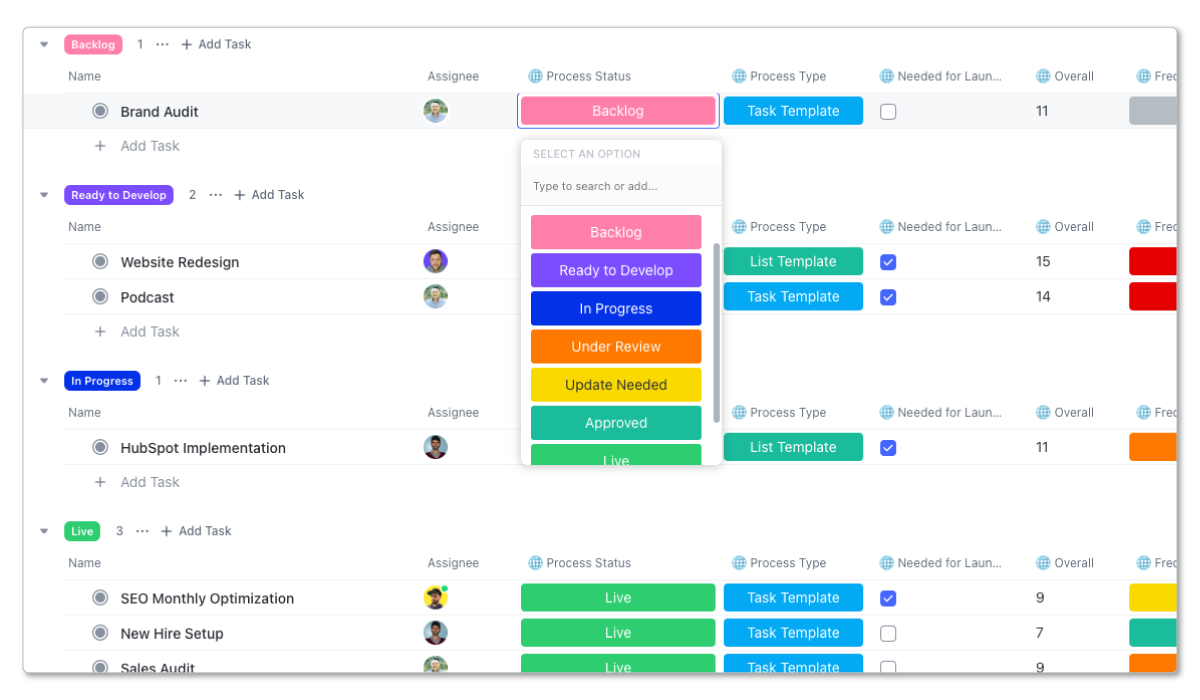
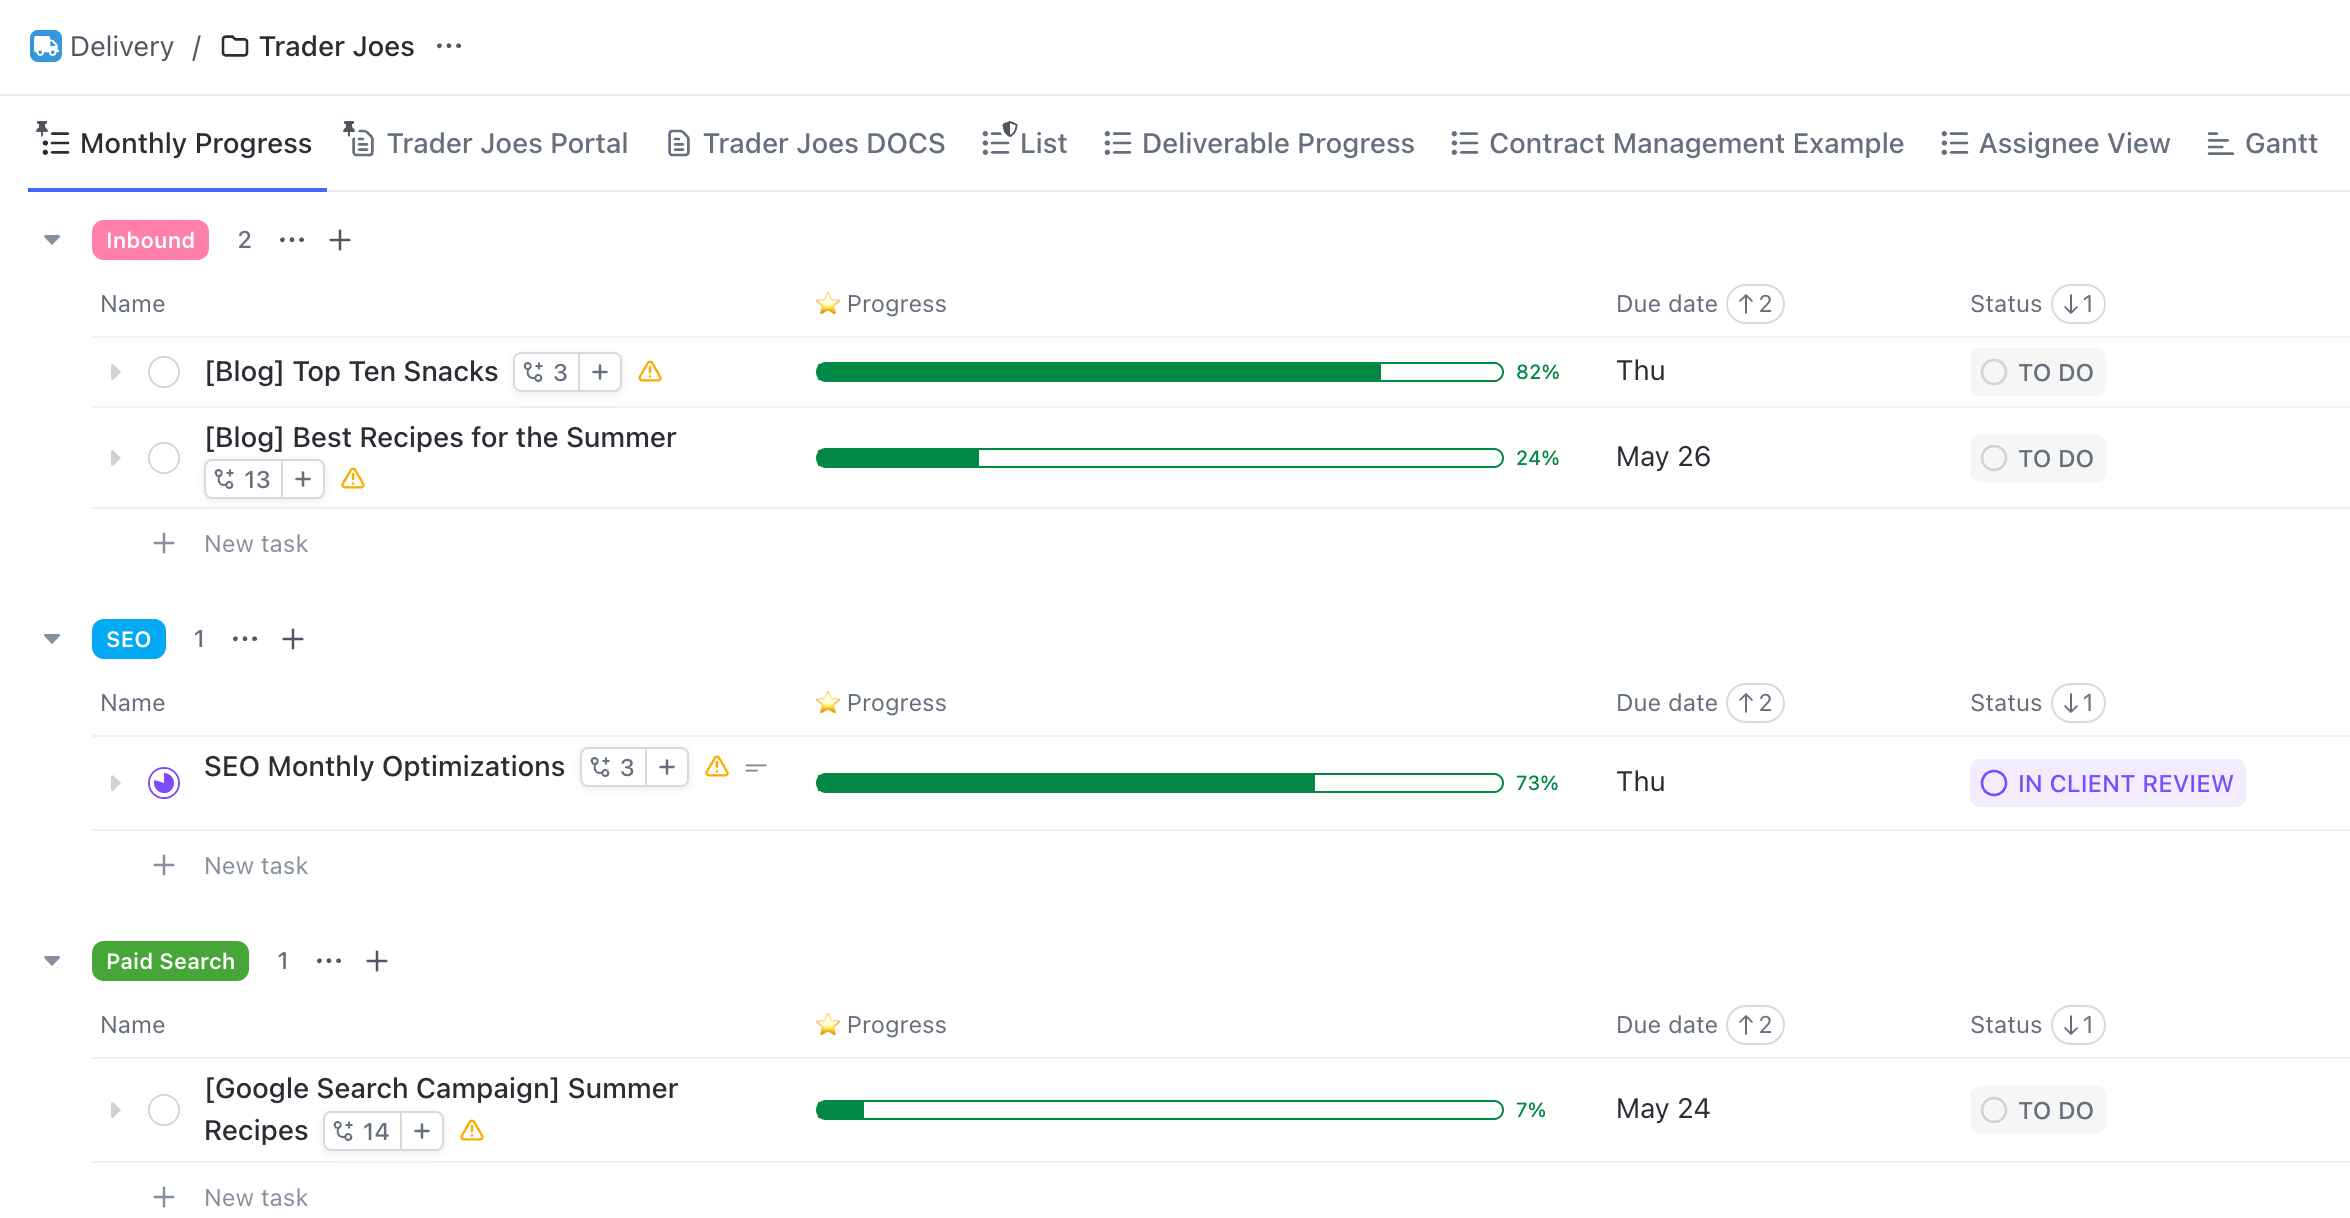
Lists should be broken down into either Service Lines (i.e. Paid Social, Organic Social, SEO, ABM, etc.), Project Phases (i.e. Blueprint, Implementation, Optimize) or just a Retainer list to make it easier (Retainer XYZ).
For larger projects, you’ll also want to deploy lists into the respective client Folders. Creating List templates (which we dive into further in our ClickUp templates guide) is an efficient way to deploy project lists into the client’s folder.
These Lists could be Website Redesigns, HubSpot Implementations, Brand Redesigns, etc.
Parent Tasks and Subtasks
Without proper structure, Tasks can easily spiral into chaos.
Parent Tasks are best leveraged as a deliverable or milestone within a project. These Tasks help organize and group related activities (Subtasks) together. These tasks are often non-actionable and labeled as nouns.
For example, If you were producing a podcast episode, the Parent Task would be the name of the episode.
This may be hard to grasp for some, but yes, you may have non-actionable tasks in your project management tool.
Underneath our Parent Tasks are Subtasks - where the work actually happens.
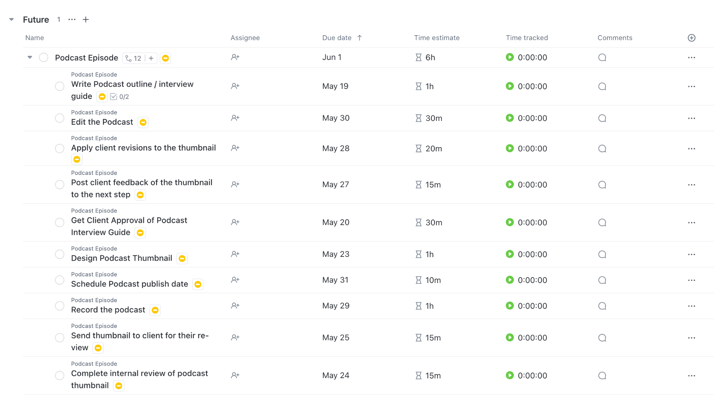
Subtasks provide the workflow to finish a deliverable. They are grouped together by the Parent Task and are the actionable steps it takes to complete the Parent Task (deliverable or project phase).
You don’t have one person sit down one day and do every single step by themselves to produce, publish, and promote a podcast episode. Subtasks pass work back and forth between team members.
Each task is assigned to the individual that needs to complete that task. When they are done, they complete the task and communicate it in ClickUp.
By completing Subtasks, progress can be tracked at the Parent Task level, allowing for monitoring of multiple deliverables for a single client or across the entire Delivery Space, all thanks to the well-structured Hierarchy we have established.
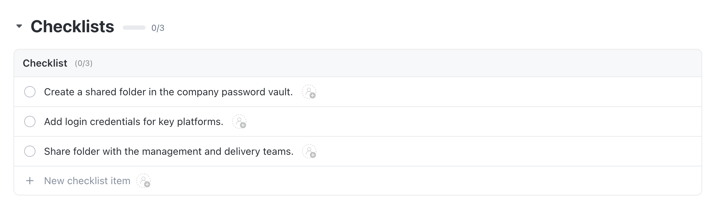
Checklists
When was the last time you had a member of your team forget to do something when completing something for a client?
Even the most diligent service teams can easily forget a small detail when performing tasks on a weekly or daily basis. Checklists serve as the ultimate safety net for your team, ensuring that no detail is overlooked. They can be built into any task, providing a vital reminder to prevent mistakes and streamline workflows.
Checklists should NOT be used for teaching somebody a process - you can use descriptions and docs for that - but rather to jog their memory, just to make sure that they don’t forget each step in the process.
If you’d like to see an example of how we build a process - Parent Task, Subtasks, and Checklists - in ClickUp, you can download our Client Onboarding template here.
Reviewing Your ClickUp Hierarchy
So there you have it, our complete ClickUp Hierarchy for agencies. By implementing this structure, you can efficiently manage your Growth, Delivery, and Operations, while also organizing your processes and tracking client data in a CRM.
Your Hierarchy should look something like this when you are done:
- Growth Space
- Marketing (Folder)
- Sales (Folder)
- Partnerships (Folder)
- Delivery Space
- Client A (Folder)
- Retainer (List)
- Website Redesign (List)
- Client B (Folder)
- Retainer (List)
- Client A (Folder)
- Operations Space
- HR (Folder)
- Finance (Folder)
- Legal (Folder)
- Process Library Space
- Delivery Processes (Folder)
- Growth Processes (Folder)
- Operations Processes (Folder)
- CRM Space (Optional)
- Deals (List)
- Companies (List)
- Contacts (List)
Download the Complete ClickUp for Agencies Guide
The 47-page guide includes our complete 5-phase implementation framework, hierarchy templates, process checklists, and links to how-to videos - everything you need to get ClickUp right the first time.
Get the Free Guide →Take the Next Step into Clarity
If you’re using ClickUp or any other project management tool and find yourself facing frustration due to limited visibility or functionality within the system, it’s time to take a step back and evaluate how you’ve structured your business within the tool.
- Is it organized?
- Is there consistency?
- Is there any structure at all?
Simply having a project management tool in place won’t magically solve all your business woes. (If you’re on ClickUp 4.0, the new interface is powerful - but the hierarchy principles in this guide still apply exactly the same way.)
The same goes for AI. ClickUp Brain answers questions based on the structure it can see, so a clean hierarchy is exactly what makes it useful - and a messy workspace gets you messy answers. If you want to go deeper on that side of ClickUp, start with our ClickUp AI guide and our ClickUp Brain 2 review.
While these tools do come equipped with impressive features to aid your operations, they’re not capable of building your processes or instilling healthy habits in your team. And without a clear structure, they won’t provide the clarity and visibility you need as an agency owner.
This is exactly why our 1-3-5 Agency Formula exists.
By implementing a well-structured ClickUp Hierarchy and instilling healthy habits within your team, you can generate insightful reports that showcase how effectively your project managers are planning and executing tasks. And with this, you can evaluate the past and predict the future.
Armed with this valuable data, you can make data-driven decisions that will drive the growth of your agency.
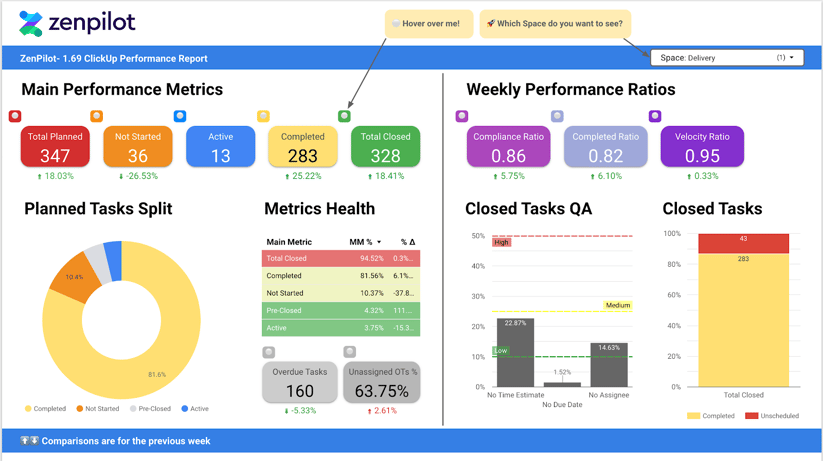
Below is a report that our amazing solutions team sends out to agencies on a weekly basis, but this is a result of building the system right in ClickUp.
To get to this level of clarity and structure, here’s what you need to do.
Step 1: Take our PM Health Benchmark. This will help you benchmark your team against thousands of others to see where your strengths and weaknesses are.
Step 2: Read our ClickUp for Agencies Guide. This will take you through our implementation process we’ve used with 3,100+ clients. It’s packed with resources and the step-by-step instructions you need to get up and running. Or if you prefer a broader starting point, check out our ultimate guide to using ClickUp.
Step 3: Schedule a call with us. We’d love to see where you’re at and take a look at your current project management setup.
We are always here if you need an easy button.