6 Steps to Accurate Workload and Capacity Visibility in ClickUp

Running a marketing agency or professional services firm comes with no shortage of moving pieces. You’ve got multiple clients, projects, campaigns, and team members to manage. It quickly becomes extremely difficult to understand your team’s workload and availability.
Without proper visibility into your workload, here’s what happens:
- Employees get overworked and burnt out (a recent Gallup survey found “unmanageable workload” to be the 2nd largest reason for employee burnout)
- Important projects fall through the cracks
- You take on too much client work without capacity
- You turn away new business because you assume you’re “too busy”
Having clear visibility into your team’s workload and capacity is crucial for agencies. When leveraged properly, it can have tremendous impact on your employee satisfaction, quality of client work, new business growth, and overall profitability.
In this 3,500+ word guide, we will walk through the step-by-step process to gain visibility into your agency’s workload and capacity using ClickUp.
Here’s what we’ll cover:
- Creating a workload view in ClickUp
- How to start populating your workload view
- Leveraging process templates to improve visibility
- How to capture all agency work (and OOO) in ClickUp
- Continuous optimization and improvement
- Our workload-driven project management methodology
Let’s get started!
Step 1: Build a Workload View in ClickUp
The foundation of understanding your agency’s workload and capacity starts with building a consolidated Workload View in ClickUp.
Since ClickUp allows you to break down projects into multiple hierarchical levels of Folders, Lists, and Tasks, having a universal workload view is crucial to roll up all your active work into a single place.
Here are the steps to create a Workload View:
- Navigate to the Everything level at the top level of your ClickUp workspace.
- Click on “Views” in the left sidebar.
- Click the “Add View” button and select “Workload” as the view type.
- Give your view a name like “Agency Workload”.
- Click the “Add Workload” button.
This will create a new Workload View defaulted to a weekly timeframe. At first, you may not see any tasks populate, but we’ll cover how to configure the settings for accuracy next.
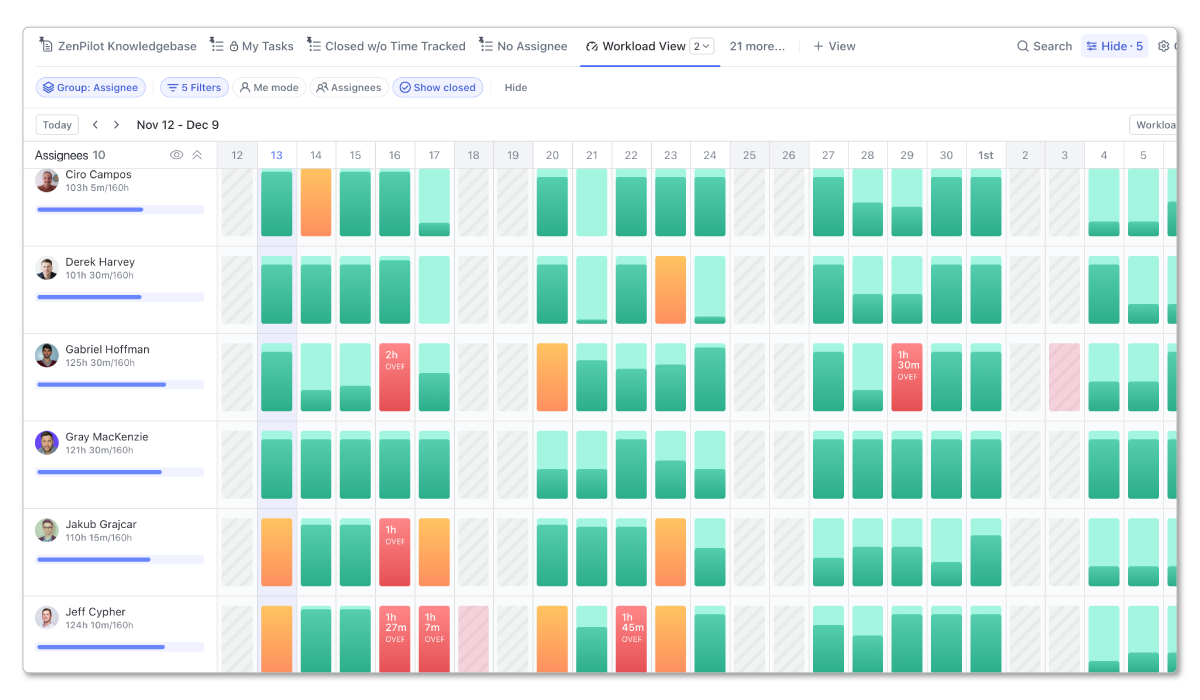
For now, take note of the following in your new Workload View:
- You can toggle between weekly and 2 week views.
- Switch between time estimate, number of tasks, points, or a custom field.
- Change assignee filtering and grouping.
Let’s move on to customizing the view settings to show the most complete and accurate workload.
Configure Your Workload View Settings
When you create a Workload View, you’ll need to edit a few settings before you’re ready to roll.
Show Subtasks
The biggest adjustment you’ll need to make is adjusting your view to show subtasks. Your team should be working out of subtasks. And if subtasks aren’t turned on in your Workload View, then nothing is going to show up.
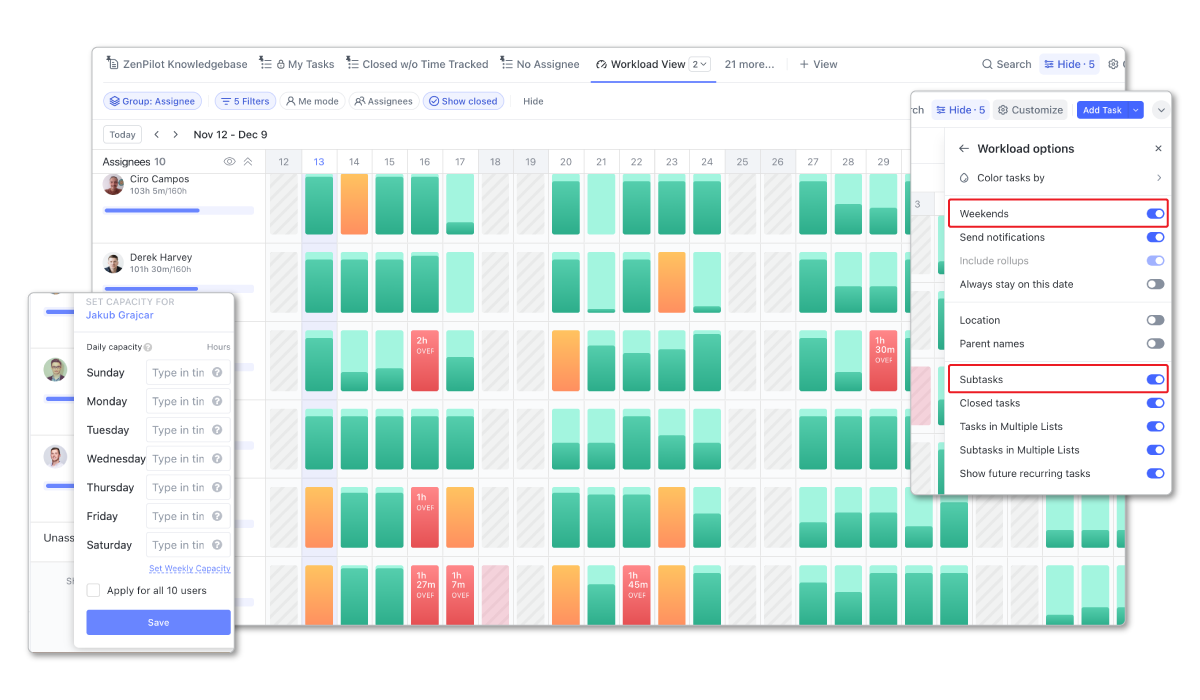
To make this change, navigate and click on the “Customize” button, and then choose “Workload Options” and toggle on “Subtasks”.
I’d recommend leaving everything else turned on too. It’s important that you don’t miss out any tasks in your workspace, because those contribute to workload!
Show Weekends
I also recommend leaving “Weekends” on. There is a good chance that task may end up accidentally falling on weekends. With “Weekends” turned on in your Workload View, you’ll be able to easily spot those issues and remap due dates.
Custom Capacity
Within your Workload View, you’ll also have the option (depending on your ClickUp pricing plan) to adjust weekly or daily capacity for your team.
This can be extremely helpful if you work on a 4-day work week or have full and part time employees.
Monthly View of Workload
Okay, so you’re probably sitting there and wondering why your Everything level Workload View will only allow you to see 1 week or 2 weeks at a time.
Unfortunately, this is a limitation in ClickUp at the moment.
Your Workload View can show a month at a time everywhere else except the everything level…
BUT, there is a workaround!
Here’s how to do it:
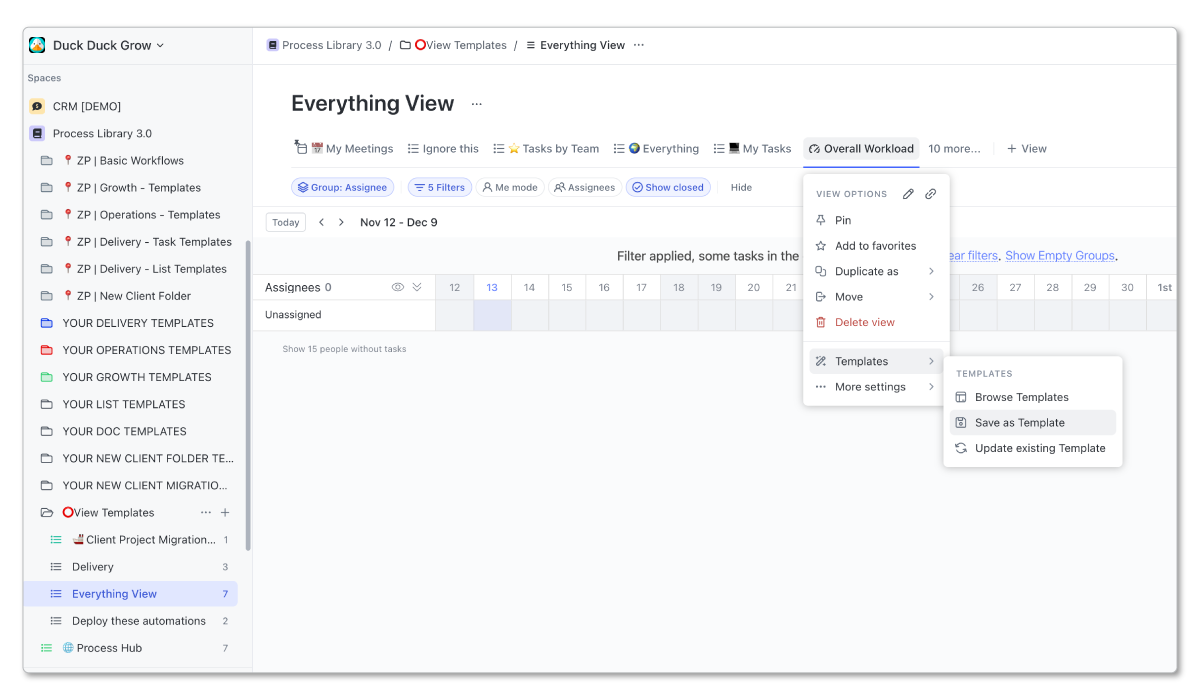
- Create a Workload View at a space, folder, or list level in your workspace. I prefer to have some view templates in my “Process Library”, so that’s where I built it (screenshot below).
- Adjust your Workload View settings (Use the section above), and make sure you adjust your time frame from 1 week to month.
- Now, save this view as a template in the ClickUp Template Center.
- Go back to your Everything level Workload View and deploy your new Workload View template. Once the template is deployed you’ll be able to view a month of workload at a time!
After you’ve successfully configured your monthly Workload View at the Everything level, it’s time to start making this match reality.
Unfortunately there is no magical switch that you can turn on to make this Workload view accurate. It will take time and effort, but there are a few steps that you can take to give you a great glimpse into your team’s capacity.
Get the Workload Visibility Training
Get the complete guide + 30 minute training video to learn how to build a more accurate workload view in ClickUp.
Get Instant Access →Step 2: Start Populating the Workload View
Now that you’ve created your Workload View, let’s discuss what it takes to get tasks to populate in that view accurately.
But, before we jump too far down a rabbit hole, it’s important that you know what is needed for a task to actually show up and populate this workload view.
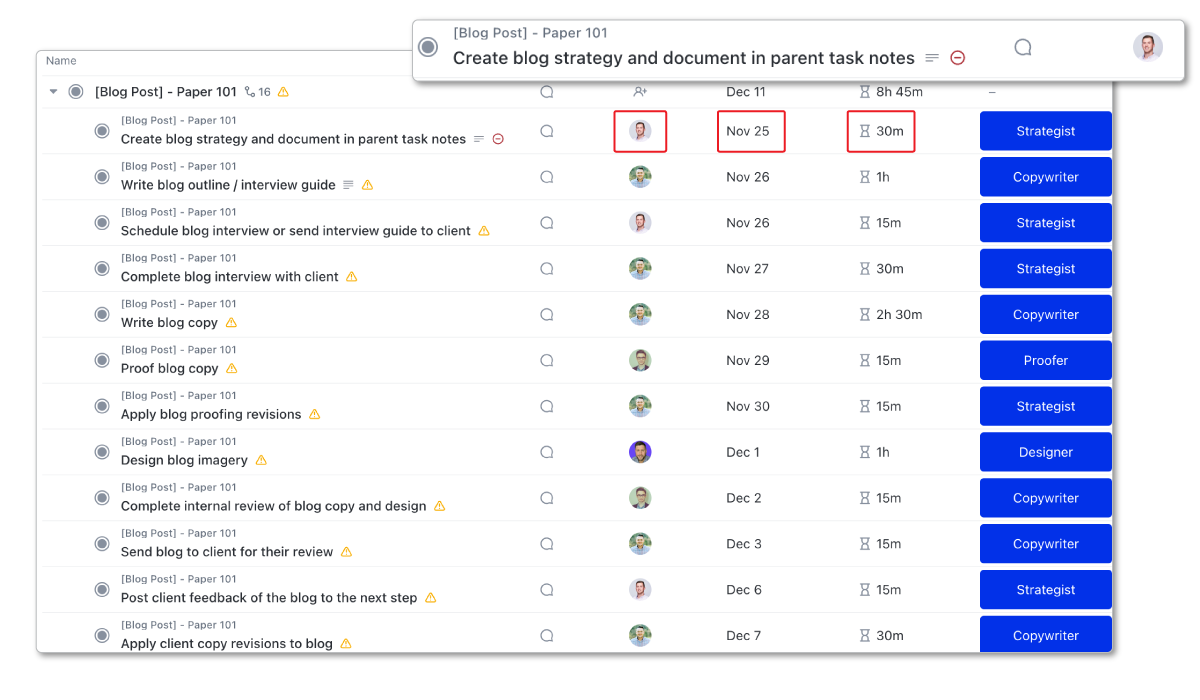
Every task in ClickUp requires these 3 key ingredients in order to show up properly in your Workload View:
- Assignee - The task must be assigned to one person.
- Due Date - The task must have a due date set.
- Time Estimate - The task must have an estimate of how long it will take to complete.
If any of these 3 items - due dates, time estimate, and an assignee - are missing on a task, it will not be factored into your workload properly.
This may seem obvious, but I’ve audited hundreds of ClickUp workspaces and there’s just too many tasks out there that are missing at least one of the three key ingredients…
And while we’re discussing auditing workspaces, I’d recommend that you start auditing your workspace as well.
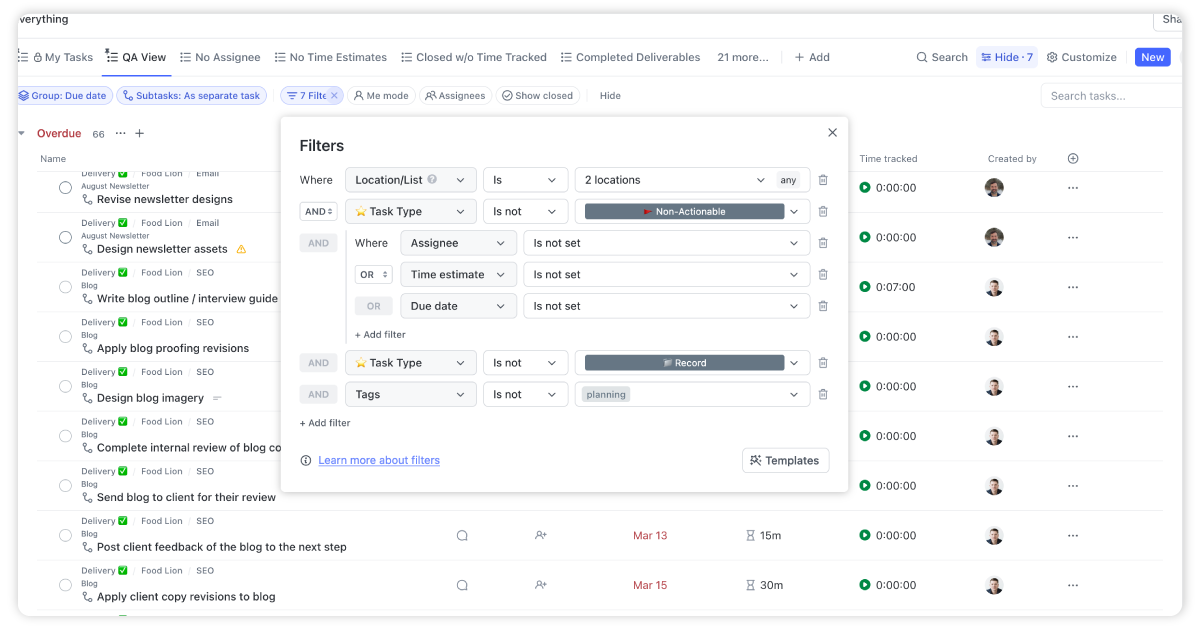
Build a “QA” view at the Everything level.
This will leverage ClickUp’s boolean logic to show any task that’s missing a time estimate, a due date, or an assignee.
Within this view, you can run through all of your tasks and make sure all of them have the appropriate ingredients - time estimates, due dates, and assignees - to ensure that no task is left behind.
But besides the basics, here are some additional tips and strategies to help make your workload view more accurate.
Tip #1: Break Down Larger Tasks
To make your Workload View as accurate as possible, you want to keep tasks broken up into smaller “bite-sized” pieces.
Most teams don’t provide enough granularity in their tasks and it leads to minimal visibility and work slipping through the cracks.
I’ve seen plenty of teams make the mistake of having one task for a blog post, assigning it to three different people, with a start date of November 7th, a due date of November 14th, and a time estimate of 9 hours.
With that task structure, you’ll end up splitting the time estimate amongst the 8 days, with each person having the 9 hours assigned to them as well.
On top of that, nobody really knows that they are responsible and therefore nothing will probably get done.
If you split this blog into different tasks - write the post, review the post, design the creative, and publish the post - and each person is assigned to their task, with a time estimate, and a due date, you’ll minimize work slipping through the cracks and get an accurate picture of workload.
Every task in your workspace needs to follow our “one user, in one sitting” methodology, which we’ll describe more in the next few tips.
Tip #2: Assign Only One Person Per Task
One of the biggest mistakes agencies make in ClickUp is assigning a task to multiple people.
Resist the urge to assign multiple people to a single task.
First, this creates ambiguity around who is responsible.
Secondly, this will mess up your time estimates.
Both people will get the same time estimate applied to them unless you have “Estimates per Assignee” turned on within the “Time Estimates” ClickApp. The “Estimate per Assignee” feature will take a task time estimate and split it amongst the assignees.
But turning this on will only lead to problems. The “Estimates per Assignee” setting moves a time estimate from a task to a person. If you end up removing an assignee from the task and reassigning it, the time estimate will be taken with that assignee and removed from the task.
To save yourself from headaches, stop assigning multiple people to tasks.
Tip #3: The Due Date is the “Do” Date
One of the best things you can do for your Workload View is make your due dates the DO dates.
And yes, this strategy involves getting rid of start dates completely. Crazy, I know…
This can be a big change for some, but hear me out.
When you use both start dates and due dates in ClickUp (or any other project management system), you’ll be taking a time estimate and splitting it up across multiple days. By default, ClickUp will split the time estimate evenly across the days between the start and due date.
How often does someone work like this on a task?
And if your start and due date cross a weekend, then you’ll be putting time estimates on the weekend days as well.
Break your tasks up into smaller “bite-sized” pieces so that every task can be started and completed on the same day. This will be much more realistic and keep workload more accurate.
Tip #4: Time Estimates Under 4 Hours
In order for the due dates becoming the do dates to be a reality, you’ll need to make sure that every task has a 4 hour time estimate limit.
If a task takes longer than 4 hours, split it into two or three tasks and label them as phase 1: task, phase 2: task, phase 3: task… you get the point.
This will ensure that tasks aren’t spanning across multiple days. When someone finishes phase 1 of a task, they can close it out. They’ll move on to phase 2 tomorrow or today if they have the capacity to do it.
By ensuring that your team doesn’t half complete a task, you’ll make sure the time estimate is always falling on the correct day.
Tip #5: Remap Due Dates
Additionally, you’ll need to keep due dates up to date.
The reality is, tasks will probably fall overdue - other work may come up, or someone falls behind, and they need to push a task to tomorrow.
If task due dates are not remapped and moved, you’ll lose visibility on the Workload View.
As I mentioned earlier, the Workload View is populated by time estimates, due dates, and assignees. If a task was due two days ago, but it’s still not complete, and the due date wasn’t updated to today or tomorrow, it won’t show up in my workload for today.
Someone may assign me a task because they think I have 2 hours of capacity, but that 2 hours is actually booked with overdue work.
To minimize this mistake from happening, I recommend that you build an “Overdue” view at the Everything level. This will funnel all overdue work for me to manage appropriately.
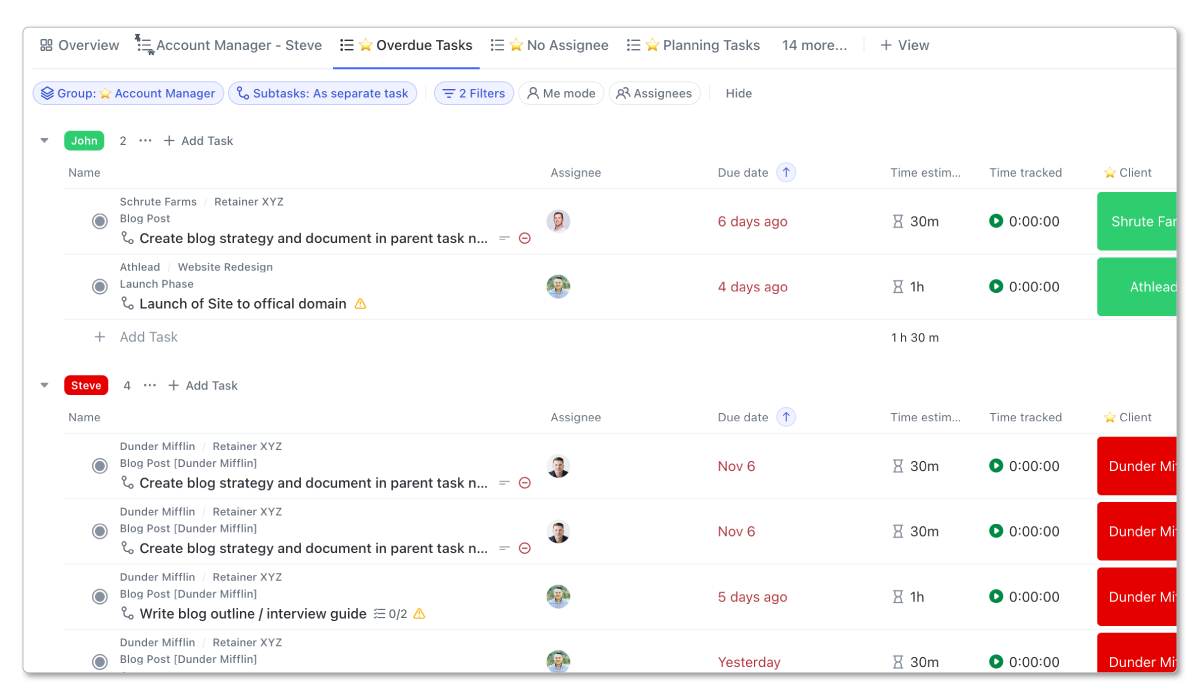
This view can also be built elsewhere or in a dashboard. You can leave this responsibility to your team leads or assign your ClickUp champion to take on the responsibility for your full team.
Additionally, you’ll want to leverage the Gantt View in ClickUp to remap due dates. This will enable your team to remap deliverables and projects easily and skip the weekends!
Overall, with updated due dates that are do dates, smaller tasks, one assignee per task, and no more than 4-hour time estimates, you’ll be setting yourself up for success.
Step 3: Build Your Processes
One of the best ways to improve the accuracy and completeness of your Workload View is to standardize your workflows using reusable task and list templates.
You’ll most likely struggle to gain momentum into workload visibility by creating every task from scratch. There is a lot of room for error on accurate time estimates, and it’ll take too much time to get every task in the system.
Documenting your processes in ClickUp helps you get more tasks into your system with more accurate time estimates, due dates, and assignees. And that’s just one benefit amongst many.
To be blunt, your business won’t survive without documented processes, so you might as well start documenting them today. If you don’t have a single process built, I’d recommend you start by grabbing our process prioritization worksheet to start prioritizing what needs to be built first.
Process Prioritization Worksheet
Get the exact Process Prioritization Framework we’ve used to help 3,100+ clients prioritize and organize their processes.
Download the Worksheet →And while you grab and get started on that exercise, let’s walk through building these in ClickUp.
1. Create a Process Library
Start by creating a dedicated “Process Library” space to store your process templates and workflows.
This is where you’ll store all of your process template source files.
After you build them here, you’ll end up saving them into the ClickUp Template Center, but we created a “Process Library” so that we can come back to optimize these (which is a future step in your workload journey).
2. Build Task & List Templates For Your Deliverables and Projects
Within your Process Library, build out templated workflows for your most common projects and deliverables:
- Blog posts
- Email campaigns
- Monthly reporting
- New client onboarding
- Recurring internal meetings
- etc.
For each template, map out all the subtasks, time estimates, due dates, and delivery roles (which will become assignees when the template is deployed) required to complete the work.
Follow the 5 tips I listed above when creating your process templates.
If you’re interested in learning more about process template best practices, I’d advise that you read, “ClickUp for Agencies: The Definitive Guide”.
3. Save Templates to The ClickUp Library
Once your process templates are built out, save them to the ClickUp Template center so they can be easily deployed.
Now when you kickoff new work, simply navigate to the ClickUp Template Center, select the appropriate template, rename it, change the due date, and deploy it.
After you assign the work to the appropriate team members, you’ll have all of your tasks ready to go.
Do this over and over again for other deliverables and projects that need to be done, and you’ll continue to populate your workload view.
By using process templates, you’ll automatically populate all the key workload data - time estimates, due dates, and assignees. This saves massive time compared to creating each task from scratch.
Over time as you refine your templates based on actual work, your workload forecasts will become more precise.
Step 4: Capture ALL Agency Work
For your Workload View to be truly effective, ALL work at your agency needs to be captured in ClickUp - not just client projects.
Here are key items that also must be tracked:
- Internal Meetings - Build templates for recurrent meetings like stand ups, planning sessions, one-on-ones etc. Track prep time, actual meeting time, and follow up tasks.
- Growth Tasks - Strategic planning, process documentation, hiring, training, etc. These projects often get ignored but need to be tracked.
- Operations - Invoicing, payables, tech management, and other internal tasks.
- Professional Development - Course work, webinars, live events, and other professional development tasks need to be tracked in ClickUp.
- Admin - Checking and responding to email, filling out a daily scorecard, or checking LinkedIn should also be added. You can use ClickUp’s recurring settings to set up daily tasks for this.
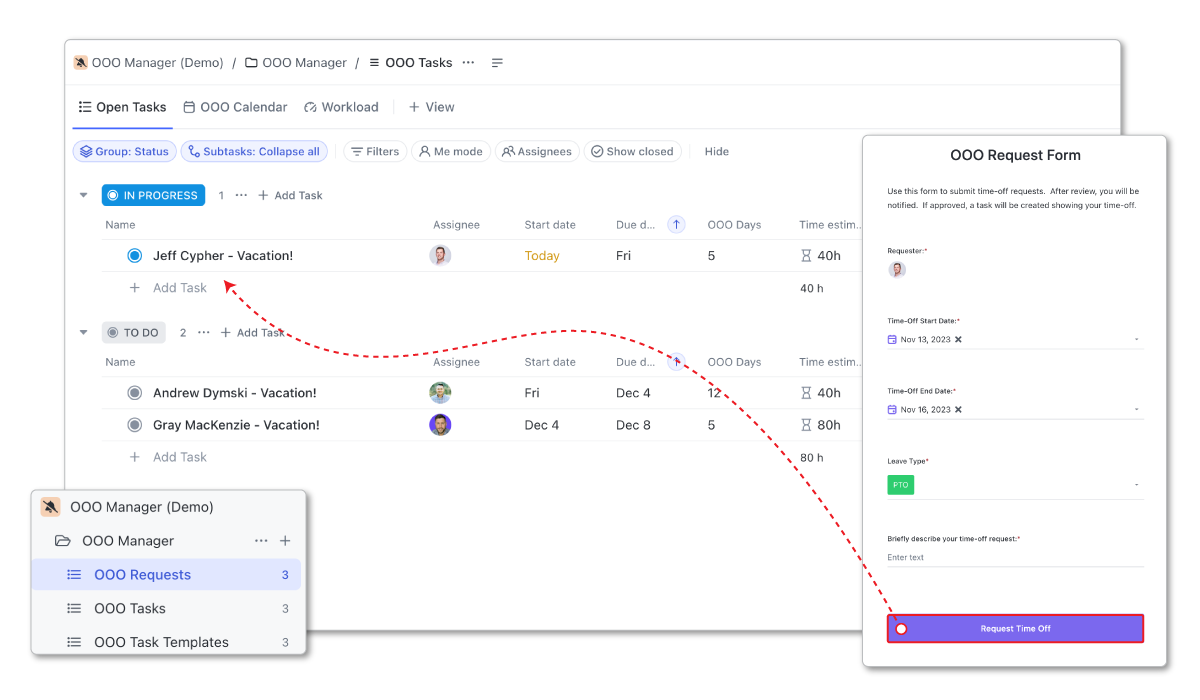
- Out of Office - Good news: you no longer need a hack for this. ClickUp’s new Time Off feature (shipped June 2026, Business Plus and above) lets teammates set PTO right from the Schedule tab on their profile or from Team Hub. Capacity automatically drops to 0 hours in the Workload View for those days, and if someone tries to assign work over PTO, ClickUp throws a clash warning. On plans below Business Plus, the old fallback still works: create an OOO task with a start date, due date, and time estimate covering the time out, and assign it to the person who’s away.
The phrase “If it’s not in ClickUp, it doesn’t exist” should become your agency’s mantra.
Follow this rigorously to ensure your Workload View is complete.
Download the Complete ClickUp for Agencies Guide
The 47-page guide includes graphics, checklists, and links to how-to videos so you can actionize your ClickUp plan.
Get Instant Access →Step 5: Continuously Optimize
Unfortunately, or if you like a good challenge, thankfully, this is only the beginning. Once you’ve developed your processes, and gotten all of your work in to ClickUp, you need to continue to optimize what you’ve built.
Here are ways to continuously optimize your Workload View accuracy:
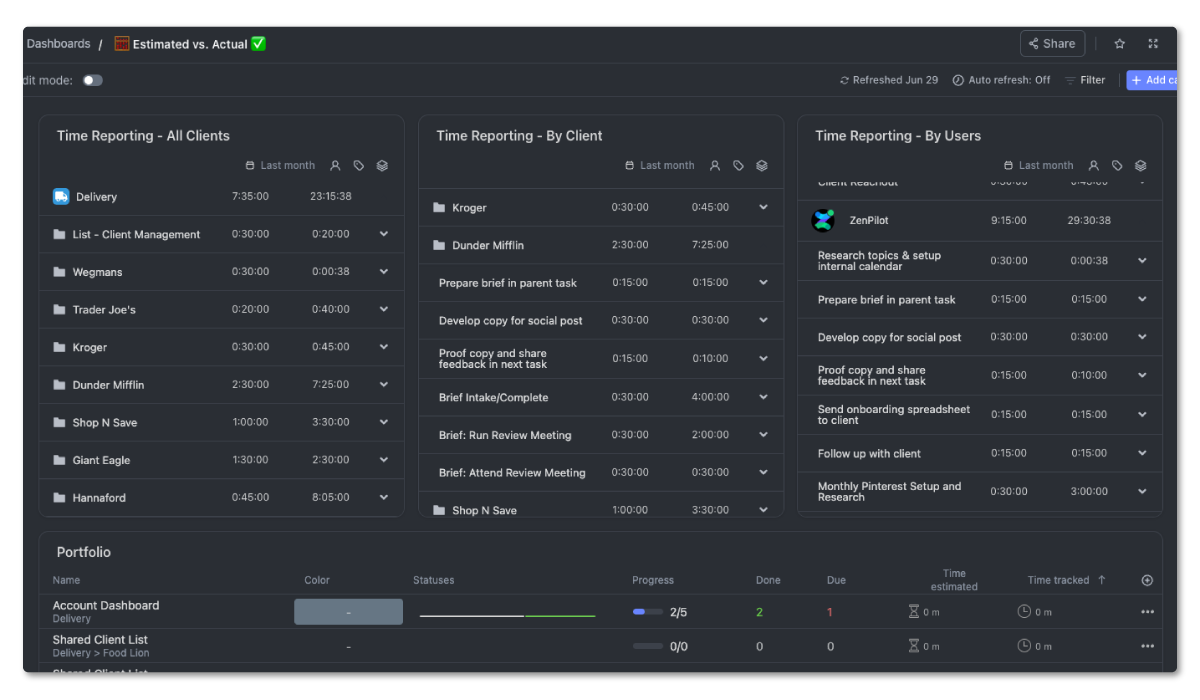
Analyze Trends in Estimates vs Actuals
You’ll need to create a dashboard comparing estimated time vs actual time spent on tasks.
This dashboard will help you analyze trends where estimates are frequently way off. You can use this data to make adjustments to your process templates.
I’d recommend that you hire a ClickUp Champion to analyze this data on a daily, weekly, and monthly basis.
The more accurate you can get your time estimates on your process templates, the more accurate your Workload View will be.
Review Overdue Tasks
As mentioned earlier, regularly review overdue tasks and update due dates to keep workload forecasts realistic.
You’ll want a ClickUp Champion or project managers to be in charge of this process.
Aside from just moving due dates, your ClickUp Champion should also be pushing the team to pick up this habit themselves.
Healthy habits across your team is a massive contributor to success in your Workload View.
Audit Completed Projects
You’re probably already looking at time tracked for your completed client projects. This will help you with profitability analysis and invoicing, but it’ll also help you with a further understanding of time estimate accuracy.
By creating a view in ClickUp that shows all complete projects with time estimates and time tracked, you can easily pin-point issues.
If there are tasks that are taking longer than the time estimate across multiple clients and people, then it’s time to adjust the process template.
Additionally, you’ll want to navigate due date changes to see if you need to adjust your date map in your process template as well.
![]()
Adjust Your Templates
Based on findings from your analysis, edit your process templates to improve time estimates, due dates, etc.
You built a “Process Library” for a reason. Use it!
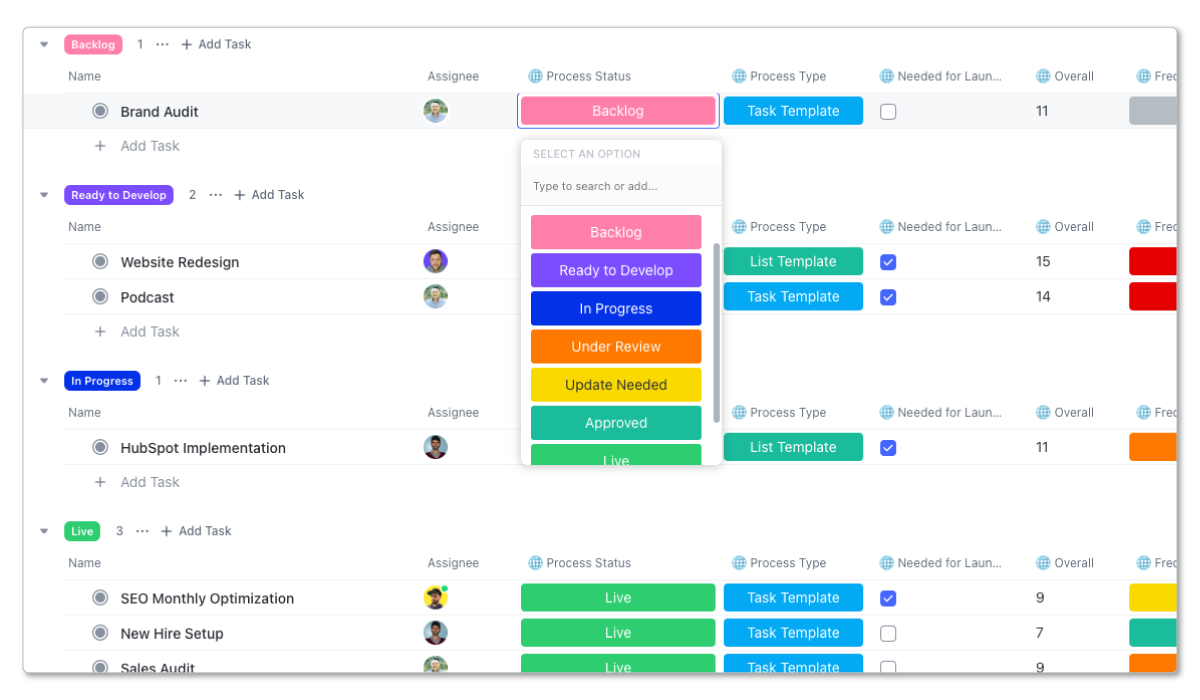
Within your “Process Library”, you can also build a “Process Hub” (shown below) that provides a place for your team to document changes, statuses, and necessary adjustments to your process templates.
Create a process around process building and process optimizations.
Step 6: Workload-Driven Project Management
Now, if you’re still looking for additional ways to take this to the next level, you’ll need to think beyond ClickUp and look at how your team is planning, assigning, and delivering work.
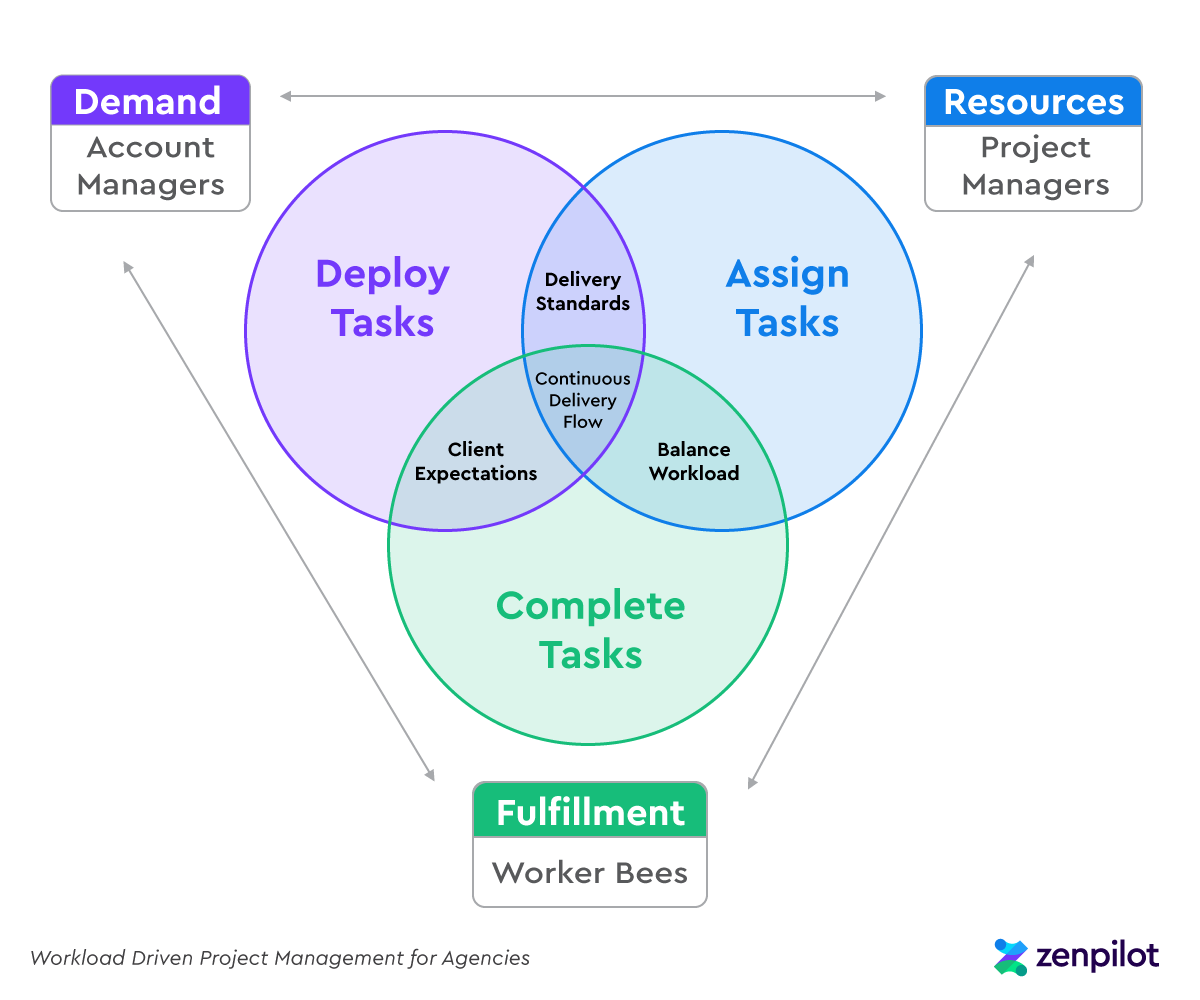
Workload-Driven Project Management (a ZenPilot Methodology) is a three power balance - Demand, Resources, and Fulfillment - to plan, allocate, and prioritize resources efficiently and effectively.
Demand determines what we’re going to do (and why we’re going to do it), Resources determine how we’re going to do it, and Fulfillment gets it done.
These three power balances offer agencies a scalable approach to enhance their planning, assignment, and execution of work, resulting in even more precise understanding of their team’s capacity.
To go deeper on this methodology and how you can implement it at your agency, grab our free Workload Visibility in ClickUp guide and training.
Conclusion and Next Steps
Understanding workload and capacity is a must-have for agencies.
When workload is accurate, it can have tremendous impact on profitability, employee satisfaction, and quality of client work.
Sadly there is no magical switch you can turn on to start seeing workload data in ClickUp. It takes time and effort, but it’s always worth it in the end. And once the foundation is solid, tools like Brain get a lot more useful - our ClickUp AI breakdown covers where AI fits.
At ZenPilot, we’ve helped 3,100+ clients streamline their operations in ClickUp to gain full visibility into workload, utilization, profitability, and client health.
If you’d rather not figure this out alone, book a free 30-minute call and we’ll map out your workload setup together. You’ll leave knowing exactly what to fix first.