As an agency, continuously updating and sending your clients notes, documents, reports, timelines, and lists of completed deliverables can be a very time consuming and tedious process. This can also cause stress on account managers, eat into your profit margins, and even take a hit on client satisfaction ratings, especially if your work is disorganized without a central source of truth.
But what if there was a solution where you could build a centralized dashboard or portal for your clients and automate this whole process? You could send your clients one link and everything they need would be right there.
Thankfully, with ClickUp, you can create a custom client portal or dashboard for all of your clients - saving you time, effort, and stress, while also helping improve your client relationships.
In this article, I'll walk you step-by-step through how you can build a client portal inside of ClickUp.
Why Build a ClickUp Client Portal?
Before we dive in to how, let's first discuss the why. Here are some of the key benefits of building a client portal:
- Centralized source of truth: Keep all key info, documents, and reports in one place rather than scattered across emails and other tools.
- Automated updates: Dashboards and views can automatically populate with latest data instead of manually exporting and sending.
- Improved communication: Quickly share meeting notes, completed deliverables, and important announcements.
- Strengthen relationships: Demonstrate productivity and results with visibility into real-time work.
- Win more business: Impress prospective clients with transparency into your process.
- Boost efficiency: Reduce time spent on status calls and sending project updates.
BONUS
Download the Complete ClickUp for Agencies Guide FREE
The 47-page guide includes graphics, checklists, and links to how-to videos so you can actionize your ClickUp plan.

3 Ways to Work With Clients in ClickUp
Though creating a portal is extremely effective, there are other ways of working and providing visibility to clients. To help you evaluate and decide which is best for you, here are the 3 main ways you can work with clients in ClickUp.
1. Shared Client List in ClickUp
You can create a list in ClickUp and share it with clients by adding them as guests. This allows them to see all views, tasks, and documents in that list.
It'll take more manual work to move tasks between lists and make sure clients are seeing what they need. You can either use ClickUp's Tasks in Multiple Lists feature to share tasks with your clients in this list, or you can create additional tasks in this list that will live side-by-side with your actual work.
By creating a shared client list, you open up the ability for you to communicate and work with your clients directly in your project management platform. However, unless you are careful about only sharing certain work with your clients, you may grant access to a lot your internal processes and communication.
There a lot of features and functionalities to be aware of with this method. If you need an expert to help, book a call with our team.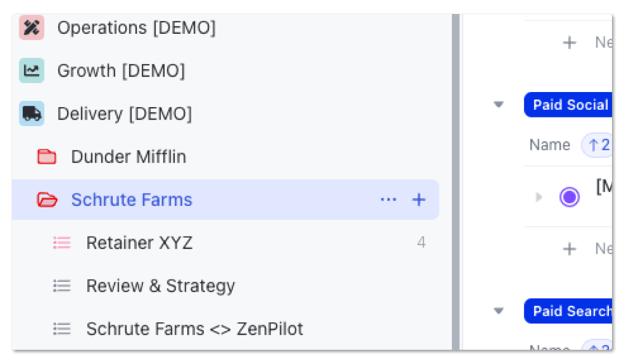
2. ClickUp Client Dashboard
You can also build a ClickUp dashboard and invite clients as guests to view it. This enables you to customize the dashboard with a lot of different widgets (or "Cards" in ClickUp parlance).
You can create chat channels, embed views, forms, or documents, and provide charts and graphs to show time tracked, completed projects, etc.
However, before building and inviting your clients to a dashboard, be aware that your clients must be a guest in your workspace (dashboards cannot be made public like views can) and if you create a Task List widget, your clients must have access to the tasks to see any data. One workaround is to create a public view and embed this in your dashboard.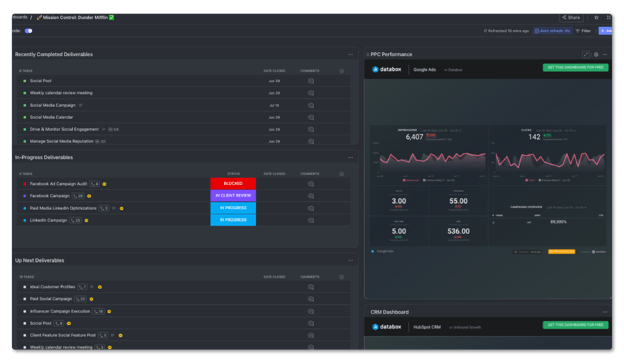
3. ClickUp Public Portal with Views
The last option, and where we will focus, is to create a public portal using public documents and views.
And best of all, this doesn't require adding your clients as guests - negating any worry of your clients seeing the ins-and-outs of your agency's processes.
The only downside to this method is the inability for you to communicate with your clients directly in ClickUp. Sometimes, a hybrid of all three methods can work tremendously, but it all depends on what you and your clients want and need.
And remember, if you need an expert to help build a client portal/dashboard and system for communication, book a call with our team.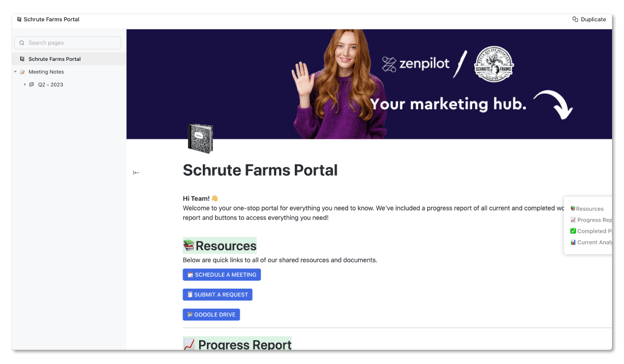
For more inspiration on how to nail client services as an agency, check out the story of how Matt McIver and Commence Studio used the ZenPilot System to delight their clients. Read Matt's story here.
How to Build a Client Portal in ClickUp
Now that we've discussed three different methods, let's walk through how to build a client portal using the public doc method.
Step 1: Set Up the Correct ClickUp Hierarchy
Proper ClickUp hierarchy is crucial as the foundation. Each client should have their own folder containing all lists where their work is managed. This allows visibility into all client deliverables in one place.
Related: The Best ClickUp Hierarchy for Agencies
Step 2: Create Tasks for All Client Work
Within each client folder, create lists to host their tasks and projects. For agencies, this usually includes a Retainer list for ongoing work, a Review & Strategy list for meetings and management tasks, and extra lists for one-off projects.
Another strategy is to create lists for your different service lines. This provides great visibility into which service line is most and the least profitable.
To understand which list structure you should implement, book a call with our team. We take agencies through our agency operator blueprint process to provide the best project management hierarchy for their team.
Once the structure is set, add all active and upcoming tasks and make sure to utilize statuses like Open, In Progress, In Review, etc. This will feed the different views we set up next.
Related: How to Implement ClickUp for Agencies
Step 3: Create the Portal Document
Navigate to the client's folder and create a blank ClickUp doc. Name it something like "[Client Name] Portal". You can optionally add a cover image at the top for branding.
In the doc, write a simple welcome message and intro text explaining what this portal is for. And if you want some bonus points, record a loom video of yourself saying hi to the client and welcoming them to the portal. This is always a great touch.
I'd also recommend adding in a table of contents to make navigation easy for your clients. The sticky table of contents feature in ClickUp works well.
To save yourself time and effort, you can also leverage ClickUp Doc templates to create a skeleton for your client portal and then deploy it in your client folders to rid yourself of the initial setup and formatting.
Related: Supercharge Your Workflow with ClickUp Docs
Step 4: Add Resource Links
Under the intro, create a "Resources" section using the H2 header formatting. Make it visually stand out by highlighting it as a banner and adding an icon.
Then include buttons linking to key external resources your client may need quick access to, like:
- Book a Call: Link to your calendar booking page
- Submit a Request: Link to a work request form
- View Google Drive: Link to the shared Google Drive folder
The buttons make it easy for clients to quickly access the tools you use to collaborate. You can customize the text and styling of the buttons as needed.
To save your clients time and clicks, you can also embed any of these resources directly in the document, but sometimes that may make the scroll length of the portal a bit too long and a button makes perfect sense.
Step 5: Embed a Progress Report View
Under Resources, create another section titled "Progress Report". This will highlight all current projects that are a work in progress.
Go to the client folder and create a Table view that shows Task Name, Due Date, Status, and Progress bar. Make sure it only shows tasks that are Open. Name it something similar to "Client Deliverable Progress". Share the view publicly and copy the public embed code or url.
Then embed the view into the "Progress Report" section of the portal doc. The client will now be able to see real-time progress on deliverables.
Note: It's important to use a Table view for this. The Table view will hide subtasks from your clients and eliminate their ability to see the nitty gritty details. Although a list view may be better looking, there is currently no way in ClickUp to eliminate your client's ability to see subtasks.
Related: The 8 Views Every Agency Needs in ClickUp
Step 6: Embed Completed Projects View
Under "Progress Report", create another section titled "Completed Projects". This will highlight all projects that you've completed for your client.
Follow the same steps to create another Table view filtered to only show completed tasks. Name it "Completed Deliverables". Generate the public link and add it to a "Completed Projects" section in the portal doc.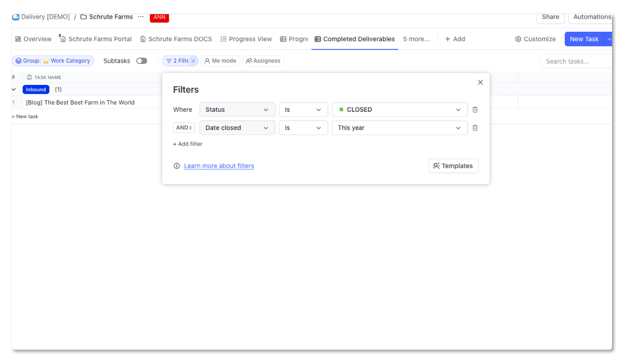
Optionally, you can also filter this closed tasks view to only show the last month, year, or quarter. This gives the client visibility into recently finished work.
Step 7: Embed Analytics Reports
Underneath your "Completed Projects" section, add a "Results" section to show key metrics related to the work you're doing for the client.
Embed reports from your business intelligence tool, like charts from Databox, Looker Studio, Google Analytics, etc.
Adding all of these elements - "Progress Report", "Completed Projects", and "Results" - helps tie your strategy to results, making it much easier to show the value you're driving for their business.
Step 8: Add a Meeting Notes Page
Additionally, you can capture and share all of your notes for your clients. This will document the journey and everything you're doing and have done for them. This is especially useful when theirs changes in points of contact.
To do this, click the +Page button in the top left corner to create a second page in the doc named "Meeting Notes". Here you can take notes from each client meeting and organize them by quarter or year.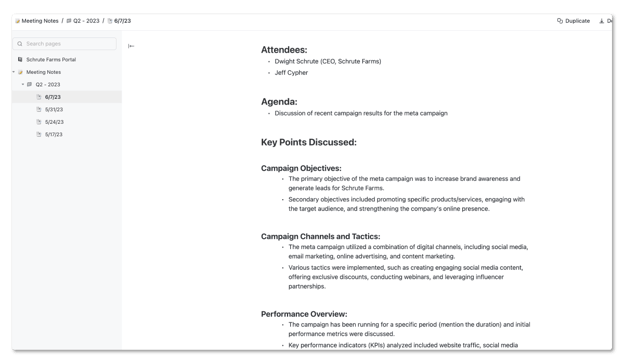
Step 9: Make the Portal Public
Once finished, go to Sharing and Permissions and generate the public link for the doc.
Send this to your client and now they have a beautifully designed, self-serve portal to get all the information they need in one place!
Customizing Your Client Portal
The great thing about ClickUp is that the possibilities are endless when building your client portal. Here are some ideas for customization:
- Add more branding elements - colors, icons, and images
- Additional embedding of forms, documents, and availability calendars
- Additional pages or sections for documentation - strategy, QBRs, team charts, etc.
There is a lot of customization that can be done. Start simple and optimize from client feedback.
When you've found a great base for your liking, save it as a template and deploy it everywhere else.
And if you're really advanced, save the portal document, views, lists, etc. in a "Client Folder Template". This will save you A LOT of time.
Conclusion: Creating a Client Portal is Only One Piece of the Puzzle
Building a client portal is a game changer for improving communication, transparency, and visibility with your clients. ClickUp makes it easy to create beautiful, functional portals that both you and your clients will love.
The benefits go way beyond just saving time on status updates. Client portals can transform how you collaborate and strengthen relationships.
But let's be honest, providing your clients visibility into their work is only one piece of the puzzle. And this won't work if you're team isn't using your project management system correctly and you haven't documented and created process templates.
We've led 2,700+ different agencies through their final project management implementation - helping them build a more productive, profitable, and healthy team.
Taking your operations seriously will change your life. If you're ready to experience this life changing impact, book a call with one of our operations experts.
Turn Chaos Into Clarity.
We're your agency operations pilot.
You can build a happier, more productive, more profitable team with ClickUp. We'll show you how.