ClickUp + HubSpot Integration: The Complete Guide for Agencies

If your sales team lives in HubSpot and your delivery team lives in ClickUp, you’ve felt the pain: deals close, information gets lost, and onboarding starts with a Slack message that says “hey, we just signed a new client - can someone set them up?”
That gap between “closed won” and “first deliverable” is where agencies lose time, trust, and money.
Here’s the thing most agencies don’t think about: when are your clients most engaged? Right when they give you their credit card. Right when they sign that contract. That honeymoon period is your highest-leverage window to deliver value and set the tone for the entire relationship. Drop the ball during onboarding and you’re fighting an uphill battle from day one.
The ClickUp + HubSpot integration fixes this. And after setting it up for 3,100+ clients, we’ve learned exactly what works, what breaks, and how to get the most out of it.
Why the ClickUp + HubSpot Integration Matters
Let’s be honest: HubSpot is pretty terrible at project management, and ClickUp isn’t mature enough yet to be a fully functional CRM for a team running significant sales activity. Both tools are leaders in their lane - and the magic happens when you make them work together.
In November 2022, ClickUp and HubSpot announced a strategic partnership to help businesses streamline workflows across the customer lifecycle. As HubSpot CEO Yamini Rangan put it: “ClickUp gives teams the ability to create a seamless, collaborative experience at work that results in delightful experiences for its customers.”
The way to think about it: pre-sales and marketing live in HubSpot. Post-sales servicing and tracking live in ClickUp. If you haven’t already, building a CRM inside ClickUp gives your delivery team a single source of truth for account data. The integration is the bridge between them.
Without it, the handoff looks like this:
- Sales closes a deal in HubSpot
- Someone sends a Slack message or email to the delivery team
- An ops person manually creates folders, tasks, and templates in ClickUp
- Important deal context (scope, budget, contacts, timeline) gets re-entered by hand
- Things get missed. Deadlines slip. The client’s first impression suffers.
With the integration configured properly, that entire process happens automatically the moment a deal hits “Closed Won.”
What the Native Integration Can Do
The ClickUp + HubSpot integration is a two-way, native integration - meaning ClickUp actions are available directly from within HubSpot’s workflow tool, and HubSpot actions are available from within ClickUp automations.
HubSpot triggers that create actions in ClickUp:
- New deal created or deal stage changes
- New ticket created
- New contact added
- New line item added
ClickUp triggers that create actions in HubSpot:
- Task status changes
- Priority changes
- Due date or start date changes
- Assignee changes
- New task created
This means you can automate in both directions - not just pushing deals from HubSpot into ClickUp, but also updating HubSpot records when work progresses in ClickUp.
Native vs. Make vs. Zapier
The native integration handles the most common use cases well. But for anything more complex - especially workflows that involve custom fields - you’ll likely need a middleware tool:
- Make (formerly Integromat): Our preferred tool. It has a superior ClickUp integration with full custom field support, and it goes deeper than Zapier for complex automations. Most of our client implementations use Make.
- Zapier: Easier to get started with, but the ClickUp connection has historically had custom field limitations. The integration is being rebuilt, but Make remains more capable for advanced use cases.
- Direct API: For maximum control. We build custom API integrations for agencies that need enterprise-grade automation - but this requires development resources.
For most agencies, start with the native integration for the basics, then layer on Make for anything that involves custom field data or multi-step workflows.
How to Connect ClickUp and HubSpot
Setting up the connection takes about 5 minutes:
- In ClickUp, go to Settings > App Center
- Search for HubSpot and click Manage
- Click Add to HubSpot
- Complete the authentication to link your HubSpot portal
- Select which ClickUp workspace to connect
That’s it. Your accounts are now linked. The real work is in building the right workflows on top of it.
Note: The HubSpot integration requires at least the ClickUp Unlimited plan.
The Sales-to-Delivery Handoff (Step by Step)
This is the highest-impact workflow we build for agencies. Here’s exactly how to set it up.
Step 1: Build Your ClickUp Structure
Before connecting any automations, your ClickUp workspace needs the right foundation. We split every agency into three main spaces:
- Growth - business development, marketing, and sales
- Delivery - all client services (this is where the magic happens)
- Operations - people, culture, HR, finance, and everything else that keeps the business running
Inside your Delivery space, you need:
- Client folders - one folder per client, containing lists for each service line (SEO, content, paid ads, etc.)
- A Client Management List (folderless) - for cross-client tasks like onboarding
- A Process Library Space - where all your standardized templates live
If your ClickUp workspace isn’t structured properly, automations will just create mess faster. Get the structure right first. (Here’s our full guide to setting up ClickUp for agencies.)
One important structural rule: keep your service line lists static. We see agencies create a new list for each month of work - but that creates maintenance headaches and makes it harder to train the team. Use a custom field to tag tasks by month instead, and let the lists represent your service lines.
Step 2: Create Your Onboarding Templates
Build these templates in your Process Library and then upload them to the ClickUp Template Center:
Client Folder Template - this is your standardized client setup:
- Folder structure with lists for each service line
- Custom fields and views pre-configured
- Automations built into lists
- Client docs at folder level for notes and meeting documentation
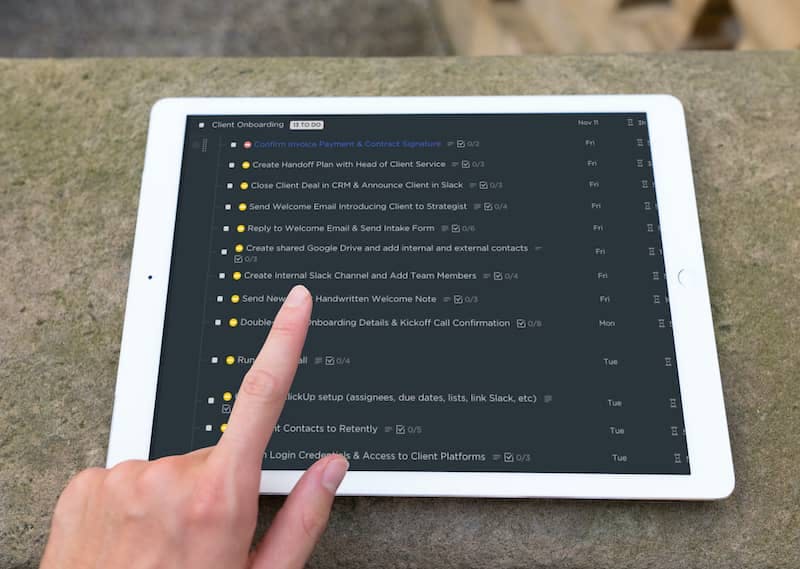
- Onboarding task list pre-populated with every step
New Client Task Template - a lightweight task that triggers when a deal closes:
- A short description (e.g., “We just got a new client! Please begin the process of creating the folder and onboarding tasks.”)
- A checklist for creating the client folder from template and assigning tasks
- A link to a Loom video walking through exactly how to complete the setup (this is critical for when someone new takes over the process)
- Time estimate so you can track how long onboarding actually takes
- Custom fields for any deal context you need to carry over
If you have one person (an admin, a central PM) who handles all client folder creation, assign the template to them. If it rotates, you’ll reassign as part of the workflow.
Pro tip: Put your processes where the work actually happens. It’s super common for agencies to go on an SOP kick - an owner reads a book, builds out detailed processes in Google Docs, and then no one ever sees them because they don’t live where the work is actually happening. Your process checklists should be inside your ClickUp task templates, not in a separate document.
Step 3: Set Up a Due Date Automation
This one is easy to miss but critical. Your templates have due dates baked in from whenever you built them - so if you created the template on January 15th, the due dates are set to January 15th. When the automation fires in March, those dates are months overdue.
In your Client Management list, create this automation:
- Trigger: When a task is created from template
- Action: Update due date to trigger date (or X days after trigger date)
This ensures the onboarding task shows up in the assignee’s task view on the day the deal actually closes, not buried under overdue items from months ago.
Step 4: Set Up the HubSpot Pipeline Automation
In HubSpot:
- Navigate to Sales > Deals and find your pipeline
- Click Actions > Add Pipeline Automation
- On the Closed Won stage, add an action: Create a ClickUp task from template
- Select your workspace, Delivery space, Client Management list
- Choose your New Client task template
- Customize the task name using deal tokens:
🚨 New Deal Won! Begin Onboarding - [Deal Name]
The emoji makes the task impossible to miss in a list view. The deal token automatically pulls in the client name so you’re not reading generic task titles.
Step 5: Add Slack Notifications (Bonus)
Add a second action on the Closed Won stage: send a Slack notification to your #sales channel. Include the deal name, owner, amount, and closed won reason. The whole team gets to celebrate, and delivery knows exactly what’s coming.
The Result
When a deal hits Closed Won, here’s what happens in about 20 seconds:
- HubSpot pipeline automation fires
- A new onboarding task appears in ClickUp with the 🚨 emoji and the deal name
- The task includes a link back to the HubSpot deal record, so the delivery team can get full context without asking sales any questions
- Due dates auto-calculate from the trigger date
- Slack notifies the team
- Your onboarding specialist starts their timer, opens the checklist, creates the client folder from template, remaps the dates (skipping weekends), and bulk-assigns tasks using the delivery role field
This automation saves agencies 5-10 hours of manual configuration per client onboarding, based on our implementation data across thousands of setups.
Watch the Full Walkthrough
Want to see every step in action? This video walks through the entire setup - from building your ClickUp templates and automations, to configuring the HubSpot pipeline workflow, to a live demo of a deal hitting Closed Won and the onboarding task appearing in ClickUp seconds later. It also covers the advanced option of chaining HubSpot payment pages into ClickUp intake forms that auto-create CRM records and onboarding tasks.
Talk to a ZenPilot Operations Expert
We’ve helped 3,100+ agencies streamline their operations. Book a free 30-minute call to see if we can help yours.
Book a Free Call →Advanced Workflows: Beyond Basic Onboarding
The sales-to-delivery handoff is just the starting point. Here are the most valuable advanced workflows we’ve built:
Automated Project Deployment Based on SOW
Instead of creating a generic onboarding task, deploy specific project folders and task lists based on the services sold. If a deal includes SEO + content marketing + paid ads, the automation creates three separate project lists from templates - each pre-loaded with the right tasks, timelines, and assignees.
For agencies doing templatized work (like property management marketing or a specific HubSpot onboarding playbook), you can get extremely prescriptive - down to 18-step checklists per deliverable. For agencies running more agile workflows, the same workflow structure applies but the inputs and outputs differ each time.
HubSpot Payment Pages + ClickUp Intake Forms
This is the most seamless version of the onboarding chain:
- Client pays through a HubSpot payment link
- They get redirected to a ClickUp intake form that captures everything you need for delivery (services, contacts, brand assets, logins, etc.)
- The form submission automatically creates a deal record in your ClickUp CRM
- That deal record triggers the creation of an onboarding task with all the form data populated in the description
The delivery team gets everything they need without a single meeting. No “hey, what exactly did we sell them?” conversations. The intake form data flows directly into the task.
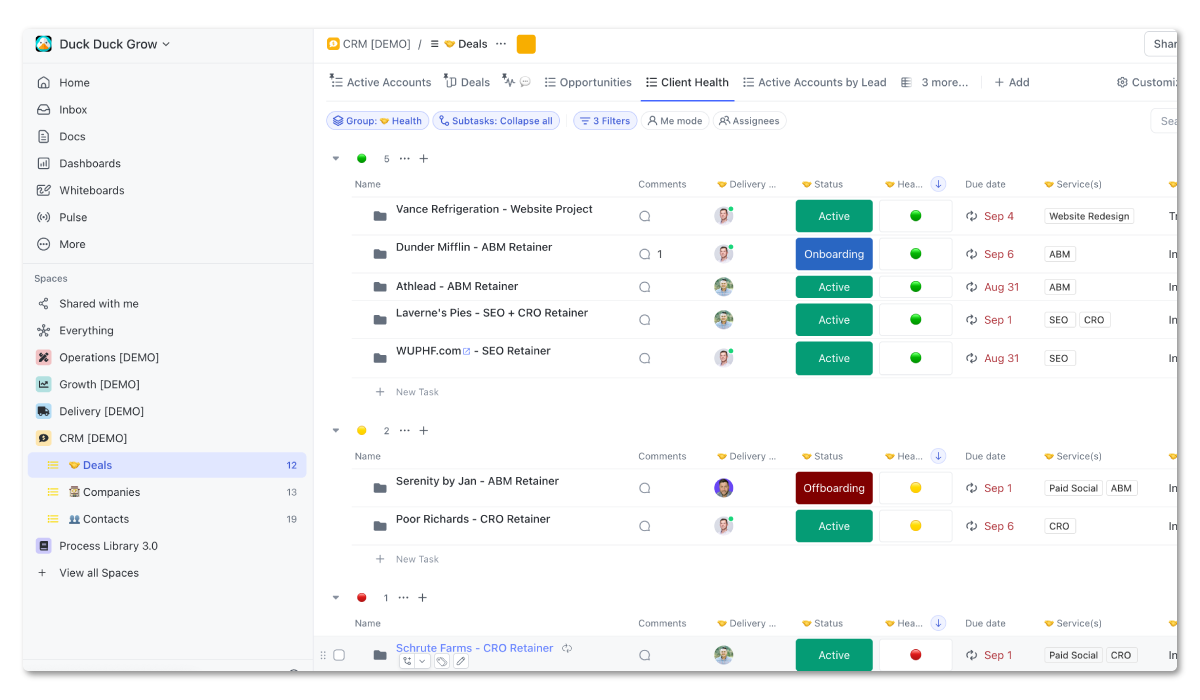
Account Dashboard with Health Scoring
Build a central account dashboard in ClickUp where every active client has a record with custom fields for:
- Services being provided
- Engagement status (onboarding, active, at risk, churned)
- Account manager / lead strategist
- Health score (1-5 with standardized definitions)
- NPS score (synced from a tool like Retently or HubSpot’s NPS feature)
- Client objectives and KPIs
Set up a weekly update cadence where account managers post a standardized update on each client’s record using the comments thread. This gives leadership a consistent pulse on every relationship without scheduling status meetings.
The powerful part: you can use NPS data to calibrate against internal health scores. If your account manager rates a client a 5 (“everything’s great!”) but the NPS survey across their contacts comes back as detractor territory, something isn’t right and needs attention.
Also track your inactive accounts - standardize why someone left, what their health score was at departure, and how long they were with you. This data is easy to capture when you set it up originally and nearly impossible to reconstruct three years later.
Two-Way CRM Sync
Keep HubSpot deal records updated as work progresses in ClickUp. When a project moves to “In Progress” or “Complete” in ClickUp, the corresponding deal stage updates in HubSpot automatically. Your sales team always knows where delivery stands.
Invoice Automation
Connect ClickUp time tracking data to QuickBooks or Xero to generate invoices automatically. What used to take hours of manual data entry happens in minutes.
Client Visibility and Permissions
How do you want clients to see their work? There are three main approaches:
- Full transparency: Share the entire client folder as a guest. They see everything.
- Filtered public view: Create a view with filters (like milestones only), then share it as a public link. Clients see progress without being logged into ClickUp.
- Status-triggered visibility: Create a separate client review list. When tasks hit a certain status, they automatically move to where clients can see them.
The milestone feature in ClickUp is especially useful here - mark key deliverables as milestones, then filter to show only those in the client-facing view. Clients see the progress that matters without the noise of every subtask.
Whatever you choose, create a client-facing guide - here’s how to work with us, here are the rules of engagement for ClickUp, here’s what to expect. Set expectations upfront.
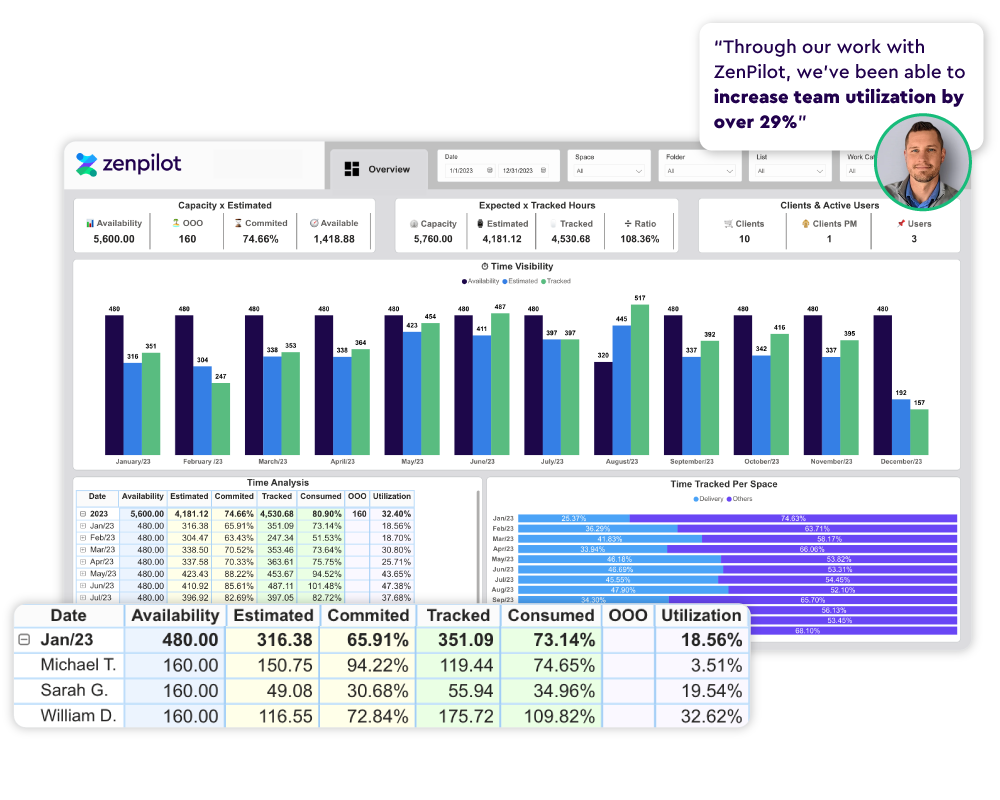
Profitability Reporting
Layer profitability dashboards on top of your ClickUp data to see which clients, projects, and service lines are actually making money. This is where the integration becomes strategic - not just operational.
How to Decide What to Automate
Not everything should be automated. We see a lot of agencies - especially the tech-savvy ones on this platform - get excited about building automations that don’t actually save meaningful time.
Here’s the framework we use to prioritize:
| Factor | Question to Ask |
|---|---|
| Frequency | How often does this happen? Daily? Weekly? Once a quarter? |
| Pain / Cost | How much time does it take manually? How much pain is there when it goes wrong? |
| Solution Complexity | How hard is the automation to build and maintain? |
Prioritize automations that: happen frequently, are painful when done manually, and have straightforward solutions.
Deprioritize automations that: happen rarely, don’t take much time manually, or require complex solutions that are fragile and hard to maintain.
Start by running each process manually. Figure out where the weak points are. Optimize the process itself. Then automate the optimized version. If you automate a broken process, you just get broken results faster.
And a practical tip: batch your automation work. Block two hours once a month to build and refine automations. Don’t let it become a constant side project that pulls you away from client work.
The same framework applies when you’re evaluating AI features. If you’re weighing where those fit alongside your automations, our guide to ClickUp’s AI features breaks down what’s actually useful.
Common Mistakes to Avoid
After 3,100+ implementations, here are the patterns we see:
1. Automating before structuring. If your ClickUp workspace is a mess, automations just create mess faster. Get your hierarchy, templates, and naming conventions right first.
2. Over-automating. Not everything needs to be automated. Start with the sales-to-delivery handoff, prove it works, then layer on complexity.
3. Ignoring the human handoff. Automation handles the system-level handoff, but someone still needs to review the deal context, understand the client’s goals, and kick off the relationship. Don’t let automation replace that human touch.
4. Not updating templates. Your onboarding process will evolve. Schedule quarterly reviews of your templates and automations to make sure they reflect how your team actually works.
5. Building dashboards too early. If you build a dashboard on day one in ClickUp, it’s going to be full of blank widgets and incomplete data. Get the system built, get the team trained, generate real data for 2-4 weeks, and then build your dashboards. You’ll actually know whether you’re measuring the right things.
6. Putting processes in the wrong place. Your SOPs and best practices need to live inside ClickUp task templates - as checklists, descriptions, and linked resources - not in a separate Google Doc that nobody opens. Keep your checklists tight: 3-7 best practice steps per subtask, not a 35-point manual.
ZenPilot + ClickUp API: What’s Possible at Scale
As ClickUp’s largest implementation partner, we’ve built custom API integrations that go well beyond the native HubSpot connection. Our API-driven onboarding sequences deploy standardized workflows connecting:
- CRM systems (HubSpot, Pipedrive, Salesforce) for deal-triggered onboarding
- Contract software for signature-triggered workflow deployment
- Intake forms (Content Snare, Typeform) for pulling client data into ClickUp automatically
- Business intelligence tools (Power BI) for real-time profitability dashboards
The result: onboarding that used to take days now takes hours, with zero manual data entry.
Deep Dive: ClickUp Setup for HubSpot Partners
If you’re a HubSpot partner agency, this webinar covers the full picture - not just the integration, but how to structure your entire ClickUp workspace to work alongside HubSpot. We walk through hierarchy setup, template design, account dashboards with health scoring and NPS tracking, onboarding automation workflows, what to automate vs. what to keep manual, and how to set up client permissions and reporting dashboards.
Getting Started
You have two paths:
-
DIY: Follow the steps in this guide. Set up the native integration, build your templates, and configure the Closed Won automation. Start simple - just the sales-to-delivery handoff - and expand from there.
-
Work with us: If you want the full implementation - structured workspace, custom templates, API integrations, and team training - book a call with ZenPilot. We’ll help you build the system that scales with you.
Either way, stop losing context between sales and delivery. Your clients will notice the difference.
Related: How to Build a CRM in ClickUp | How to Organize Your HubSpot File Manager