20 ClickUp Tips and Tricks to Boost Productivity

Here are 20 ClickUp tips covering templates, views, custom fields, automations, and keyboard shortcuts to help your team work faster and gain better visibility. These recommendations come from ZenPilot, ClickUp’s #1 rated Solutions Partner, refined across 3,100+ implementations.
All 20 tips at a glance:
- Build a ClickUp template library
- Make the process live where the work gets done
- Build a knowledge base and connect it to tasks
- Create view templates
- Use “default for everyone” and “protect view”
- Use folder and list templates to standardize views
- Don’t add custom fields at the workspace level
- Use emojis on custom fields for organization
- Automate custom field assignment on tasks
- Use statuses consistently across your workspace
- Build “statuses” into your process templates
- Every task should be assigned with a time estimate and due date
- Use dependencies to quickly remap due dates
- Use a “delivery role” custom field to assign tasks in bulk
- Train your team on the software AND expectations before launching
- Favorite views for easy navigation
- Use slash commands
- Use hot keys
- Upload multiple tasks with “multiple lines detected”
- Keep learning - explore ClickUp 4.0 features
If you’re starting from scratch, make sure you have your hierarchy set up correctly first - these tips build on a solid foundation.
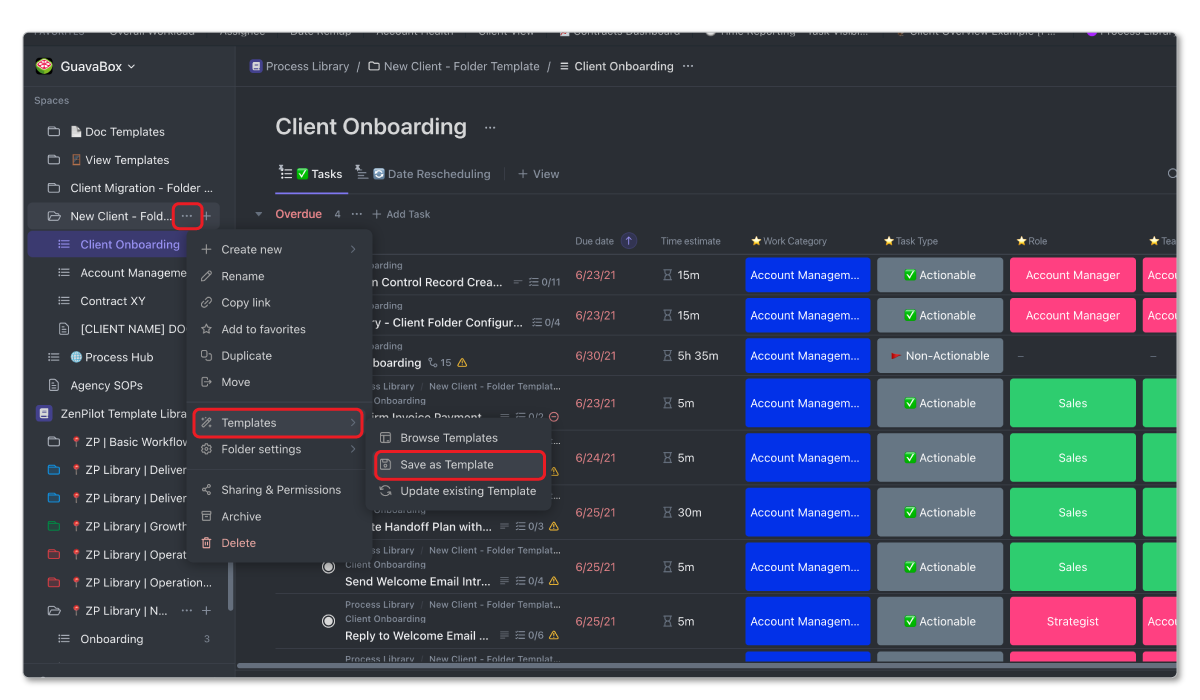
ClickUp Tip #1: Build a ClickUp Template Library
The first tip I’ll give anyone using ClickUp, whether you’re just getting started or have been using it for a while, is to build out a process library inside of ClickUp. This is super important.
You’ll notice that in ClickUp’s template center, you can’t actually edit any of the templates before deploying them. You can use them and deploy them, then edit when deployed, and re-upload - but that’s not the best workflow.
You want to make sure you have the source files for all your templates. The easiest way to manage this is to build all your process templates into ClickUp first and keep them stored in a single location.
Here’s what I recommend:
- Build a “Process Library” space
- Create folders reflective of the departments/teams in your business (operations, growth, delivery, etc.)
- Build out all your process templates inside this Process Library
For example, a marketing agency might have folders for ABM, SEO, web development, organic social, etc. Then within each folder, build out the relevant process templates with all the tasks, due dates, time estimates, custom fields documented.
Once built, you can save these as templates that will always live in your Process Library. This gives you a place to go back to edit and improve templates over time, rather than having to edit live deployed versions.
When updates are made, you can update the existing template in ClickUp’s template center. This will ensure the most up-to-date version is used for the next deployment.
Building a well-organized template library should be one of the very first things you do in ClickUp. It’s a critical foundation for improving your team’s productivity.
Related: How to 10x Productivity With ClickUp Templates
ClickUp Tip #2: Make the process live where the work gets done
Building on the first tip - it’s important that you make the detailed process live where the actual work is being done by your team.
So within each task in your process template, include a description that explains exactly what needs to be done to complete that task. This could be written instructions, a Loom video, links to standard operating procedures or templates.
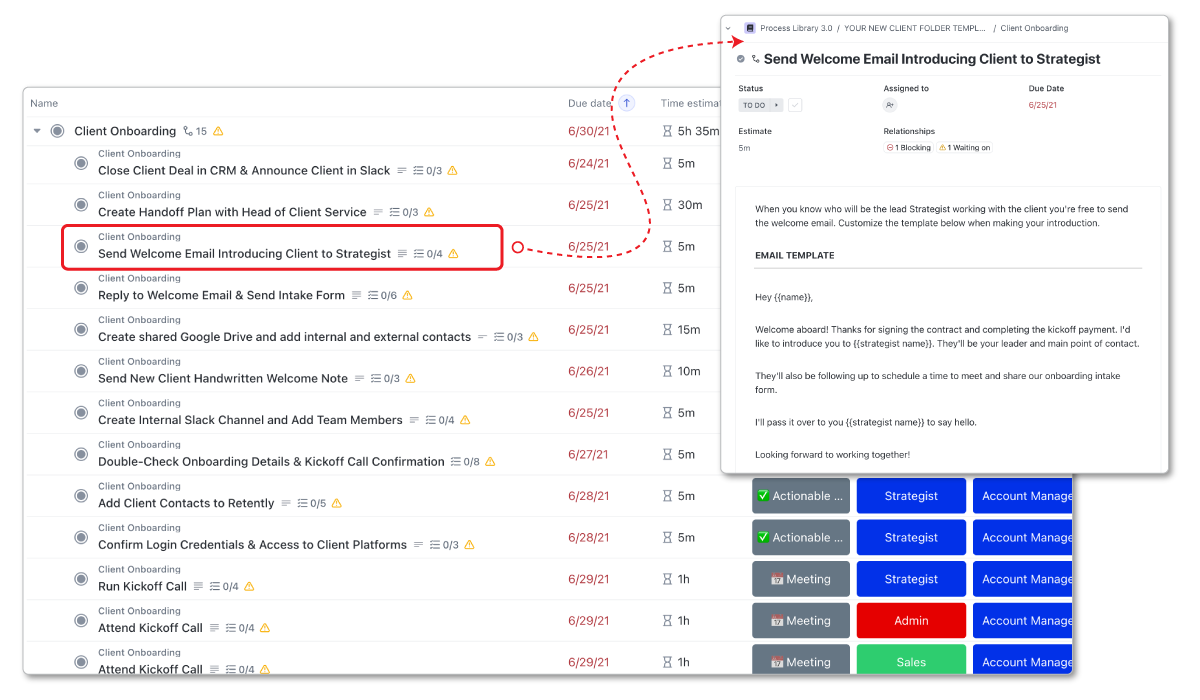
The key is getting all the required steps and details out of your head and into ClickUp. That way, when a new team member is assigned a task, they can open it up and immediately know what they need to do by following the process you’ve documented.
This enables your proven strategies to be consistently followed, which is key for a successful business. Make sure the process lives where the work gets done.
Related: The Proven Process Documentation Framework from a ZenPilot Process Pro
ClickUp Tip #3: Build a knowledge base in ClickUp and connect it to tasks
Going a step further, I recommend building out a knowledge base with all your standard operating procedures right inside ClickUp. You can build this at the Everything level.
Then, within your process template tasks, you can link directly to the relevant knowledge base SOP.
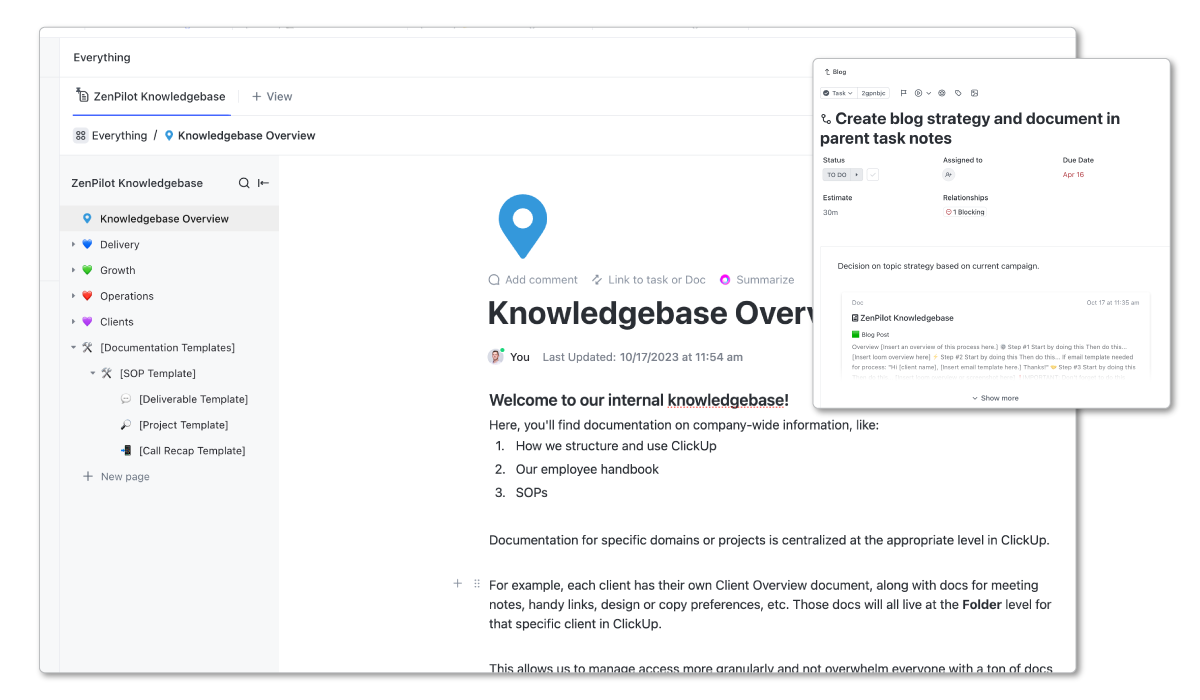
For example, let’s say you have an SOP for how to create a podcast episode. You could build this out step-by-step in your knowledge base.
Then in your podcast process template, you can link the first task directly to that SOP. This way, every time that podcast template is used, even if for different clients, it always links to the same instructions.
The benefit is that you only have to maintain the SOP in one place - the knowledge base. Any updates will automatically apply to all templates linking to it.
Combining an organized process template library with a knowledge base creates a very scalable system that’s easy to maintain over time. This should be one of the first things you implement in ClickUp.
Related: How to Create an Internal Wiki in ClickUp
ClickUp Tip #4: Create view templates
Views are a powerful feature in ClickUp but can be hard to manage, especially for new users. One way to make it easier is by saving key views as templates.
Create a “View Templates” folder in your Process Library. Then whenever you build an important view with specific filters, fields, etc. - save it as a template into this folder.
Then if someone accidentally edits or messes up an active view, you can easily deploy the view template to revert it back to the original settings. This creates a “source file” for your views to fall back on.
Related: Everything You Need to Know About ClickUp Views
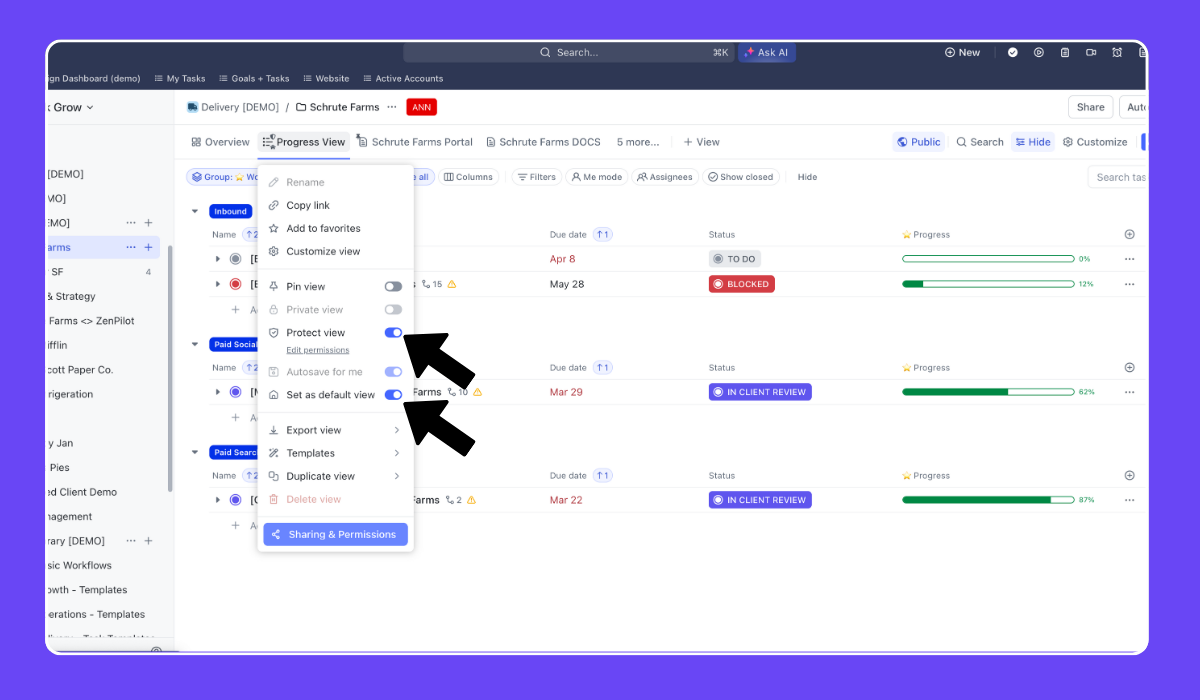
ClickUp Tip #5: Use “default for everyone” and “protect view”
In addition to saving view templates, there are a couple key settings to be aware of:
- Default for everyone: This pins a view so that all users land on that view first when navigating to a certain location, regardless of what view was last opened. Very helpful for avoiding confusion.
- Protect view: Prevents other users from being able to edit the view filters and settings. They can still change how the view looks for just themselves, but it won’t affect anyone else.
Standardizing your views through templates and these settings will make ClickUp much easier for your team to navigate and stay organized.
ClickUp Tip #6: Use folder and list templates to standardize views too
Another way to maintain consistent views across your workspace is by using folder and list templates.
Let’s say you have a standard set of lists you want available in each client folder, along with certain pre-configured views. You can build this out once in a folder, with all the lists and views, then save it as a template.
When you use that folder template in the future, all the lists and associated views will be pulled in automatically. This saves a ton of time compared to manually recreating the same structure and views over and over.
The key is putting in the work upfront to set up your ideal folder/list structure with the right views. Then save it as a template and deploy it for each new client or project. This will drive major consistency in how work is organized and visualized in ClickUp across your workspace.
Related: How to 10x Productivity With ClickUp Templates
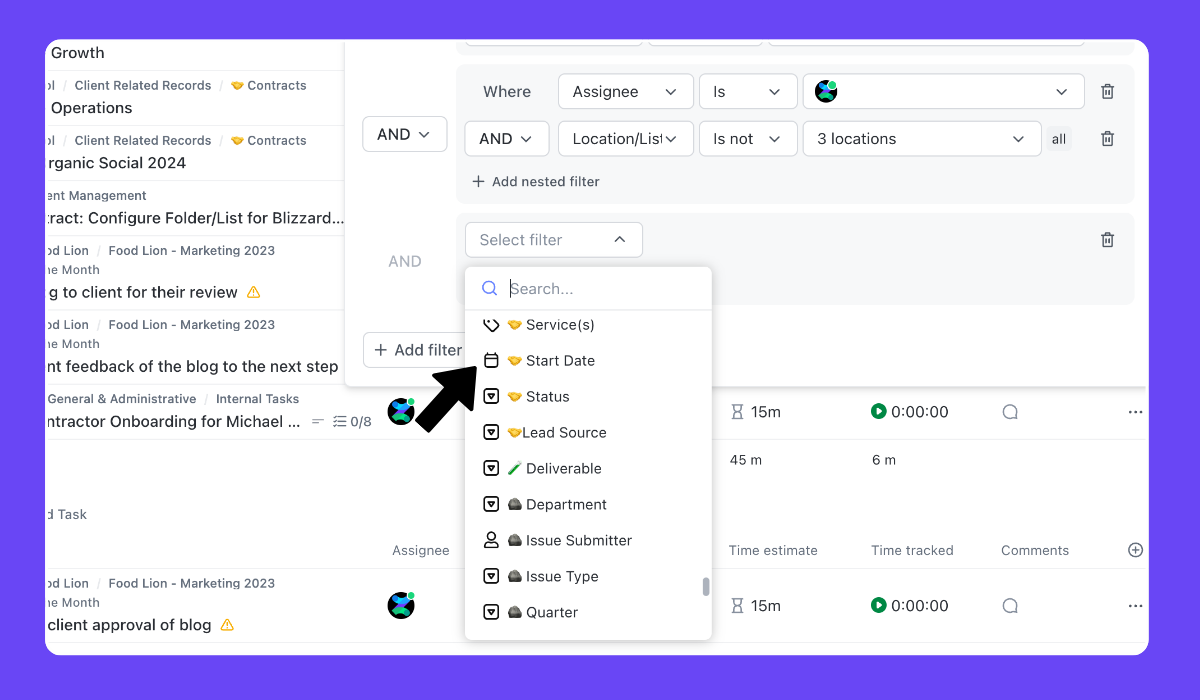
ClickUp Tip #7: Don’t add custom fields at the workspace level
Custom fields are a critical feature for almost any ClickUp use case. But one of the biggest mistakes you can make is adding custom fields at the workspace level.
It’s very tempting to do this, because you assume that if a field is important, you’ll want it everywhere. But in reality this creates major issues:
- Irrelevant fields get added to places they don’t belong. For example, you don’t want “Deal Stage” showing up on your copywriting tasks.
- Reporting becomes more difficult because of all the irrelevant and crowded field data.
Instead, you want to be very intentional about where you create custom fields. In general, I recommend adding them no higher than the space level. This allows you to have the same field in multiple spaces, but keep it out of a space that it doesn’t belong.
There are some cases where you might want a field everywhere for reporting purposes, but you can still roll up space-level fields into a dashboard or global view when needed.
The added granularity is well worth it for keeping your workspaces clean and relevant. Avoid workspace-level custom fields whenever possible.
Related: What are ClickUp Custom Fields?
ClickUp Tip #8: Use emojis on custom fields for organization
Here’s a little tip for organizing your custom fields. Use emojis!
This may seem like just fun decoration at first, but it can actually make a big difference in usability, especially as you add more and more fields over time.
Let’s say you have a set of fields used for your sales pipeline, like Deal Stage, Amount, Close Date, etc. Add the same emoji, like a money bag, to the front of each of those field names.
Then when you go to filter a view and see a huge list of fields, the emojis will group all the related ones together and make them easy to find. It provides valuable visual organization.
You can take this a step further and use different emojis for different field categories. Maybe a people emoji for all your client fields, a gear for internal operations, and so on.
This is one of my favorite little ClickUp hacks that can make a surprisingly big impact on efficiency.
ClickUp Tip #9: Automate custom field assignment on tasks
One of the keys to streamlining work in ClickUp is having the right custom fields populated on every task. But it can be difficult to make sure your team is consistent with this, especially when creating new tasks on the fly.
Luckily, ClickUp allows you to automate custom field assignment based on certain rules. Here’s an example:
Let’s say you have an “Account Manager” field that needs to be assigned to every task within a specific client folder. Instead of relying on users to do this manually, you can create an automation at the folder level that says:
“When a task is created in this folder, set the Account Manager field to John Smith.”
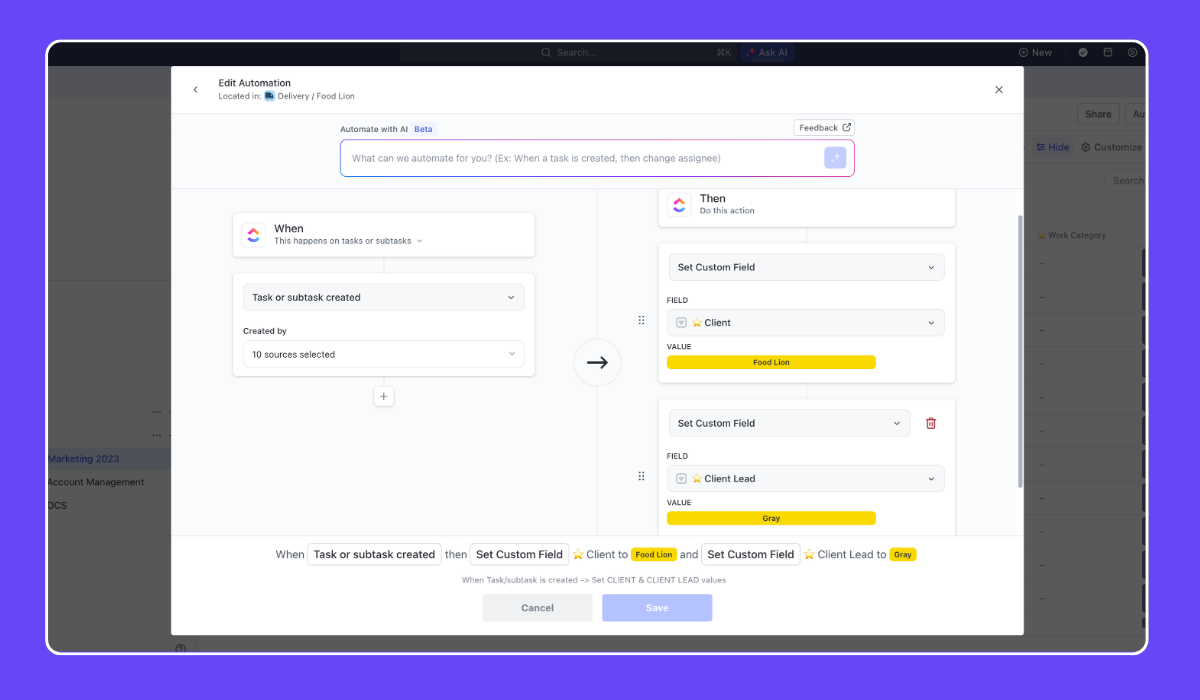
This way no matter who creates a task in that location, or how they create it, the right fields will always get populated.
Look for opportunities to automate custom fields wherever you can. It’s one of the best ways to keep your ClickUp data clean with minimal ongoing effort.
Building templates in ClickUp will be the easiest way to get most custom fields applied, but automating other fields in this way is another great way to remove the manual process.
ClickUp Tip #10: Use statuses consistently across your entire workspace
Another huge mistake I see ClickUp users make is having inconsistent task statuses across different spaces, folders and lists.
It usually happens because different departments or project managers want to use their own status options. But this creates major issues:
- Team members get confused about what different statuses mean as they work across projects
- It becomes difficult to report on work at a high level because you can’t roll up tasks by status
- Automations and workflows break down because you can’t apply consistent rules
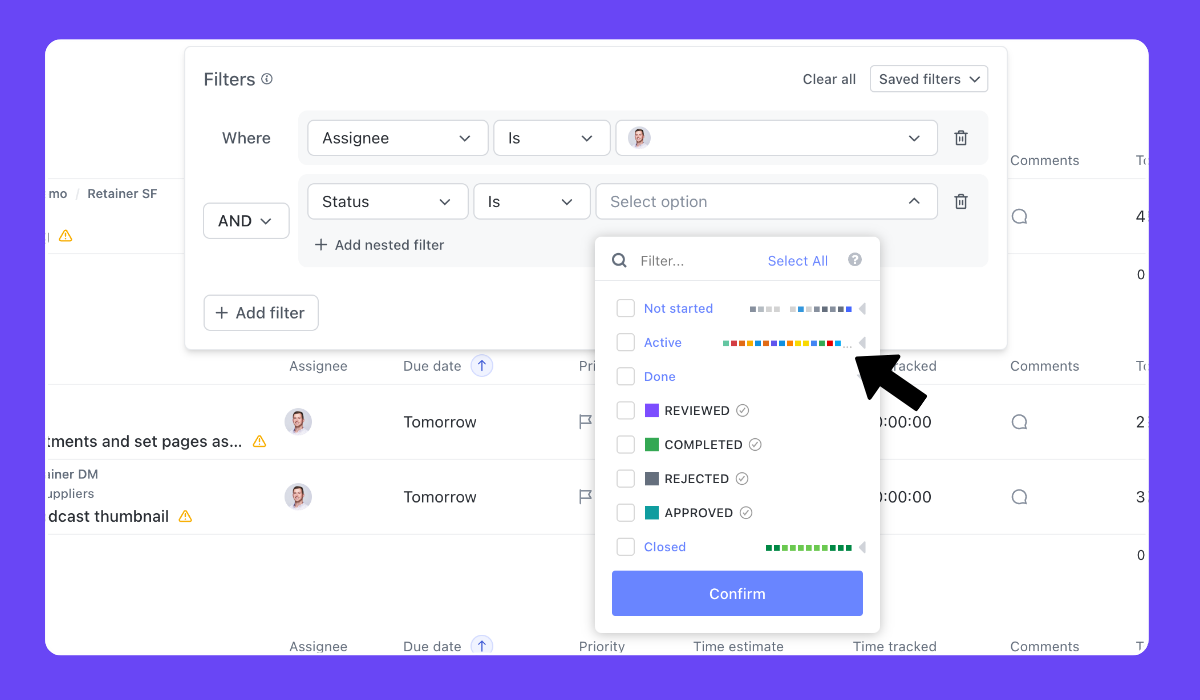
The solution is to standardize your task statuses and use them everywhere (with a few exceptions like “Open” and “Closed” on an invoicing board).
I recommend creating a single status template that defines the status options you’ll use universally, like:
- Planning
- To do
- In progress
- Blocked
- Internal review
- Client review
- Complete
Then apply that status template on every space, folder, and list. This creates a standard language for task progress that everyone understands.
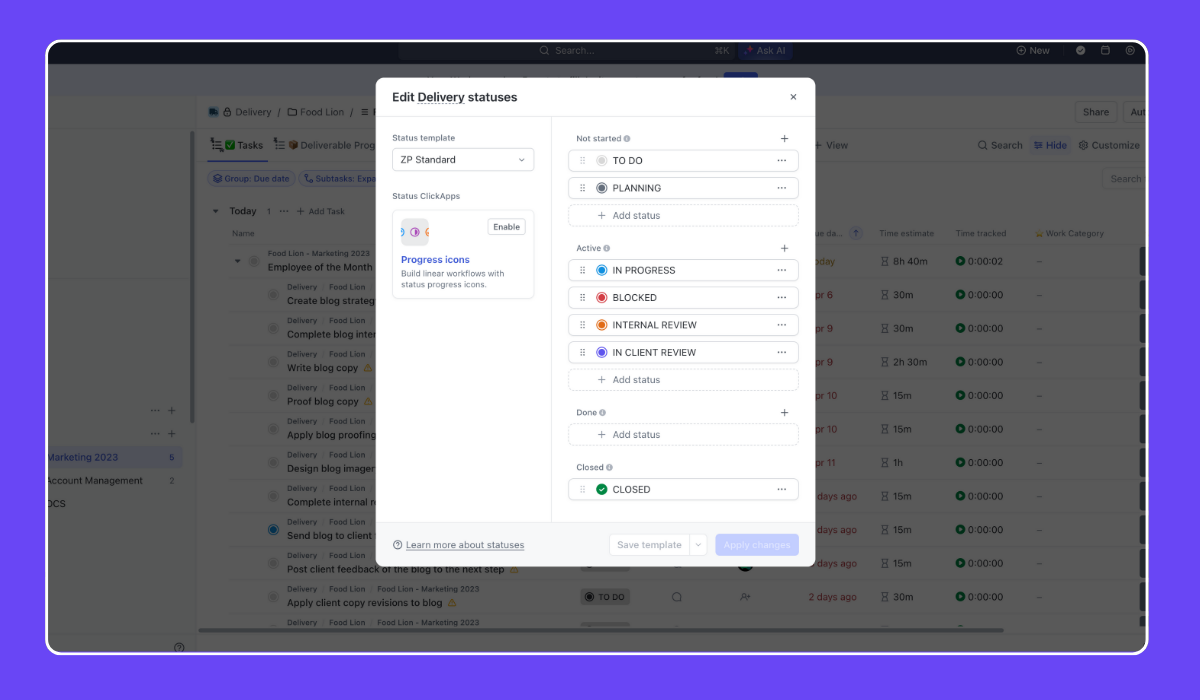
It can be tempting to customize statuses for each use case, but the small benefits aren’t worth the much larger cost in terms of visibility and automation. Standardize your statuses everywhere and your ClickUp workspace will be much more powerful.
Related: How to Set Up ClickUp for Agencies
Want help implementing these tips at your agency?
ZenPilot has helped 3,100+ clients build the ClickUp systems that run their businesses. We handle the hierarchy, templates, views, automations, and training - so your team gets it right the first time.
Book a Call →ClickUp Tip #11: Build “statuses” into your process templates
A lot of teams rely on custom task statuses to track the progress of work through a pipeline. For example you might have statuses like “In Copy”, “In Design”, “In Review” and so on.
The problem is this becomes very difficult to manage when you have lots of different pipelines. You end up with an explosion of different statuses that are hard to keep track of.
Instead, I recommend building your process statuses into subtasks within your templates. So for a content pipeline you might have top-level task called “Blog Post” with subtasks for:
- Outline
- Draft
- Edit
- Design
- Review
- Publish
Then you can just use universal statuses like “To do” and “Complete” to track progress through those standard subtasks.
This makes your templates much more descriptive and actionable. People can easily see exactly what step the work is in.
It’s also easier to manage, because you can assign due dates and people to each subtask, rather than trying to rely on an automation to change assignees and due dates based on the task status.
Essentially what you’re doing is moving from a single task with lots of status options to a more granular breakdown where the subtasks themselves represent the status of where a project actually is.
This is a much more scalable approach, especially as you’re building out lots of different process templates.
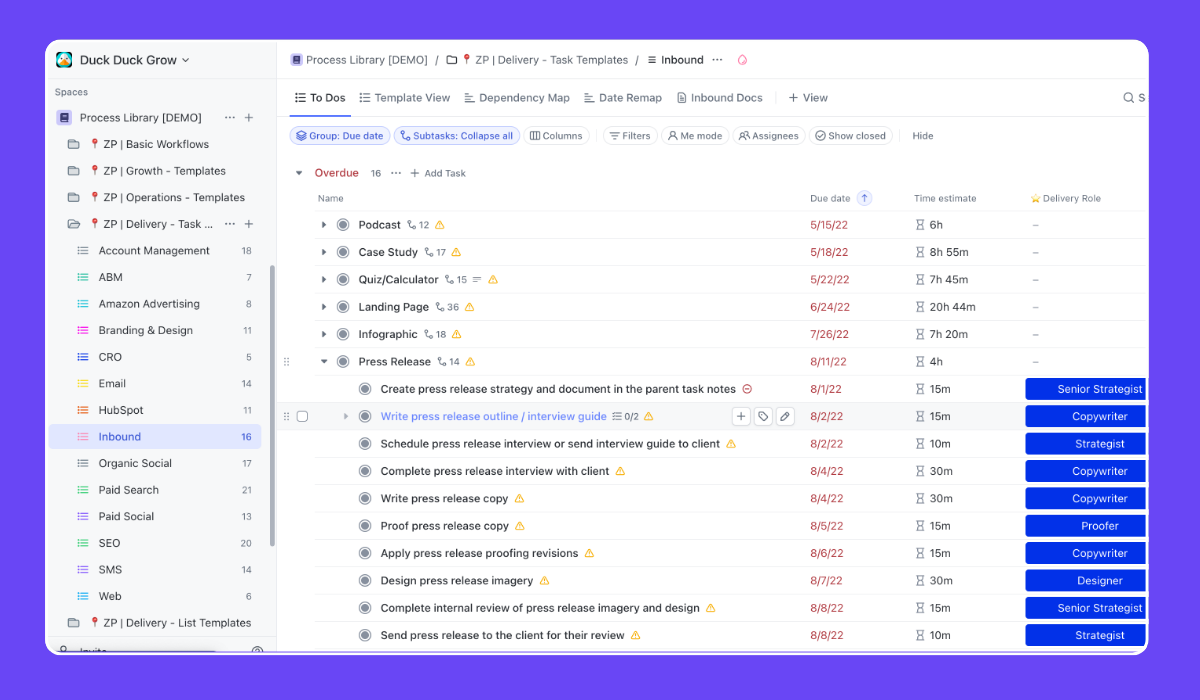
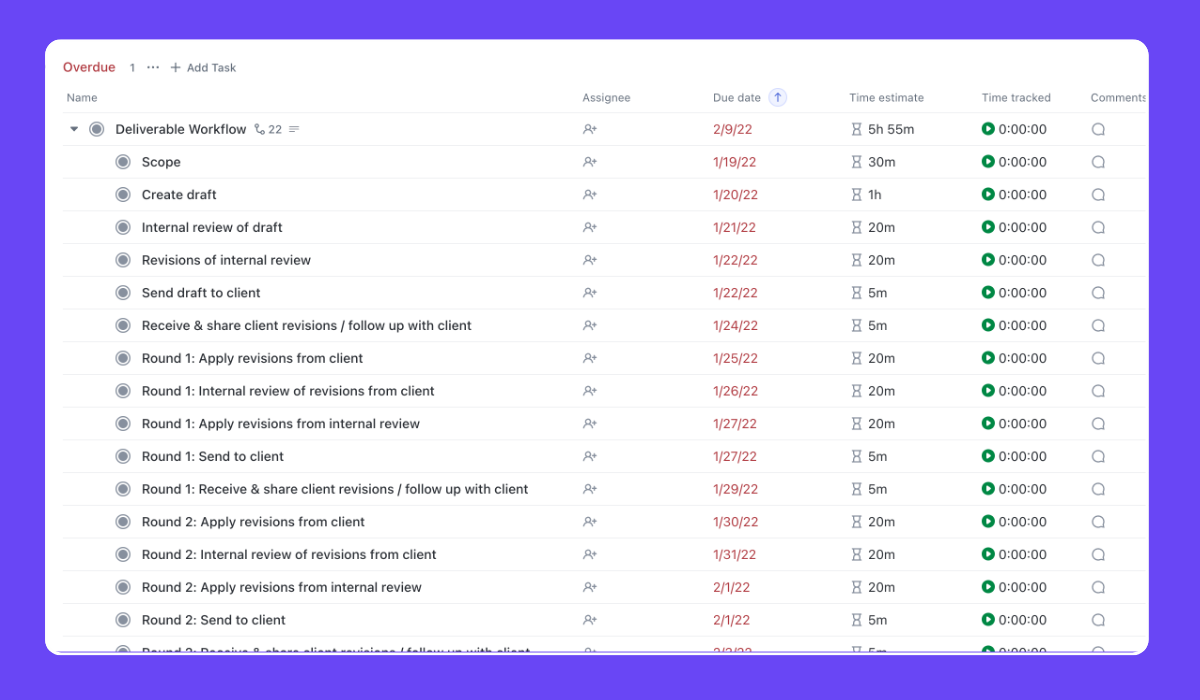
ClickUp Tip #12: Every task should be assigned with a time estimate and due date
Here’s a simple but powerful rule to implement in ClickUp: every task needs an assignee, time estimate, and due date.
If you can get your team to follow this consistently, your workspace will become infinitely more useful from a planning and forecasting perspective.
Assignees are key for accountability. If a task has more than one person attached, nobody knows who is truly responsible. But if it’s assigned to one specific person, it’s clear who owns the deliverable.
Time estimates are critical for capacity planning and forecasting. By knowing roughly how long work will take, you can stack it intelligently and avoid overloading your team. For a deeper dive, see our guide on ClickUp time tracking best practices.
Due dates are necessary for managing priorities and hitting deadlines. Without a due date, tasks tend to slip through the cracks because there’s no forcing mechanism to get them done.
In tandem, these three pieces of metadata give you superpowers when it comes to allocating resources, identifying blockers and managing up to stakeholders.

But they’re only useful if they’re applied consistently. Make them a requirement on every task and hold your team accountable. The results will speak for themselves.
Related: How to Implement ClickUp for Agencies
ClickUp Tip #13: Use dependencies to quickly remap due dates
Even with the best planning, scope changes and blockers are inevitable. And when they happen, it can be extremely tedious to go through and remap all the due dates on impacted tasks.
ClickUp has a few built-in features to make this easier. My favorite is the ability to draw dependencies between tasks in a gantt or timeline view, and then automatically remap due dates when one task shifts.
For example, let’s say you have a string of tasks to publish a blog post:
- Draft due Monday
- Edit due Tuesday
- Design due Wednesday
- Publish due Friday
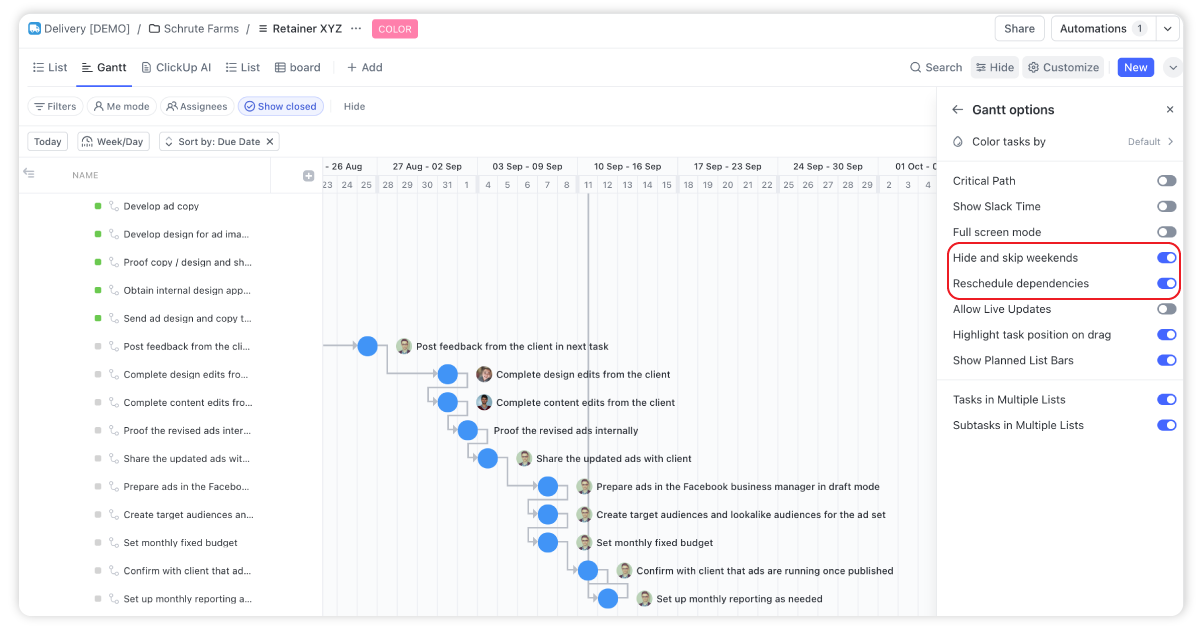
If the draft task gets behind and needs to be pushed to Wednesday, you can just drag that task to the new date, and any dependent tasks will automatically shift by the same amount. The edit will move to Thursday, design to Friday, and publish to next Monday.
This is a huge time saver compared to updating each task individually. It also ensures you don’t accidentally miss a task and end up with broken hand offs.
The key is setting up the dependencies correctly ahead of time by drawing arrows between related tasks. It takes a bit of extra effort, but the time savings down the road are well worth it.
You can also set up these dependencies at the template level, so common workflows will automatically have them applied on each use. That’s a big efficiency win as you scale.
Related: How to Best Leverage ClickUp’s Gantt Chart
ClickUp Tip #14 + #15: Use a “delivery role” custom field and the bulk action toolbar to assign tasks in bulk
When you’re building out process templates with lots of subtasks, one of the most tedious parts is assigning the right person to each step. You have to go through and manually update each subtask with the right assignee name.
But there’s a better way! Instead of hard-coding names, use a custom dropdown field called something like “Delivery Role” with options for each role on your team, like:
- Project Manager
- Strategist
- Copywriter
- Designer
Then add this field to every subtask with the appropriate role selected. When you’re ready to start the work, you can use ClickUp’s multitask editing toolbar to mass update the assignee field based on the delivery role.
So in one click, every subtask with “Copywriter” selected would get assigned to your copywriter, every “Designer” task to your designer, and so on.
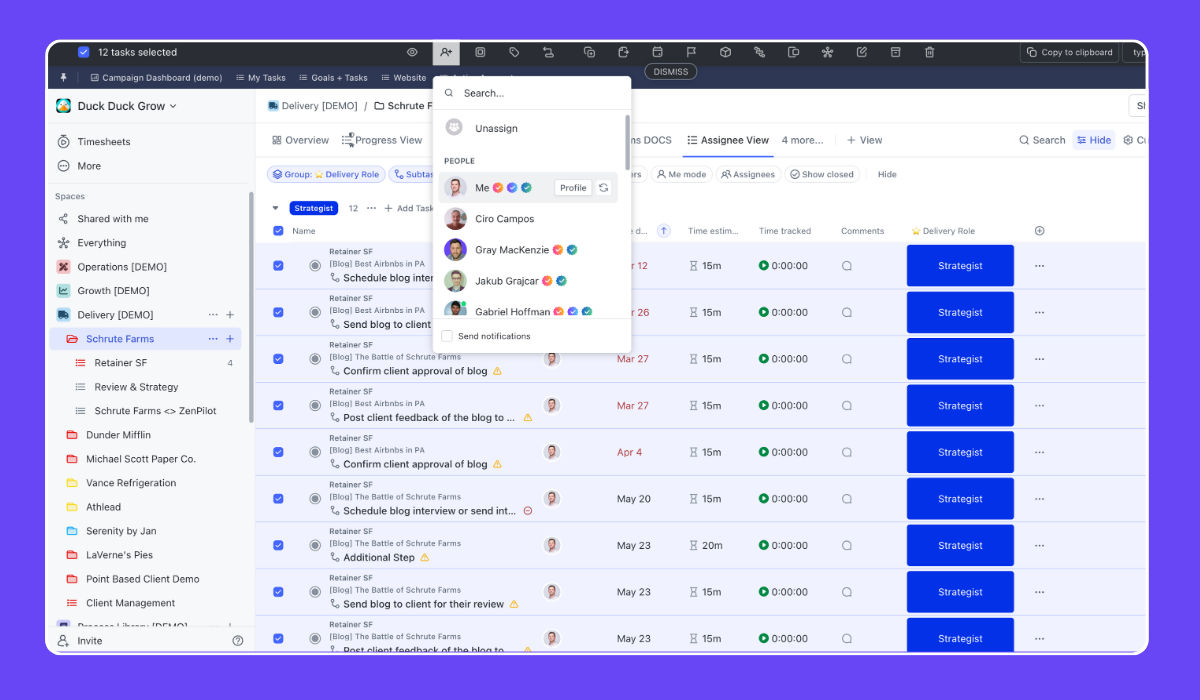
This is a huge time saver and also makes your templates more flexible as your team changes. You’re connecting the assignment to the role rather than a specific person.
It does require a bit of up-front work to define the roles and implement the field, but the efficiency gains are massive, especially as you scale to lots of templates and users. Highly recommend this approach!
Related: The Fastest Way to Create and Assign Work in ClickUp
ClickUp Tip #16: Train your team on the software AND expectations before launching
Rolling out any new tool is hard. There’s always a learning curve, and ClickUp has a particularly steep one due to all its features and customization options.
The biggest mistake I see teams make is just adding users to their new workspace and letting them loose to “figure it out.” That’s a recipe for confusion, inconsistency and lack of adoption.
Instead, you need to intentionally train your team not just on the features of ClickUp, but on your specific conventions and processes within your workspace.
I recommend creating a series of training videos walking through:
- The basic ClickUp UI and key features
- Your workspace structure and naming conventions
- How to use your core process templates
- Your standard views and what they mean
- How to manage notifications and updates
Invest the time to create these once, and then make them required watching for all new hires. This will drastically reduce ramp time and ensure everyone is following the same playbook.
You can even set up a basic certification quiz in ClickUp to confirm people have gone through the training and understand the key concepts.
The other key is holding live Q&A sessions to reinforce the training and give people a chance to ask questions. Build this into your launch plan and ongoing operations.
A little bit of training goes a long way in driving ClickUp adoption and consistency. Don’t let your team loose without it!
Related: How to Train Your Team on SOPs
ClickUp Tip #17: Favorite views for easy navigation
One of my favorite features in ClickUp is the ability to favorite views, documents, or any other item within the platform.
By favoriting frequently used items, you can access them quickly from the top of your screen, saving you time and effort. To favorite an item, simply click on the star icon next to it. You can also rename your favorites to make them more descriptive and easier to identify.
Additionally, ClickUp offers flexibility in how you display your favorites. You can choose to pin them to the top of the screen, ensuring they’re always visible and easily accessible.

Alternatively, you can keep your favorites in the sidebar menu, which can be collapsed or expanded as needed. This customization allows you to tailor your ClickUp experience to your preferences and work style.
ClickUp Tip #18: Use slash commands
Slash commands are a game-changer when it comes to creating and formatting content in ClickUp. By simply hitting the slash key on your keyboard, you’ll see a list of all available commands.
These commands allow you to perform various actions without ever having to take your hands off the keyboard or rely on your mouse.
With slash commands, you can create tasks, assign them to team members, set due dates, and add tags or priorities.
You can also format your content by adding headings, lists, tables, and more. As you become more familiar with the slash commands, you’ll find yourself memorizing the ones you use most frequently, allowing you to work faster and more efficiently.
ClickUp Tip #19: Use hot keys
Looking for more ways to speed up your workflow? Check out our complete guide to ClickUp AI for how Brain and Super Agents can automate repetitive work alongside these keyboard shortcuts.
In addition to slash commands, ClickUp offers a set of hotkeys that enable you to navigate the platform using your keyboard.
Hotkeys can be a real time-saver once you get the hang of them. To enable or disable hotkeys, simply go to your personal settings within ClickUp.
Some of my favorite hotkeys include “T” for creating a new task, “S” for opening the search bar, “M” for assigning a task to yourself, and “N” for opening your inbox.

By using these hotkeys, you can quickly jump between different areas of ClickUp without having to click through multiple menus.
It’s important to note that hotkeys may not be for everyone. Some users might find them confusing or disruptive, especially if they accidentally trigger a hotkey. Experiment with hotkeys to see if they work well with your workflow, and don’t hesitate to disable them if they don’t suit your style.
ClickUp Tip #20: Upload multiple tasks to ClickUp with “multiple lines detected”
And lastly, creating tasks in ClickUp is a breeze, but did you know that you can create multiple tasks at once? For even more ways to speed up task creation, read our guide on how to create tasks faster in ClickUp.
This feature is particularly useful when you’re building out processes, workflows, or subtasks.
By copying and pasting a list from a spreadsheet or document into the task creation field, ClickUp will detect multiple lines and allow you to create separate tasks for each line.
This feature saves you the time and effort of manually creating each task individually. You can also copy task names to the clipboard and paste them into ClickUp to create multiple tasks simultaneously. This is a great way to quickly populate your projects with tasks and ensure nothing falls through the cracks.
ClickUp Tip #20: Keep learning - explore ClickUp 4.0 features
ClickUp is constantly shipping new features, and ClickUp 4.0 brought a major UI overhaul along with new capabilities. Stay current by following the ClickUp Weekly show where we break down new features, best practices, and real implementation examples every week.
The teams that get the most out of ClickUp are the ones that treat it as an evolving system - not a “set it and forget it” tool. Build the foundation right, then keep optimizing.
Putting It All Together
The key theme across all 20 tips is being intentional. ClickUp is an incredibly powerful tool, but it takes up-front investment to get it working smoothly for your team.
Don’t just dive in without a plan. Take the time to think through your hierarchy, create solid templates, set up your views, and train your team on best practices.
If you can implement even a few of these tips, you’ll see a real boost in efficiency and clarity from ClickUp. And if you want the whole thing done right the first time, book a call with ZenPilot - we’ve helped 3,100+ clients build the systems that run their businesses.