Artificial intelligence (AI) has paved the way for efficient, streamlined operations in businesses across a multitude of industries.
For marketing professionals tasked with the monumental responsibility of documenting and replicating processes, AI has proven to be a game changer.
In this guide, I will demonstrate how to best leverage AI to build and effectively transfer your processes into ClickUp.
This will not only help you in delegating work to your team but also ensure that your team follows best practices, delivering consistent and excellent results to your clients.
The Importance of Process Documentation
Before we dive into the specifics of how to use AI to document your processes, let's first discuss the importance of process documentation.
Imagine this scenario: you're designing a website, running an SEO audit, or launching a PPC campaign. It's a task you've done multiple times, so you know the steps like the back of your hand. However, what happens when you need to delegate this task to someone else, particularly someone new to the role?
Process documentation ensures that even when tasks are delegated, they are completed accurately and according to best practices.
Any business looking to scale needs to spend time documenting and leveraging their processes. Without them, you'll be in a state of chaos.
Here's my biggest piece of advice 👉 Next time you do something, record yourself doing it.
By recording yourself performing the task and providing instructions, you're creating a valuable resource.
This resource can then be assigned to a task in your project management tool, providing your team members with clear, step-by-step instructions on how to complete it.
How to Start Building Processes (and Leverage AI)
1) Prioritize Your Processes
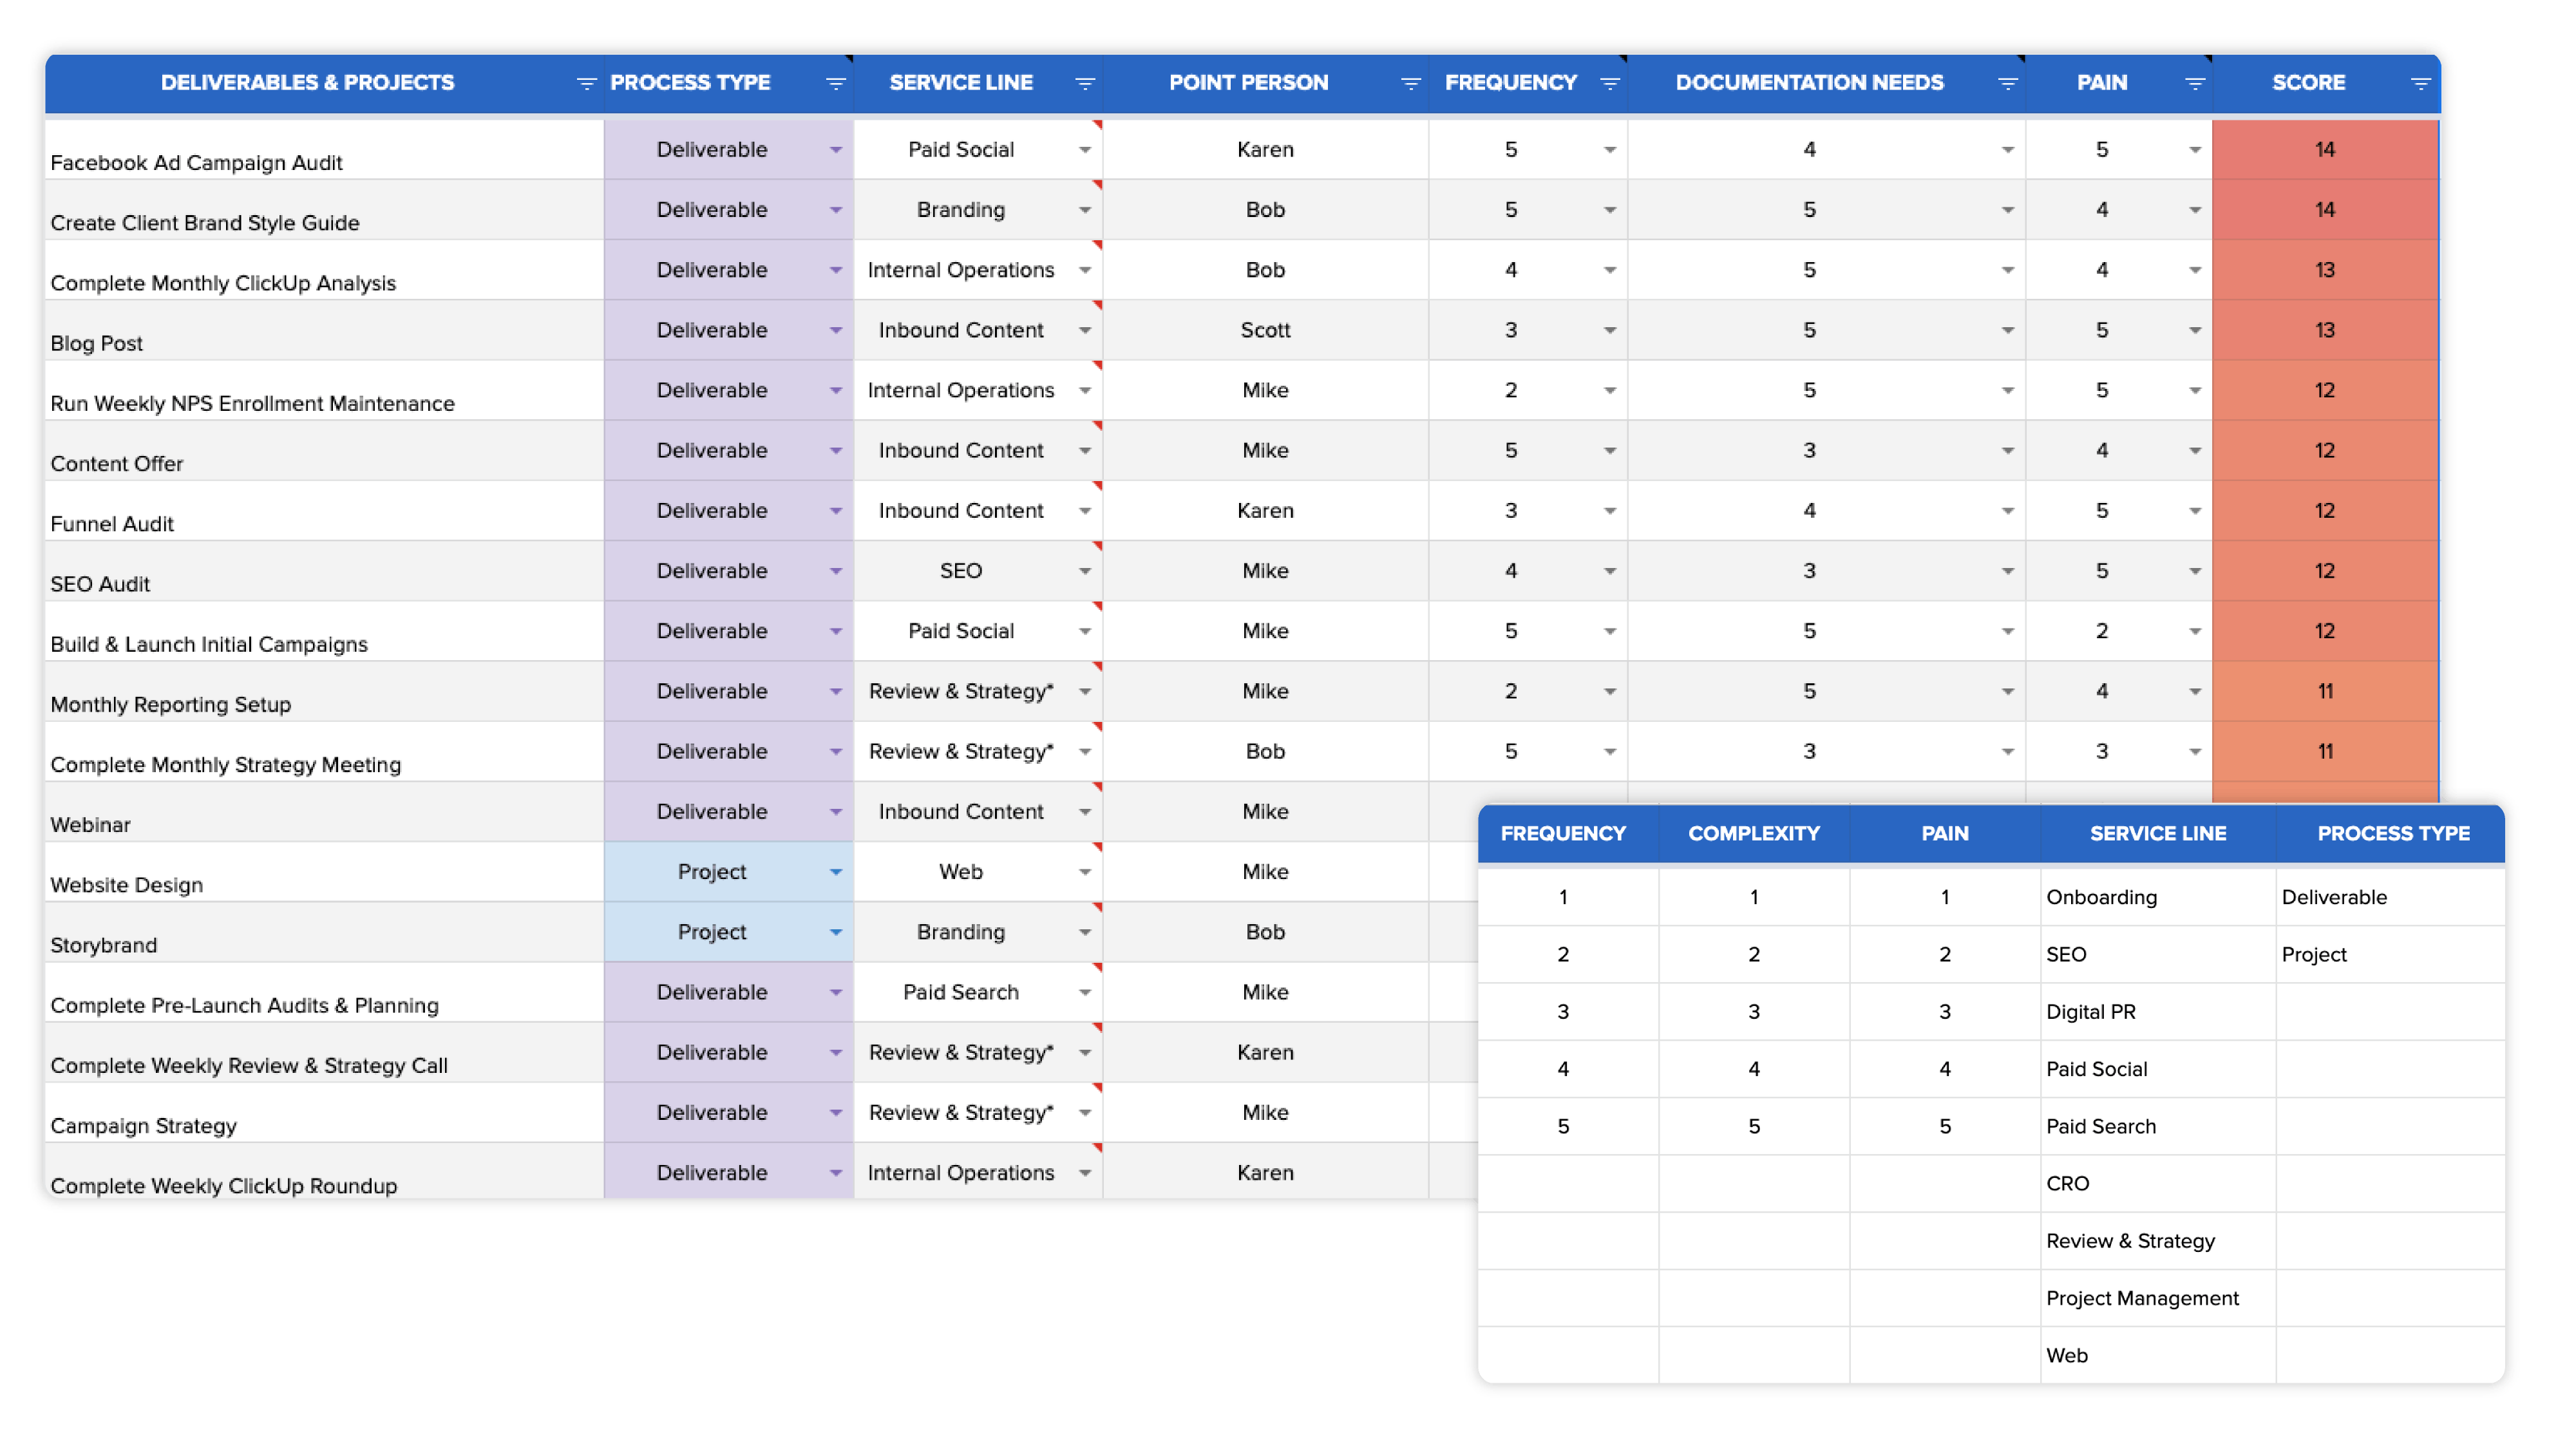
Before you begin building out any processes, you'll want to make sure you start with some prioritization. You can't build everything at once, so focus on what's most important.
Free Agency Resource
Get the exact Process Prioritization Framework we've used to help 2,700+ agencies prioritize and organize their processes.
2) Create a Copy of the AI-Powered Process Builder
To begin leveraging AI in your process building, you'll want to first get your copy of the AI-Powered Process Builder.
Once you grab your copy of the sheet, you'll receive a few initial set-up instructions to get your AI-Powered Spreadsheet connected to your ChatGPT account.

AI-Powered Process Builder
Save HOURS if not DAYS (maybe MONTHS) in process building with the AI-Powered Process Builder.
3) Start Building Your Highest Priority Process
Determine which process you want and need to build out first.
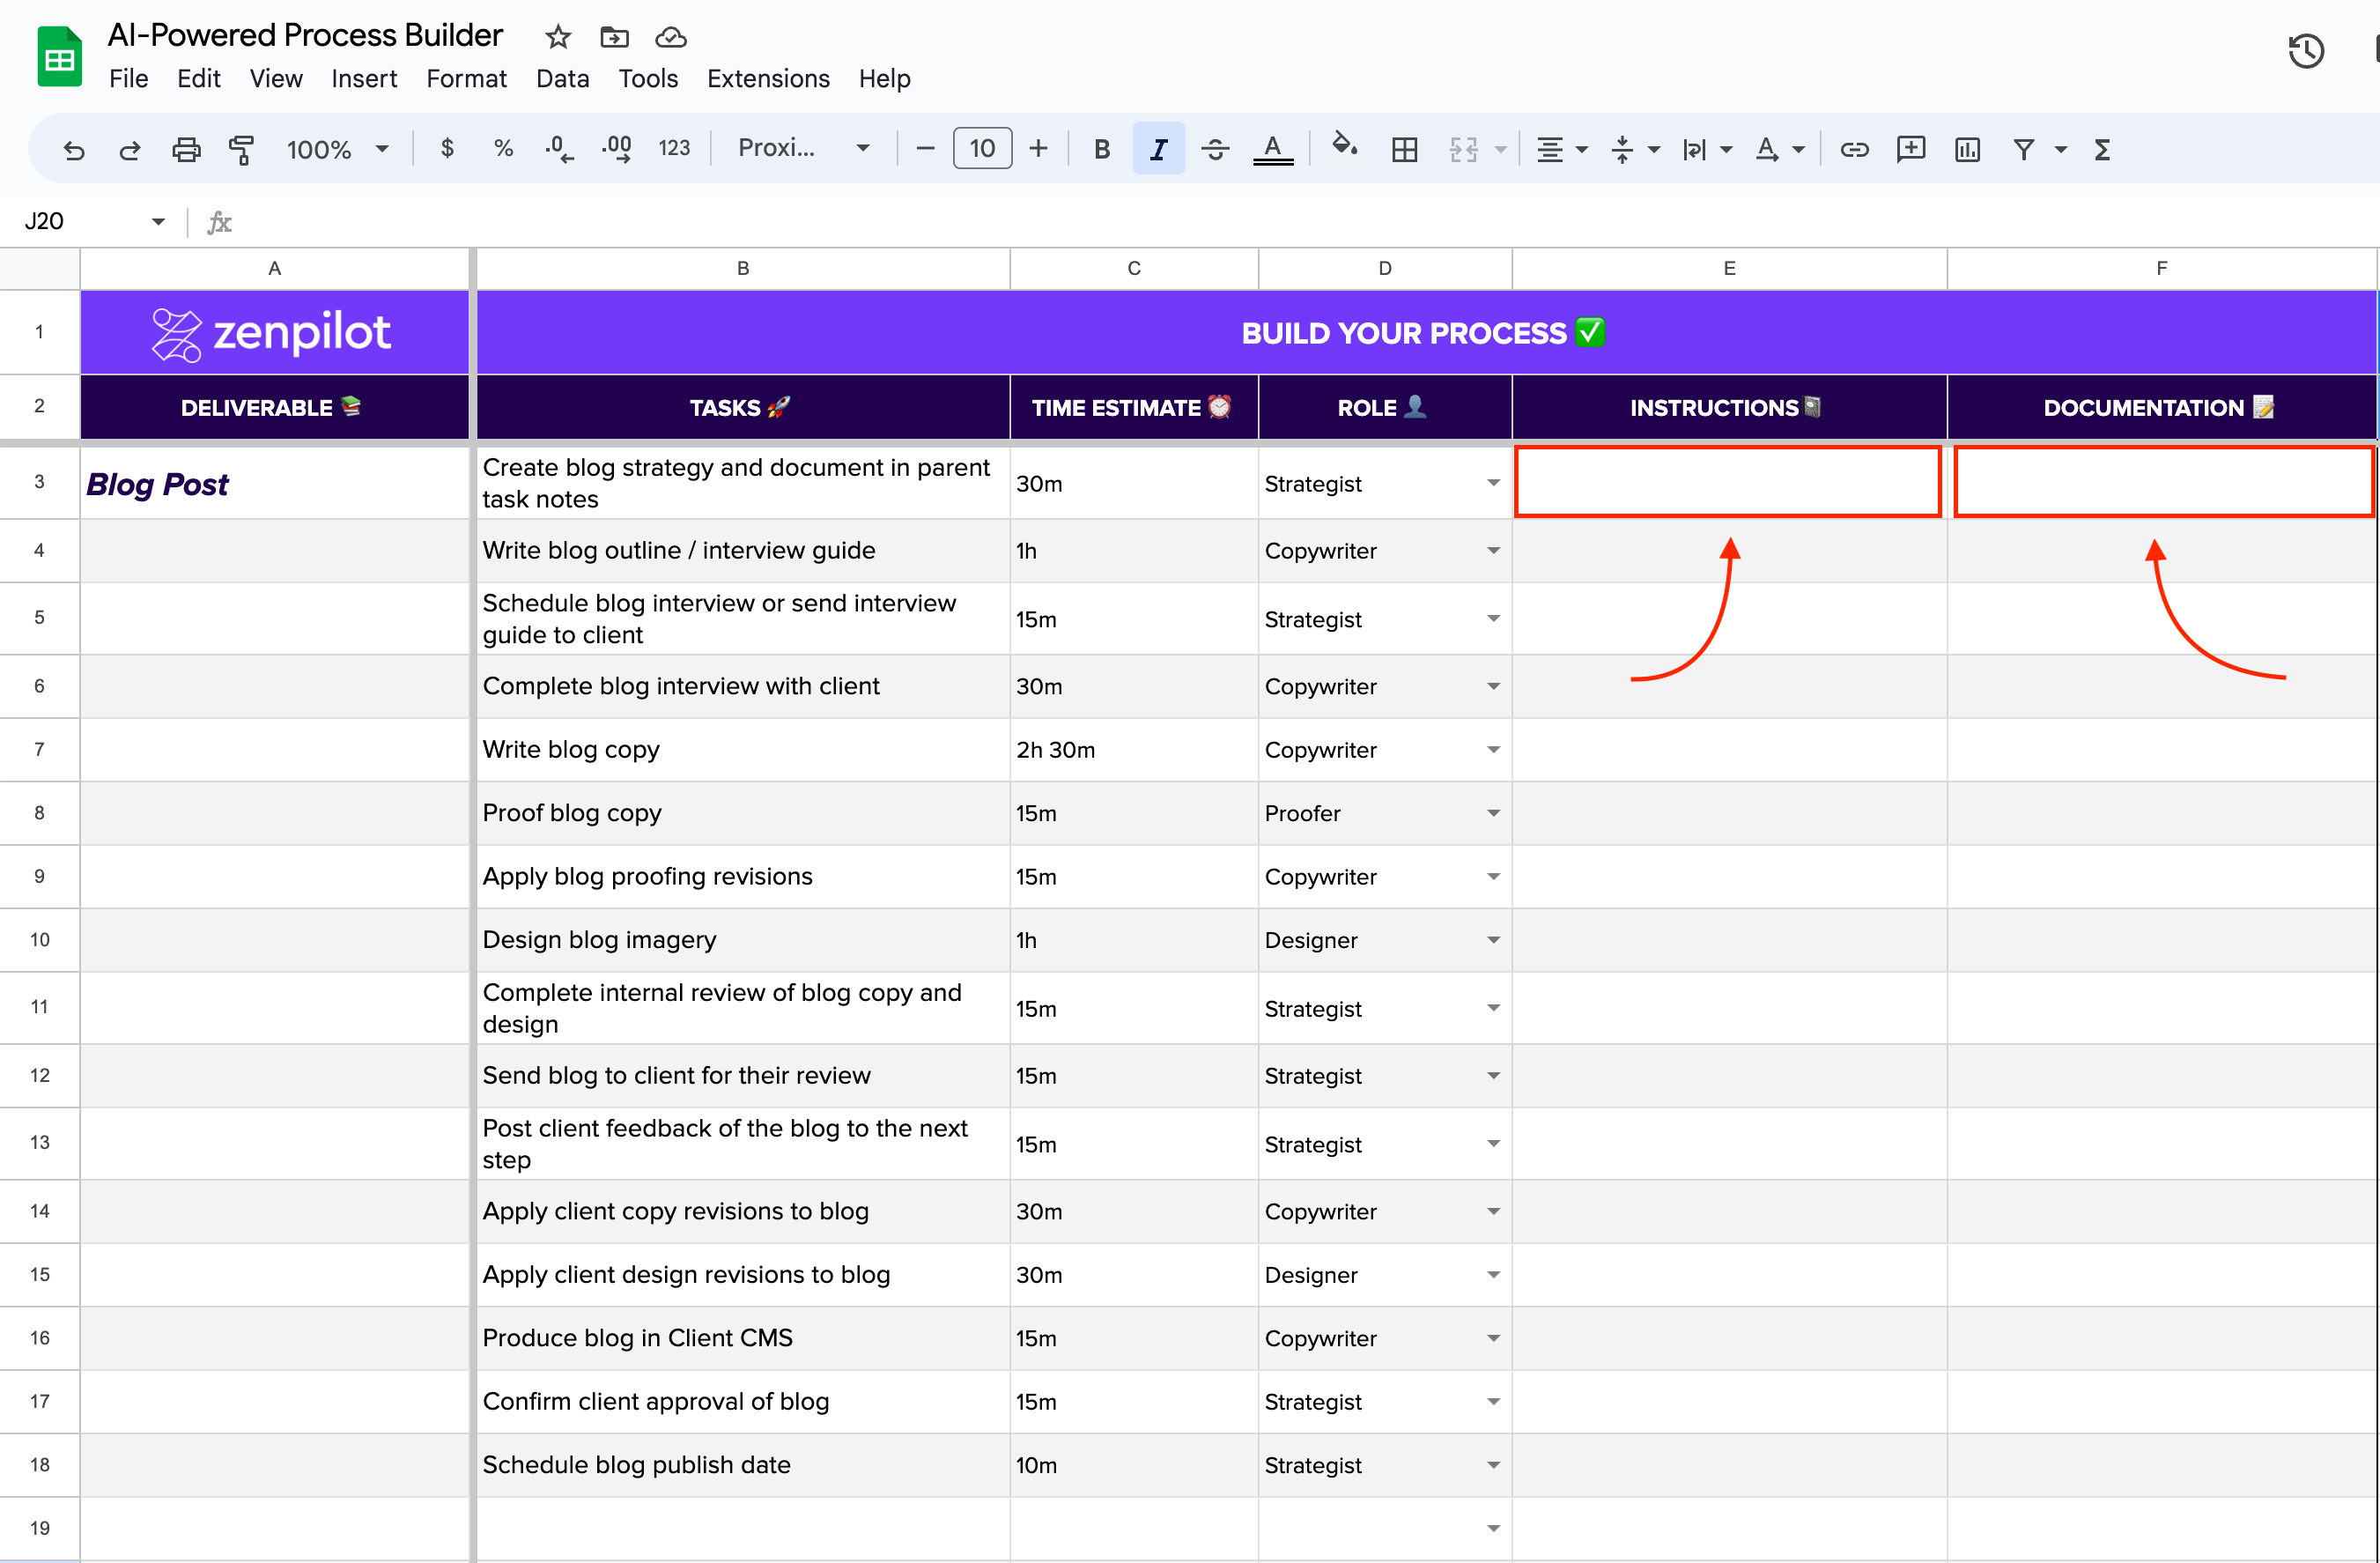
Through this example, I'll be building out the process for a Blog Post.
To ensure you get the most out of the process builder, I highly recommend watching this informative video from start to finish before diving too deep into building your first workflow.
Step 1: Paste the name of your deliverable or project into Column A, underneath "Deliverable 📚".
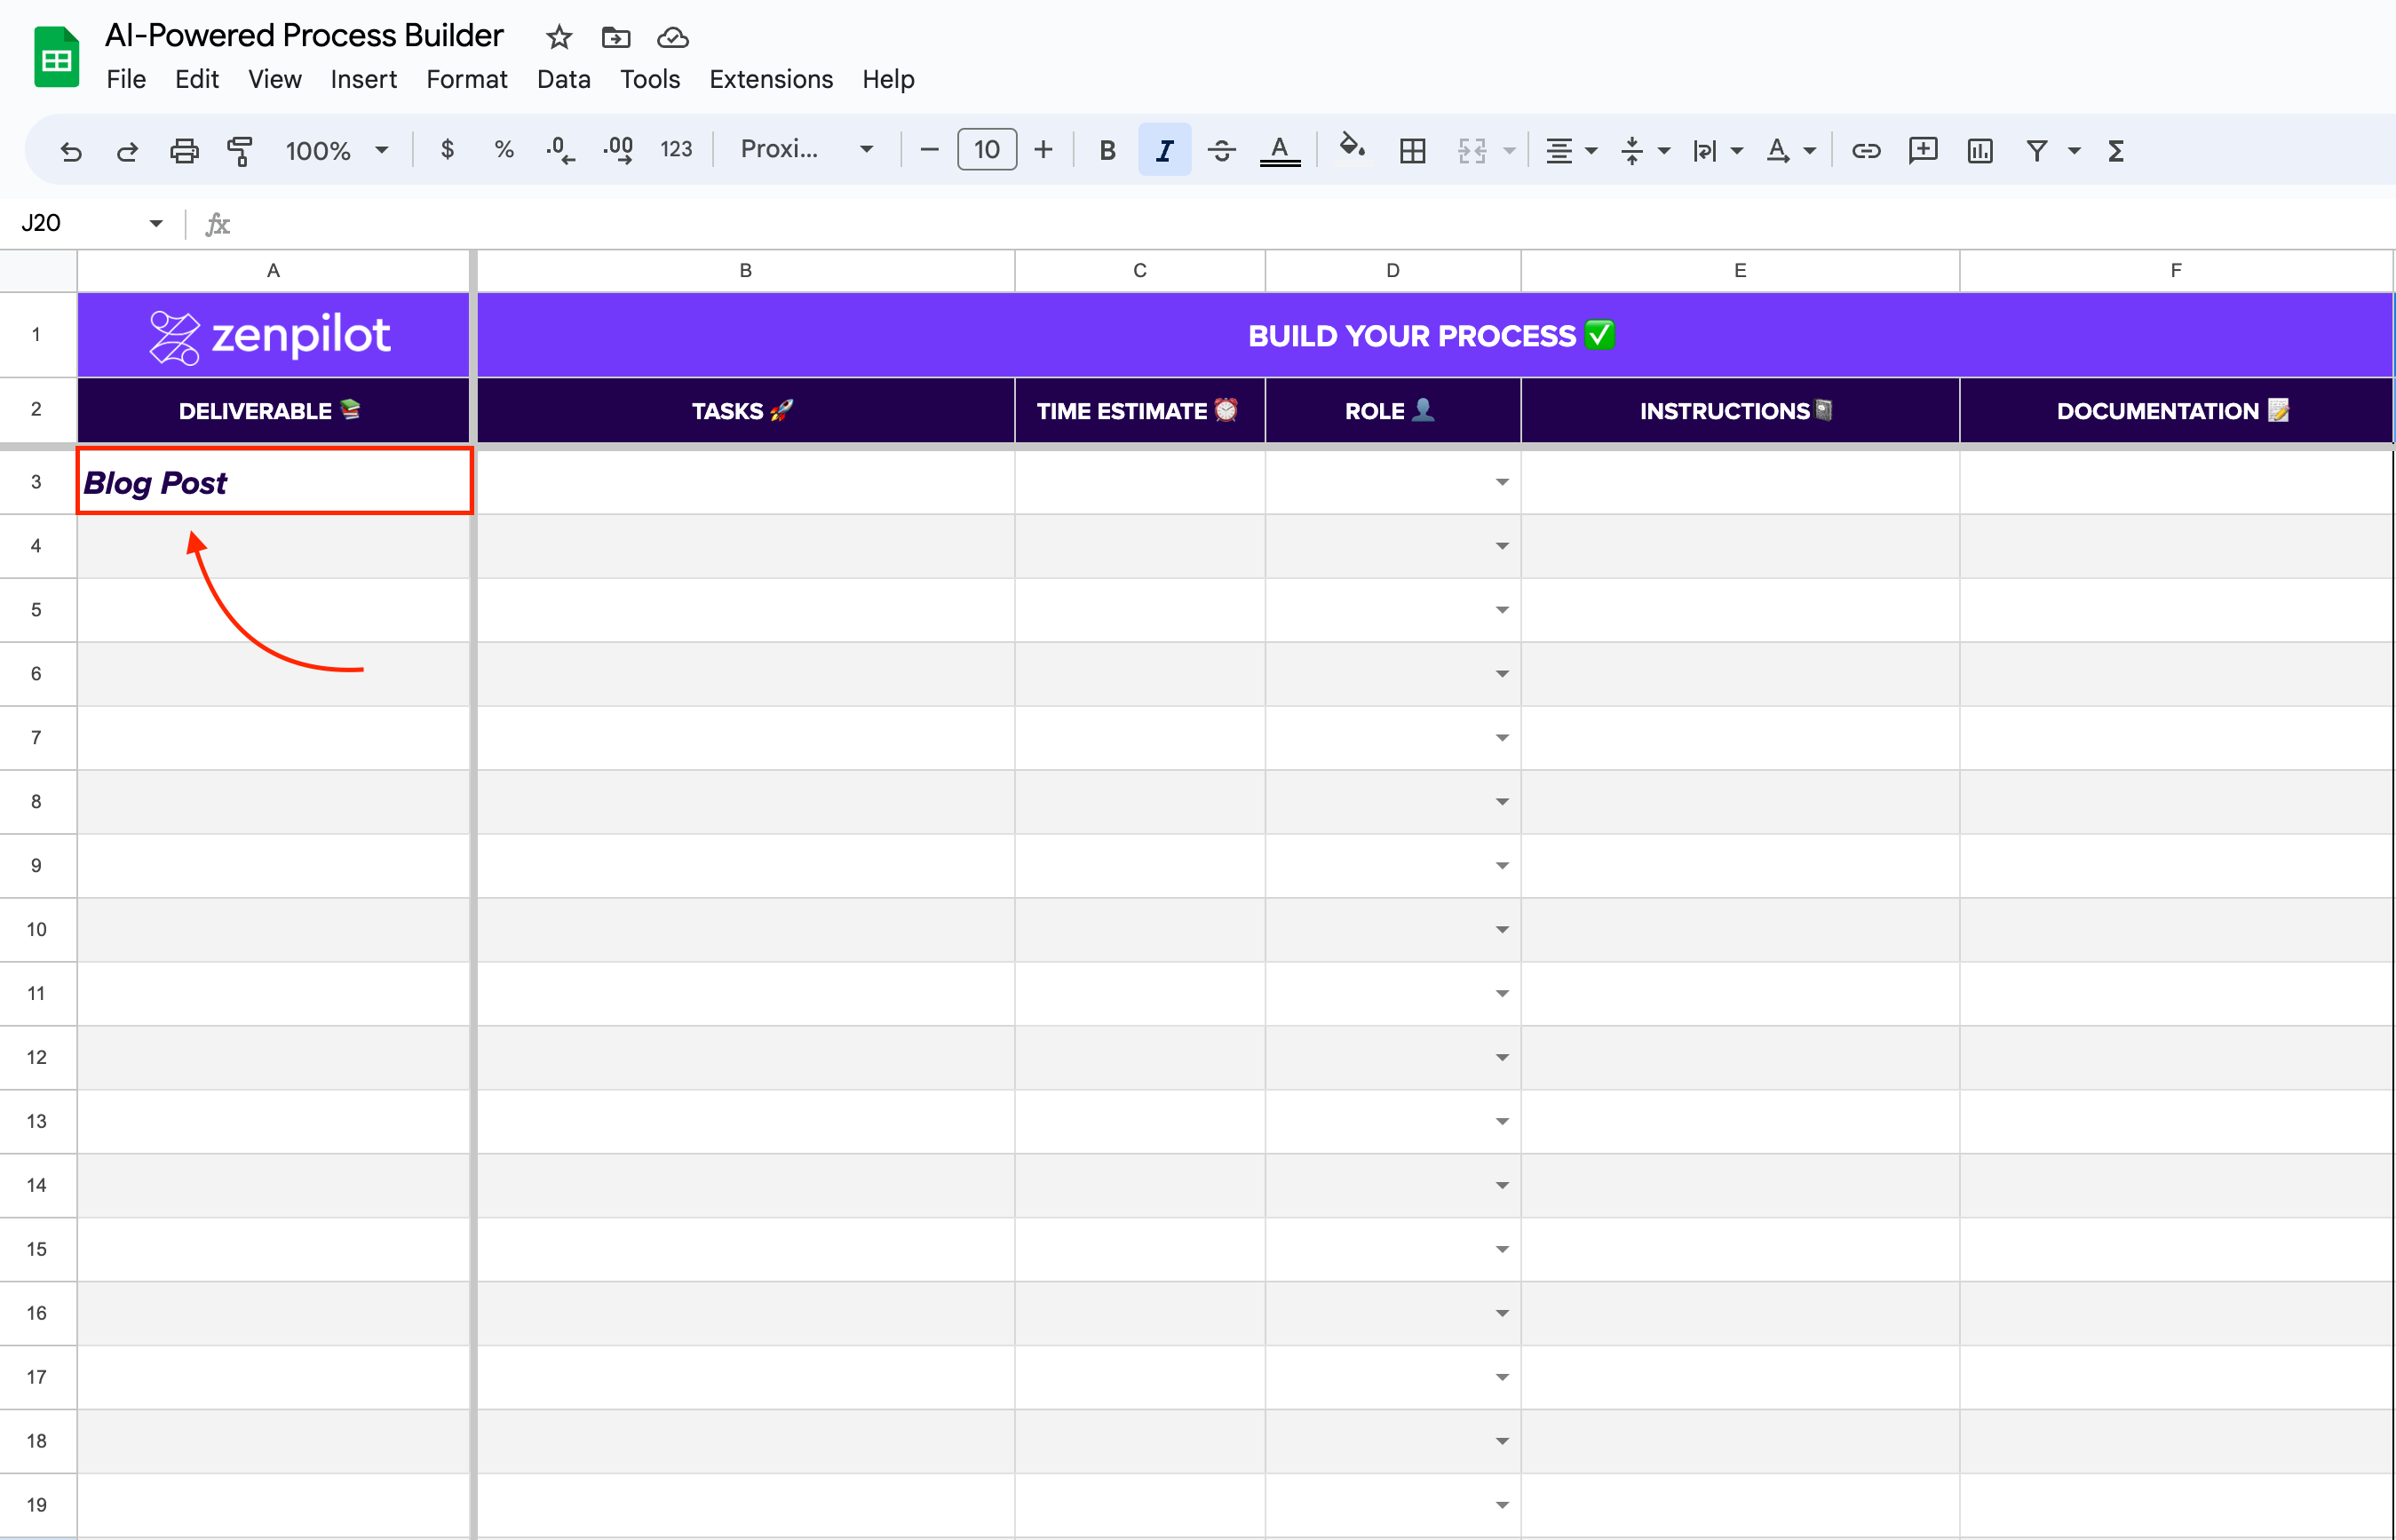
Step 2: Think about what steps are needed to complete this deliverable or project. These can be added to Column B, underneath "Tasks 🚀 ". Here's an example of what these steps could look like:
-
Blog Post
-
Develop blog strategy and document it
-
Write the first draft of the blog post and send to proofer
-
Review the blog post and provide feedback
-
Make edits of blog post and send to client for review
-
Receive feedback and make adjustments
-
Send the blog to client for review
-
Receive client feedback and make any necessary changes
-
Design blog imagery
-
Upload asset to website and launch! 🚀
-
💡 Pro Tip ➝ Each of these steps should be able to be completed by ONE person in ONE sitting. This will ensure that nothing slips through the cracks and will provide needed visibility in the future.
Step 3: If you have no idea where to start, leverage the AI-Powered Process Builder to help. 😄
-
Scroll over to the "Need Some Help🙋♂️" section.
-
Determine the # of steps you think makes sense to complete your deliverable or project. You'll adjust this number in Column G.
-
Select "Yes" in Column H underneath, "Generate Tasks🚦"
-
Tasks will start to generate for you in Column O.
-
If you don't like the output, you can go back to Column H, change your "Yes" to "No" and then back to "Yes"
-
If you like your output, copy these tasks and paste them into column B.
💡 Pro Tip ➝ Don't use the AI-generated content as your final product. Use it as a starting point. Adjust the text and steps to make more sense for your unique requirements.

Step 4: Add time estimates to every task in your workflow.
Step 5: Customize your "Roles 👤" and assign a "Role 👤" to every task (this will become an assignee in the future).
-
Your "Roles 👤" can be adjusted in the "Settings ⚙️" tab.
-
Think about what role/seat (ex. proofer, designer, copywriter, strategist, etc.) would complete that specific task and assign them to the task.

💡 Pro Tip ➝ Roles should NOT just be job titles. Someone may sit in multiple roles. (i.e. Proofer is a typical role that is not tied to one person. It's simply the hat that someone is wearing as they complete a specific task.)
4) Add Detail (SOPs, Checklists, Instructions, Templates, etc.) to Your Tasks
Now that you've created your workflow, it's time to add additional details to each step.
You may be seasoned professional who has completed this task over and over again, but think about what instructions you could provide a brand new employee to this task to complete it with your best practices in mind.
Step 1: If you have already created instructions and/or documentation for a task, you can paste that into column E or F. If not, let's leverage AI to help us out.
Step 2: Determine the task you need instructions for and scroll over to that task.
Step 3: Now, start building some documentation with the AI-Powered Process Builder.
-
Scroll over to Column J, "Instructions Type 📚", and select your desired output. You can choose either:
-
Step-by-Step Instructions
-
a Standard Operating Procedure Document
-
A Checklist
-
-
Select "Yes" in Column K underneath, "Generate Tasks🚦".
-
Task instructions will start to generate for you in Column P, underneath "Task Instructions 🤖".
-
If you don't like the output, you can go back to Column K, change your "Yes" to "No" and then back to "Yes".
-
If you like your output, copy these tasks and paste them into column E, underneath "Instructions 📓".

Step 4: Find relevant resources from the internet to provide additional instructions for new users.
-
Scroll over to Column M, "Generate Resources🚦", and select "Yes"
-
Task resources will start to generate for you in Column Q.
-
If you don't like the output, you can go back to Column M, change your "Yes" to "No" and then back to "Yes".
-
If you like your output, copy these tasks and paste them into column F, underneath "Documentation 📝".
Step 5: Adjust instructions, add resources and customize your instructions.
💡 Pro Tip ➝ As mentioned earlier, don't use the AI-generated content as your final product. Use it as a starting point. Adjust the text, add your "secret sauce" and make it fit your unique process.
Related: The Ultimate Guide to SOPs: Turn Your Business Into a Process-Driven Machine
5) Move Your New Process Into Your Project Management Platform
Once you've compiled all the tasks, time estimates, roles, instructions, and documentation, it's time to move all this information to your project management platform.
For this example, I'm going to be moving my "Blog Post" process into ClickUp.
Step 1: Build a Process Library in ClickUp. This will be a place to store all of your process templates for easy creation, management and optimization.
💡 Pro Tip ➝ If you have not completed this step, I recommend you download and read our ClickUp for Agencies guide. You'll find detailed instructions on constructing this, beginning on page 25.
BONUS
Download the Complete ClickUp for Agencies Guide FREE
The 47-page guide includes graphics, checklists, and links to how-to videos so you can actionize your ClickUp plan.


Step 2: Copy the name of your process (ex. Blog Post), into your Process Library as a parent task.
Step 3: Copy your tasks into ClickUp.
-
Highlight all tasks from column B and copy them into your clipboard
-
Move to ClickUp, click on your newly created task and paste all of these tasks as subtasks underneath the parent. ClickUp will recognize these as separate tasks so select "Yes" when it asks if you want them to be created as separate tasks.

Step 4: Add in all of your time estimates.
Step 5: Add in all of your roles.
-
Create a Dropdown Custom Field called "Role" (it's labeled "⭐️ Delivery Role" in the example below) and populate it with the options you created in the "Settings ⚙️" tab.
-
Assign a role on every task except the parent task (this is not an actionable task and therefore does not need to be assigned).
💡 Pro Tip ➝ Take advantage of ClickUp's multi-select toolbar. You can select multiple tasks and adjust your "Role" custom field.

Step 6: Add Due Dates to all of your tasks.
💡 Pro Tip ➝ Due Dates in your process templates are just a date map. We only care about the distance between the dates. These can be remapped in the future.
Step 7: Add in Dependencies to help remap due dates in the future.
Step 8: Add your instructions and additional resources to the task descriptions and create checklists in all of your subtasks.


Congrats! You Just Built an Amazing Process, But This is Just the Beginning
The AI-Powered Process Builder can save HOURS if not DAYS (maybe MONTHS) in process building. AI is extremely powerful and if you haven't started leveraging the technology, I hope this was a great first step! 😎
However, process building isn't a one day exercise that you do once and never come back to it. It's an ongoing journey. Here's a challenge for you:
Spend an hour or more each week and begin documenting, refining and working on your processes.
-
Record a few instructional videos
-
Write a few SOPs
-
Build a workflow in the process builder
-
Leverage the process in your project management platform
As you continue to refine and document your processes, you'll witness the immense impact it has on delivering consistent and exceptional results to your customers.
This is a crucial component of the flywheel that propels your business towards growth and success. 🚀
Next Step ➝ Streamline Your Operations
If you have not yet fully streamlined your operations, you need to talk with my team.
Thousands of agencies have hired us to:
-
Design their entire agency operating system
-
Build SOP's as easy-to-deploy ClickUp templates for all of their core business processes
-
Train their entire team and build healthy habits that deliver consistently great client results
-
Create incredible efficiency by implementing world-class tooling and workflow automation.
-
Give them a single source of truth with all the metrics to operate better businesses.
We've helped agency owners increase efficiency by 400%, increase utilization by over 25% and significantly improve client health.
Taking your operations seriously will change your life.
If you're ready to experience the power of world-class operations, schedule your free ops strategy call here.
On that call, we'll review your goals and current situation - then design the playbook to help you build a truly gold-standard operation.
Cancel chaos.
Create clarity.
You can build a happier, more productive, more profitable team with ClickUp. We'll show you how.