How to Use ClickUp: The Ultimate Guide

This is a 13-step guide to using ClickUp - from creating your workspace and choosing a pricing plan through hierarchy design, custom fields, templates, dashboards, and team training. It comes from ZenPilot, ClickUp’s highest-rated Solutions Partner, which has led 3,100+ implementations for agencies and professional services teams.
ClickUp has emerged as one of the market’s most popular project management systems. The platform offers flexible pricing, extensive features, significant customization options, and the ability to consolidate multiple applications into one solution. However, new users often find ClickUp overwhelming due to its blank canvas approach and numerous configuration possibilities.
To truly “save one day per week” and achieve the visibility you sought when implementing ClickUp, proper setup is essential. ZenPilot, ClickUp’s highest-rated Solutions Partner, has assisted over 3,100 clients with implementations and compiled this comprehensive setup guide.
Step 1: Creating a ClickUp Workspace
Getting started with ClickUp is straightforward. Visit their website and select “Get Started. It’s FREE” or “Sign Up.” The platform offers a Free Forever plan that you can use indefinitely, though upgrading is recommended for most teams.
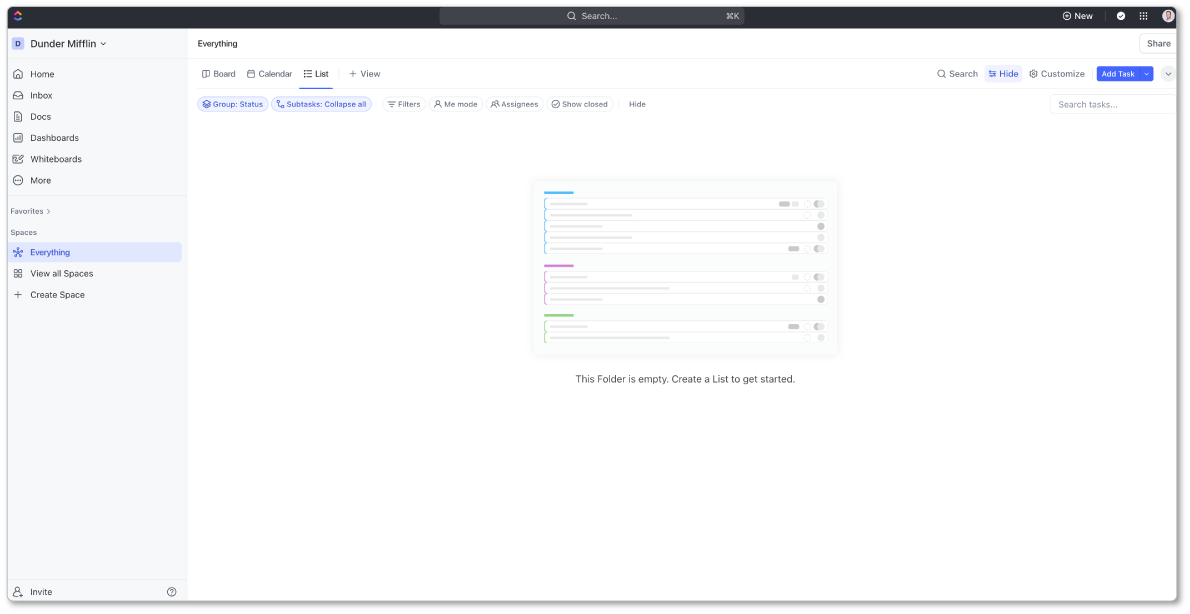
After registration, you’ll access your fresh ClickUp Workspace - a blank canvas ready for customization. While the endless customization possibilities represent a major strength, they can also feel overwhelming initially.
Step 2: Choosing the Correct Pricing Plan
ClickUp offers five pricing tiers: Free Forever, Unlimited, Business, Business Plus, and Enterprise.

Recommendation for most teams: The Business plan minimum. The Unlimited plan contains significant feature gaps despite its name. Unless your team consists of 1-5 members, upgrading is advisable.
For detailed plan comparisons, consult our guide on how to choose the right ClickUp pricing plan, which evaluates each tier’s major advantages.
Step 3: Adjusting Personal Settings
New users should customize personal settings to ensure ClickUp functions according to their preferences, particularly notification settings.
To adjust settings:
- Click your Profile Icon in the top right corner
- Navigate to Settings
- Customize sections including:
- Preferences: Light/dark mode, hotkey enablement
- Notifications: Disable unnecessary email notifications (critical for preventing inbox overload)
- Customization: Colors, profile pictures, etc.
Critical note: Disable most email notifications to prevent notification fatigue. ClickUp’s built-in Inbox already provides real-time updates. Early notification management prevents team frustration.
Step 4: Invite Your Team (At Least Your Implementation Team)
Begin with your implementation team rather than your entire organization. This typically includes leadership, project managers, and process experts who will help configure the system.
Why wait? Implementation takes months. Inviting teams prematurely creates stress, confusion, and potential implementation failure.
To invite team members:
- Navigate to Workspace Settings and select the People tab
- Enter email addresses for invited members
- Assign roles:
- Guest: Contractors, freelancers, clients
- Admin: Leadership or assistants needing billing/invitation access
- Member: Everyone else
Important: Each member added incurs costs. Reserve full invitations for necessary personnel initially.
Step 5: Turn On Helpful ClickApps
ClickApps add functionality to your Workspace, enabling customization specific to your use case. These can be toggled on/off at the Workspace or Space level.
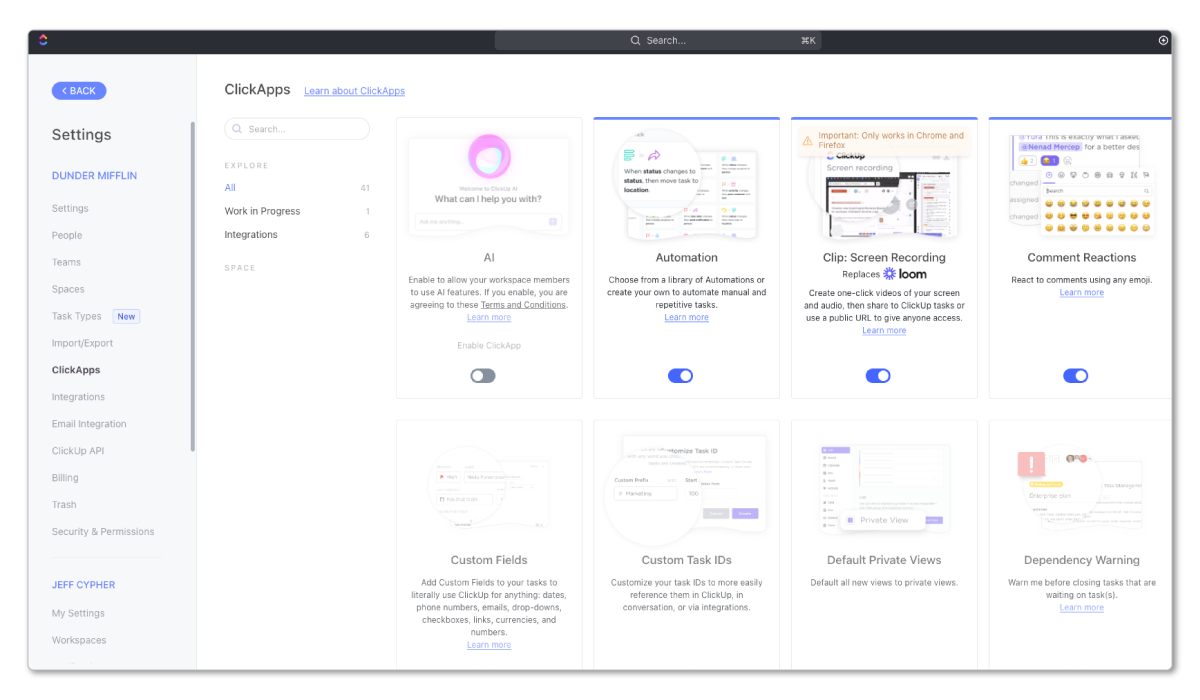
To access ClickApps: Navigate to Settings, select ClickApps, and scroll through available options.
Common ClickApps include:
- Time Tracking: Track time directly within ClickUp
- Time Estimates: Pair with Time Tracking for workload visibility
- Email: Send emails directly from Tasks to centralize communication
- Pulse: Monitor user login duration
- Giphy: Add GIF functionality to communication
- Custom Fields: Essential for customizing your Workspace and creating sophisticated Views
Recommendation: Don’t enable too many apps immediately. Focus on essential basics first. Avoid Automations initially - many teams become overwhelmed by advanced features before mastering fundamentals. Keep it simple, then build gradually.
Step 6: Start Building Your ClickUp Hierarchy
The ClickUp Hierarchy represents the platform’s most powerful feature. When properly structured, it serves every organizational level - individual contributors, project managers, account managers, directors, executives, and clients - providing exactly the visibility each role requires.
Why the Hierarchy Matters
Never implement new software without a strategy. Many teams hope technology alone solves problems - it doesn’t.
Critical questions:
- What challenges are we addressing?
- Are we seeking productivity improvements or profitability visibility?
- Do we need project progress tracking or process/SOP compliance?
Your current goals and challenges determine your Hierarchy structure, directly impacting your ability to track profitability, team utilization, contract status, and project progress.
Take our Project Management Benchmark Assessment to identify your priority areas before getting started.
ClickUp Hierarchy Overview
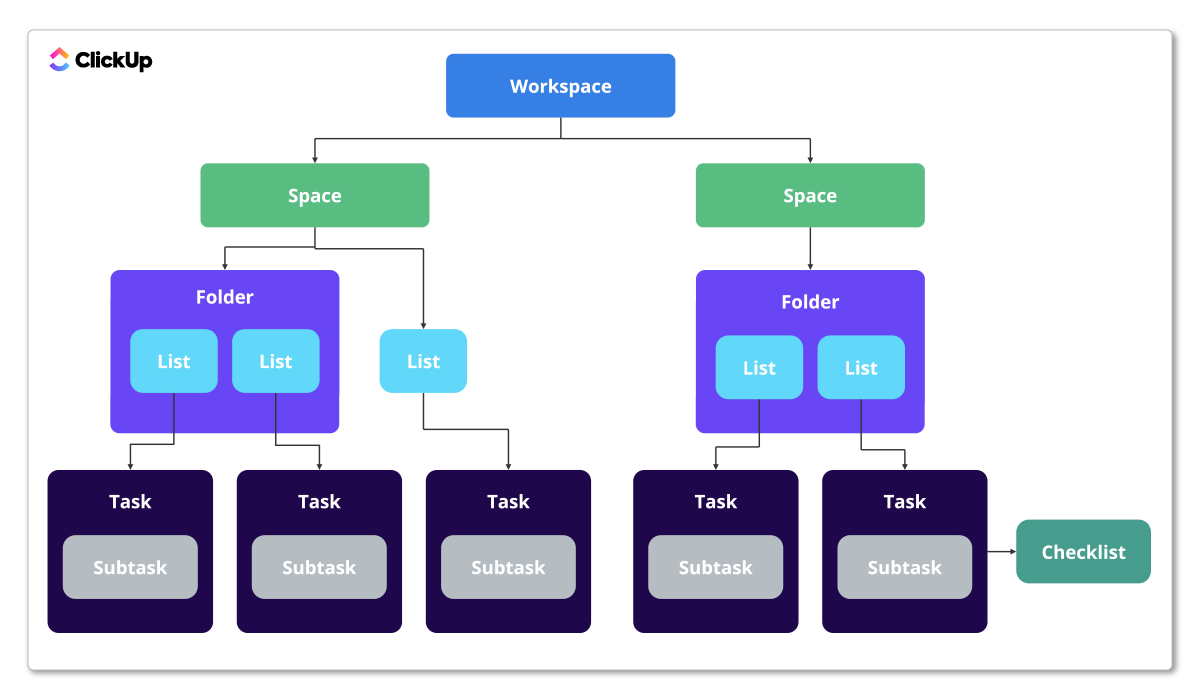
ClickUp’s organizational structure consists of seven layers:
- Workspace: The highest organizational level, typically named after your business. All work organizes within this level.
- Space: Represents departments or teams. Multiple Spaces accommodate different organizational divisions.
- Folder: Groups Lists and Tasks within Spaces. While optional, Folders assist organization and often represent service categories or clients.
- List: Where actual work resides. Lists typically represent work categories, service lines, or contracts.
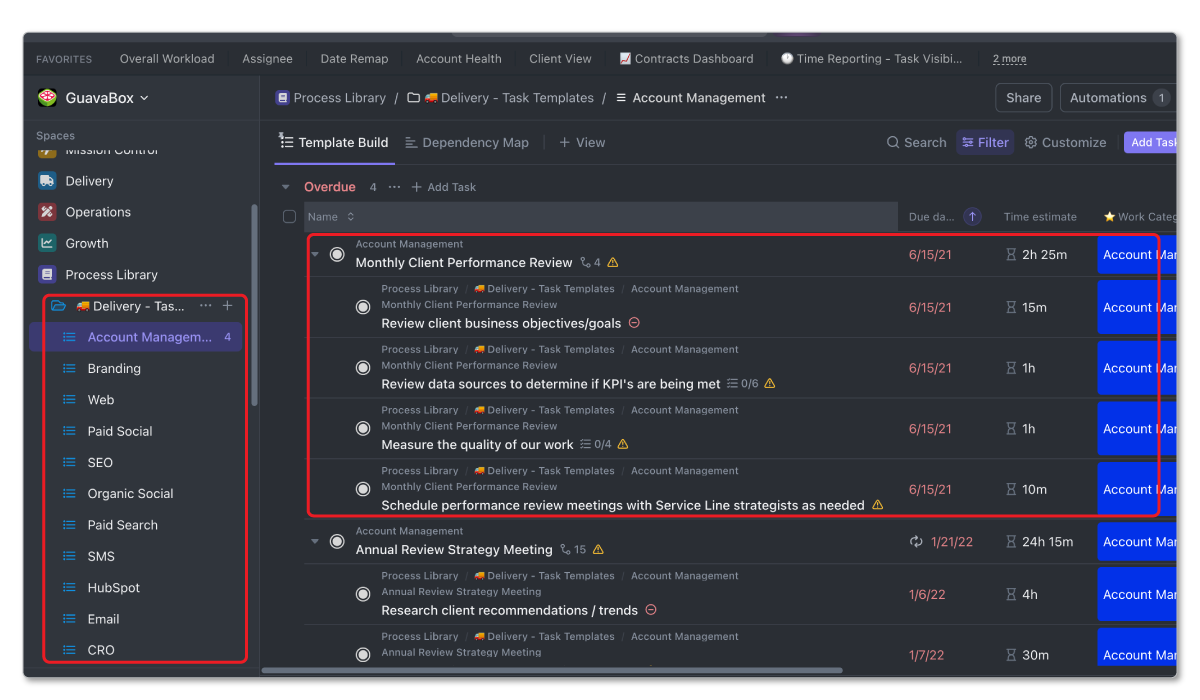
- Parent Task: The actual work. Parent Tasks typically represent deliverables or project phases/milestones.
- Subtask: Tasks beneath Parent Tasks representing actionable steps required to complete deliverables or project phases.
- Checklist: The final hierarchy level, attachable to any Task. Checklists serve as reminders ensuring team members follow established processes.
Using multiple hierarchy layers maintains structured, organized Workspaces with long-term benefits.
Hierarchy Example
Most client-servicing teams organize around three departments:
- Growth: Business development activities - marketing, sales, partnerships (making promises)
- Delivery: Client service (keeping promises)
- Operations: Support functions - HR, finance, legal, administration
Growth Space structure:
- Folder: Sales
- List: Prospecting
- List: Deals
- Folder: Marketing
- List: Website
- List: Content
- List: Email
Delivery Space structure:
- Folder: Client X
- List: Contract XYZ
- List: Website Project
- Folder: Client Y
- List: Contract ABC
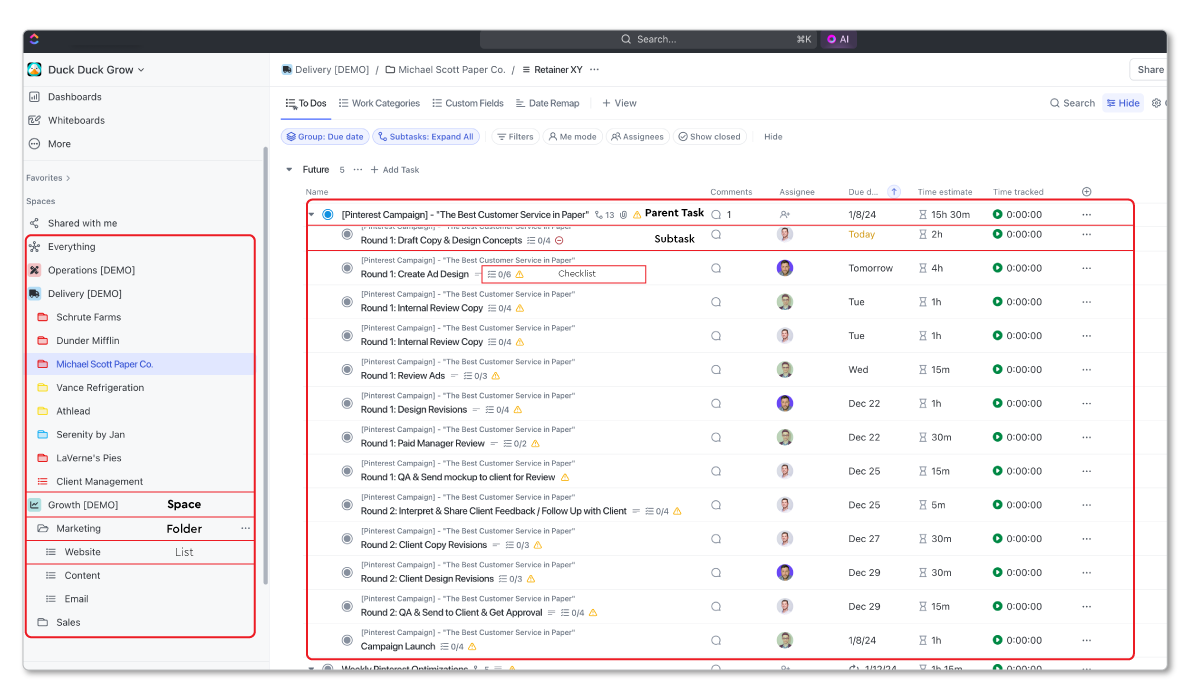
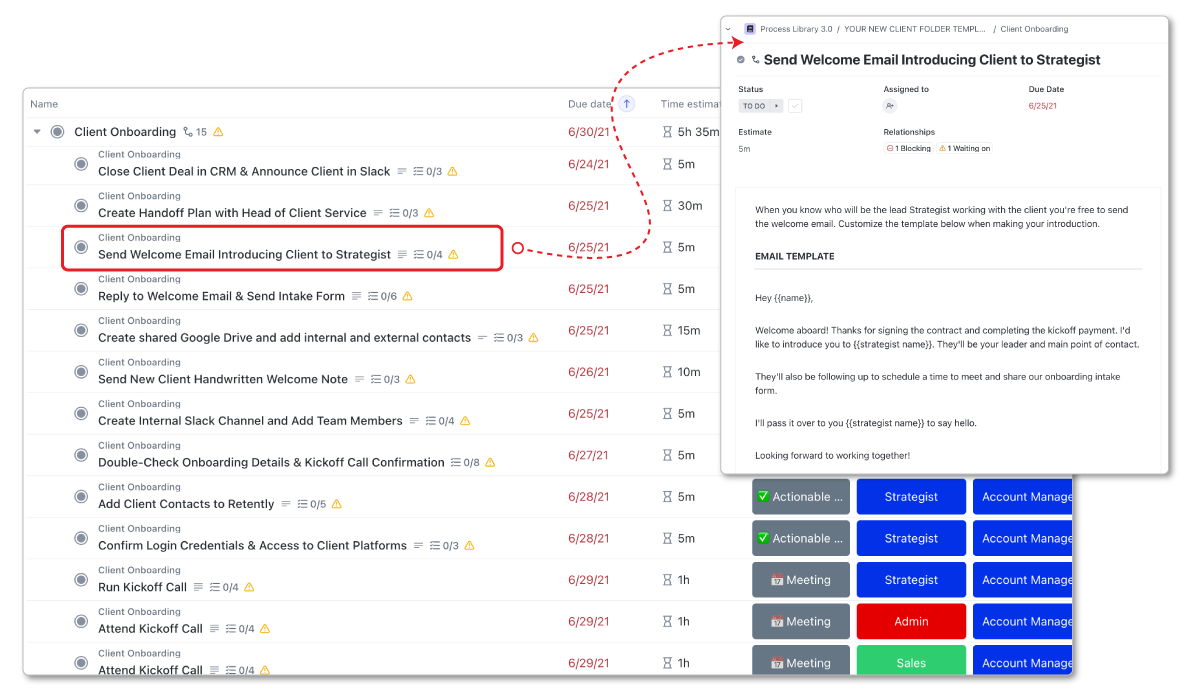
Parent/Subtask structure:
- Parent Task: Blog Post
- Subtask: Create Blog Post Strategy
- Subtask: Review Strategy and Outline Blog
- Subtask: Approve Blog Outline
- Subtask: Write Blog Copy
- Subtask: Review Blog Copy
- Subtask: Apply Blog Proofing Revisions
- Subtask: Design Blog Images
This structure enables work handoffs while providing visibility into deliverable progress.
Setting Up Spaces, Folders, and Lists

Before jumping into ClickUp, sketch your structure on Miro Board or Lucid Chart. This visualization aids planning.
Process:
- Hover over the + icon next to Spaces
- Select Create Space
- Enter Space name and description
- Adjust Space color and avatar
- Choose public or private access (public recommended initially)
- Select Statuses: recommend “Open,” “In Progress,” and “Closed”
- Toggle necessary ClickApps like Time Tracking or Time Estimates
- Add initial Views (customizable later)
- Click Review Space and Create
Repeat for multiple Spaces or save as Template for deployment efficiency.
A Brief Thought on Statuses
Common mistakes:
Mistake 1: Using Status as the project stage indicator. Instead of passing work through Subtasks, teams assign one Parent Task to multiple people and change Status to indicate project stage. This loses workload visibility and creates workflow gaps.
Best practice: Use Status as mostly “To-Do” or “Complete.” Your Subtask structure should indicate project progression.
Mistake 2: Creating different Statuses for different departments/teams. Inconsistent Statuses complicate Dashboard and View creation, making filtering and grouping difficult.
Best practice: Maintain consistent Statuses across your Workspace for easier Dashboards and Views.
Step 7: Building Your ClickUp Templates
ClickUp Templates unlock productivity and efficiency gains. Templates standardize work, connect SOPs to tasks, and provide clarity for your team.
While ad hoc task creation is possible, leveraging Templates for 85-90% of task creation maximizes ClickUp value and builds more productive, profitable operations.
Finding the ClickUp Template Center
Access the Template Center through three methods:
- In Sidebar Menu, hover over Space/Folder/List, click the ellipsis, select Templates, then Browse Templates
- Use Slash Commands: type “/Template” anywhere in ClickUp
- Click Quick Action Menu (top right, nine dots) and select Template Center icon
What Can Be Saved as a Template?
ClickUp allows creating Templates at most Hierarchy levels:
- Space Templates
- Folder Templates
- List Templates
- Task Templates
- Checklist Templates
- View Templates
- Doc Templates
- Whiteboard Templates
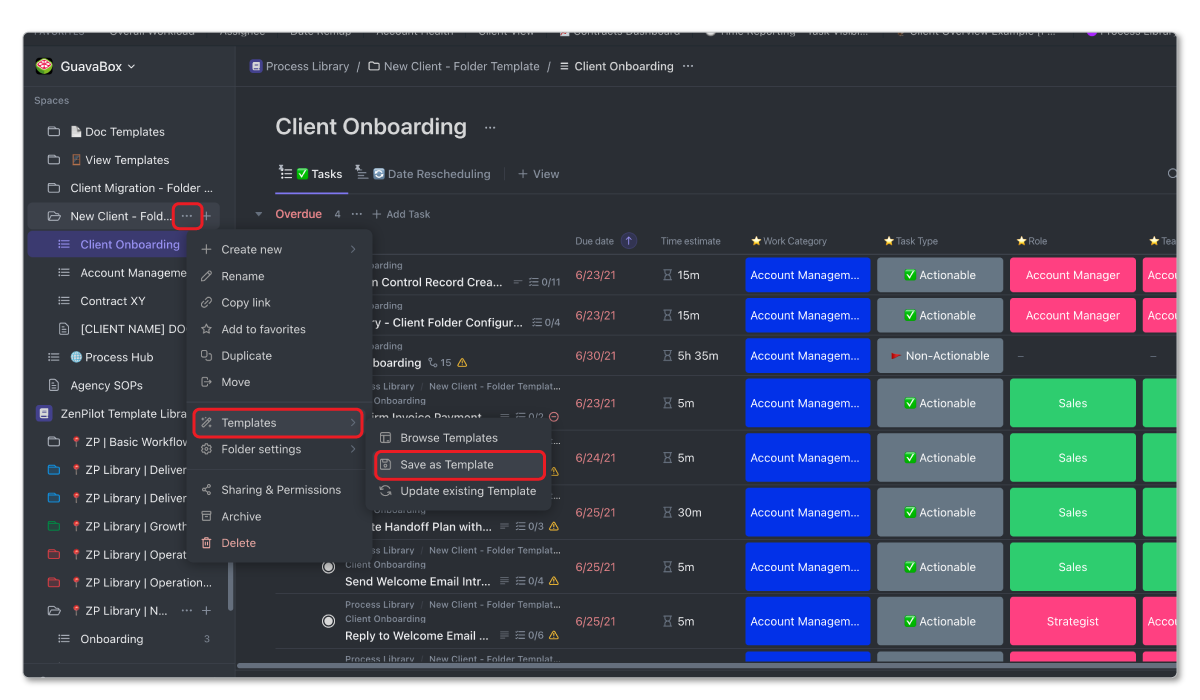
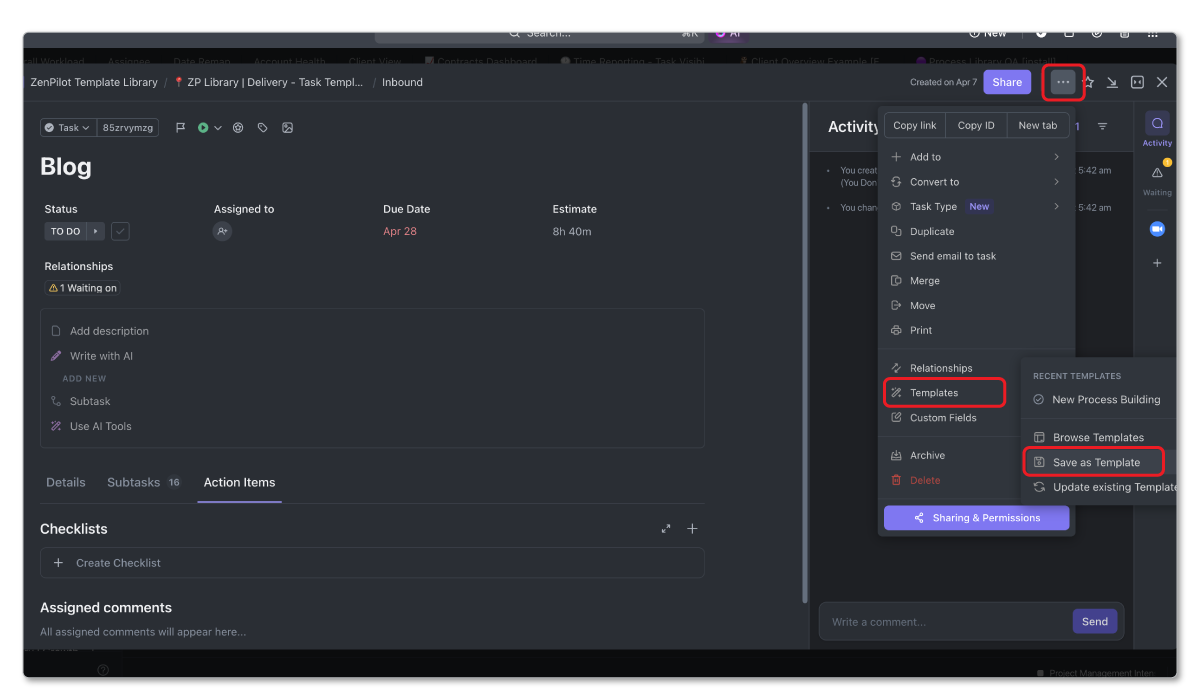
How to Save a Template
Navigate to Sidebar Menu, hover over Space/Folder/List, click the ellipsis, select Templates, then Save as Template. The same process applies for Tasks, Docs, Views, Checklists, and Whiteboards.
ClickUp Template Best Practices
1. Build a “Process Library” Space
Your project management system is largely ineffective without process templates. Your Process Library represents one of your company’s most powerful assets.
Create a dedicated Space in your ClickUp Workspace solely for building and storing process templates. This centralized repository becomes your standardization hub.
2. Prioritize Processes First
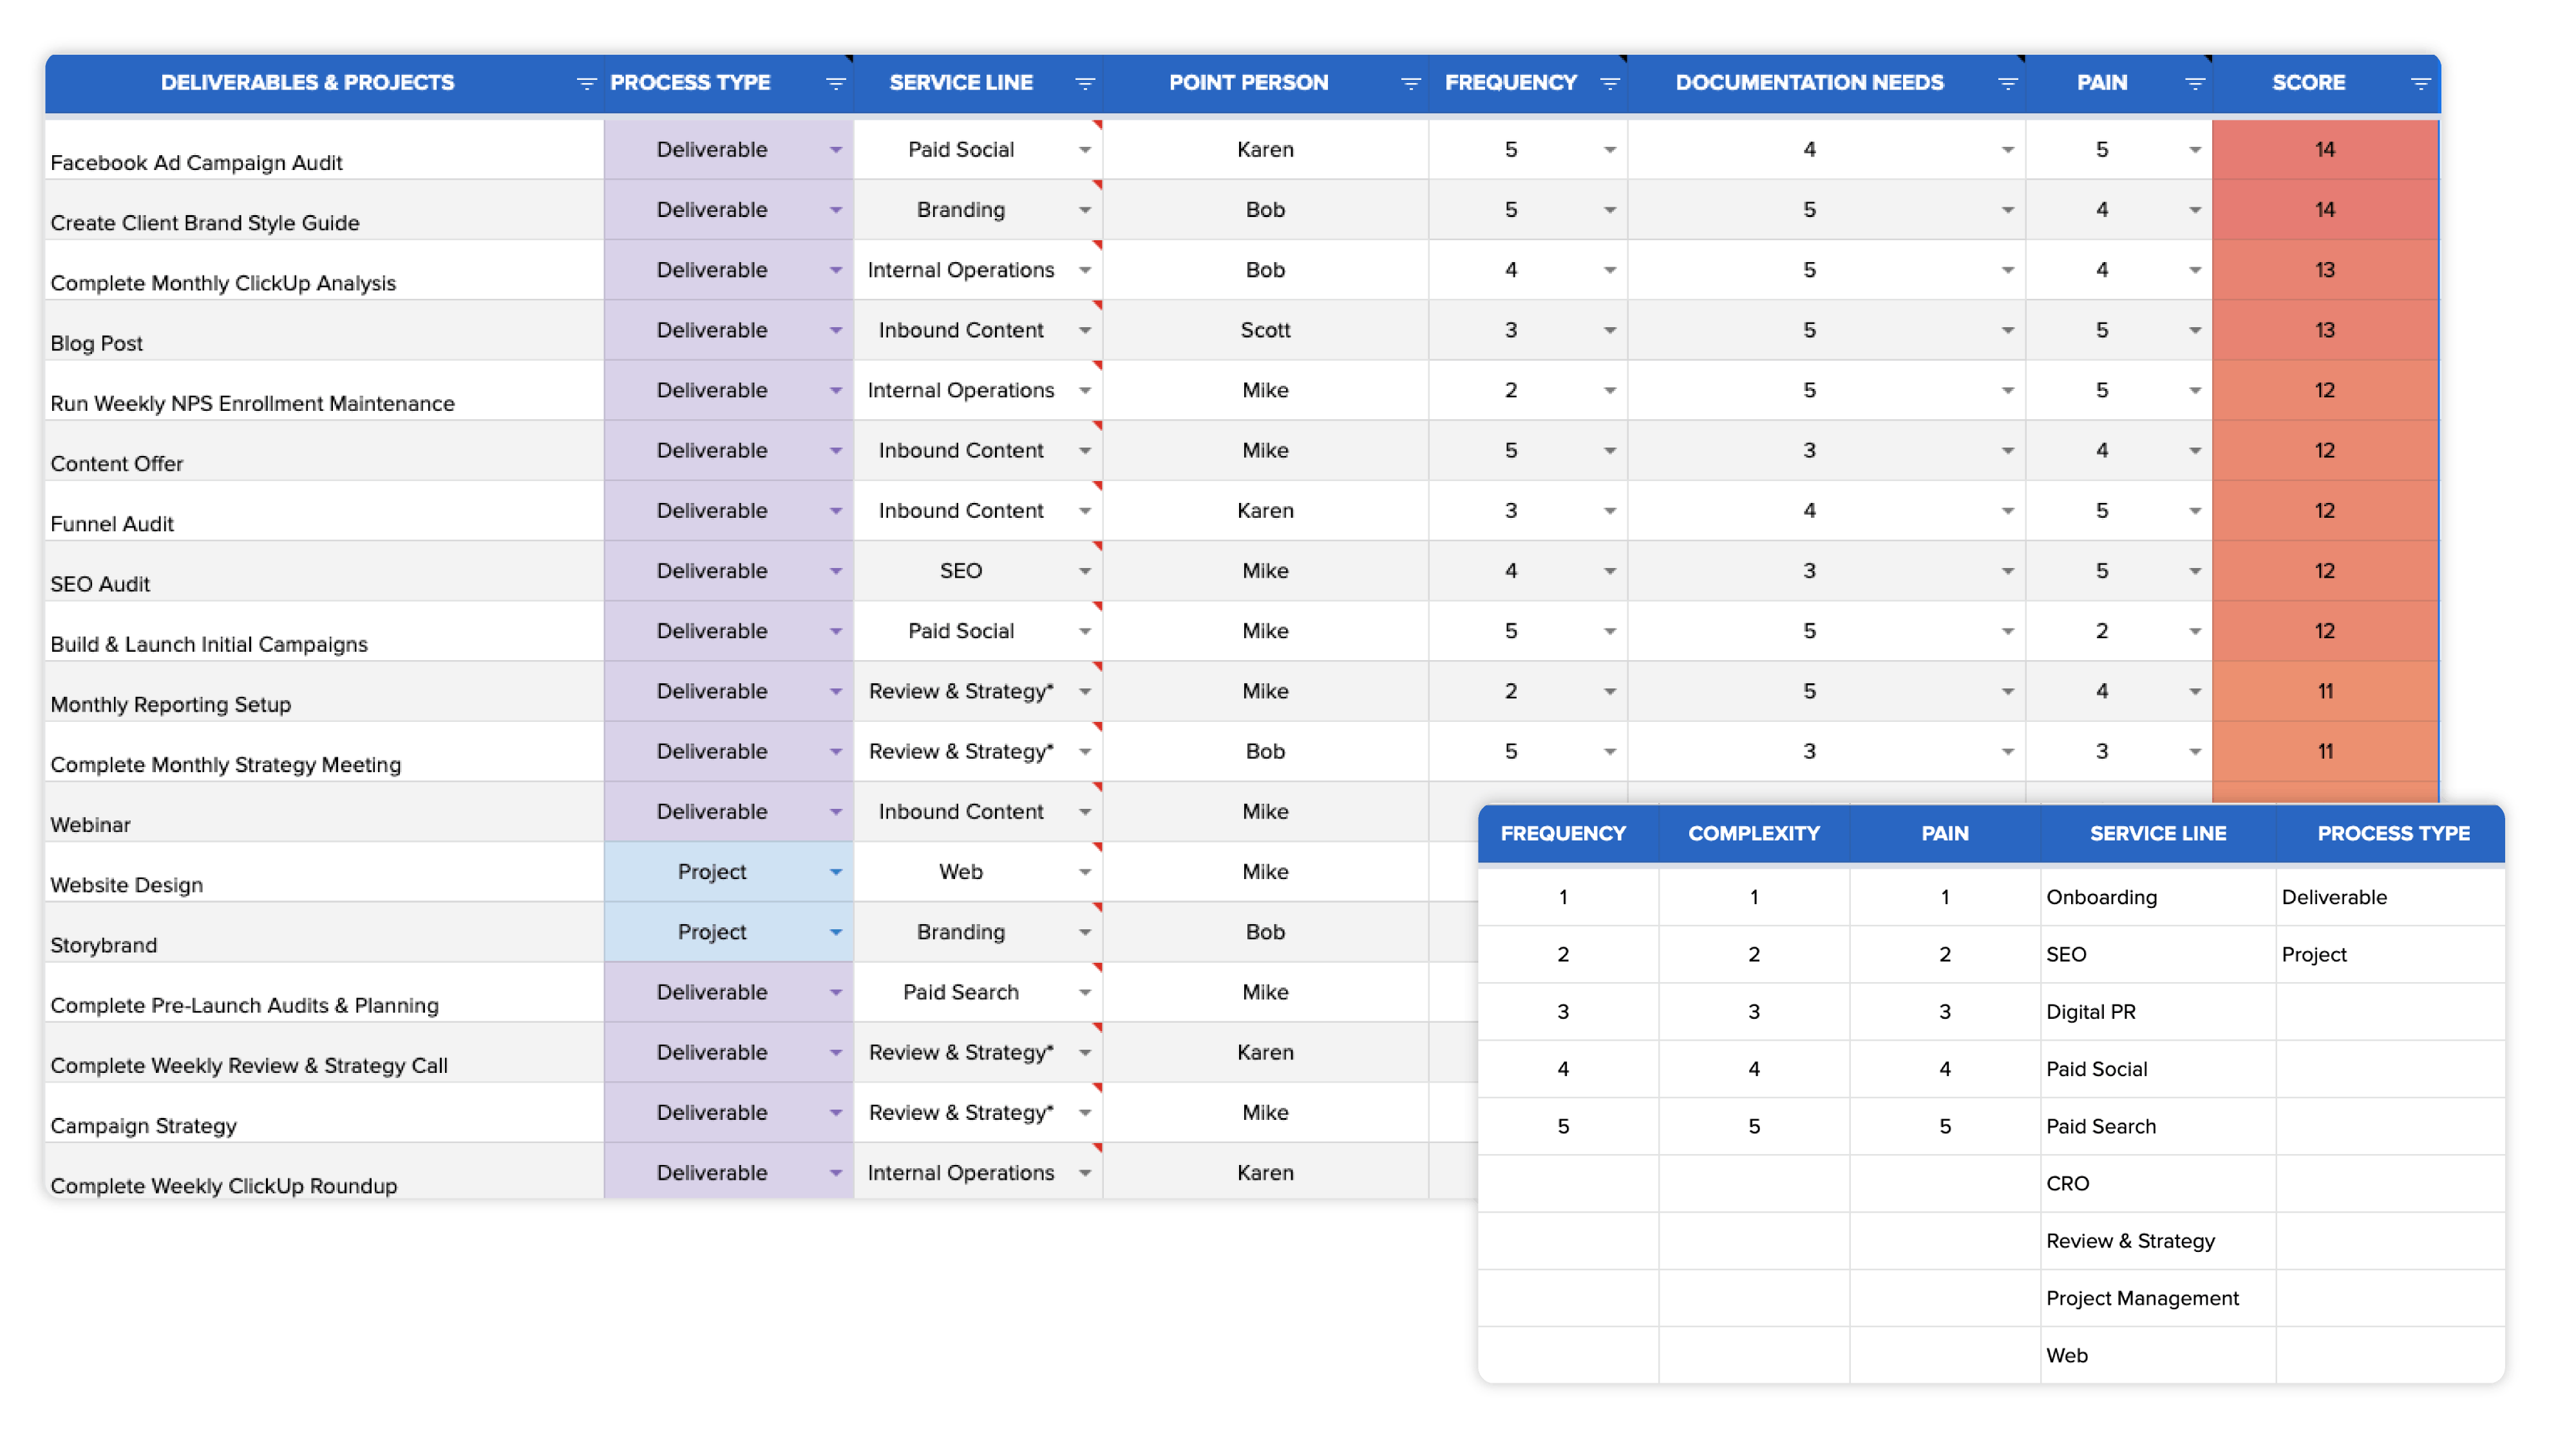
Before jumping into ClickUp, identify and prioritize necessary processes. You cannot build everything simultaneously.
Marketing agencies might need: Client Onboarding, Blog Post Writing, Website Building, Email Campaigns, and internal processes like Employee Onboarding, Recruiting, Payroll, Tax, Financial Planning.
Use our Process Prioritization Worksheet to brainstorm and rank your processes by importance.
3. Use Folder, List, and Task Templates
Folder, List, and Task Templates represent the most commonly leveraged ClickUp Templates:
- Task Templates: For deliverables - blog posts, meetings, financial reports, audits
- List Templates: For projects - website builds, implementations
- Folder Templates: Primarily for client-service teams, templatizing client folder structures
Follow the Parent Task and Subtask structure discussed earlier. Each Parent Task represents a deliverable or project phase, with Subtasks representing completion steps.
Want a head start? Grab our free Client Onboarding ClickUp Template - a pre-built template you can deploy right away.
4. Make Process Live Where Work Gets Done
Enhance Template effectiveness by connecting processes to tasks. Include SOPs or documentation in Task Descriptions, linking to SOP documents, video tutorials, or templates.
Combining processes with tasks dramatically increases team compliance rates.
5. Leverage View Templates for Standardization
View Templates help standardize Views across your Workspace, simplifying navigation and comprehension.
6. Leverage Doc Templates for Meeting Agendas
Doc Templates work excellently for meeting agendas. ClickUp enables running meetings, saving notes, and creating tasks from notes directly.
Step 8: Leveraging Custom Fields
Custom Fields can be problematic in ClickUp when overused. Many teams create numerous Custom Fields without understanding their function, creating future complications.
What Are ClickUp Custom Fields?
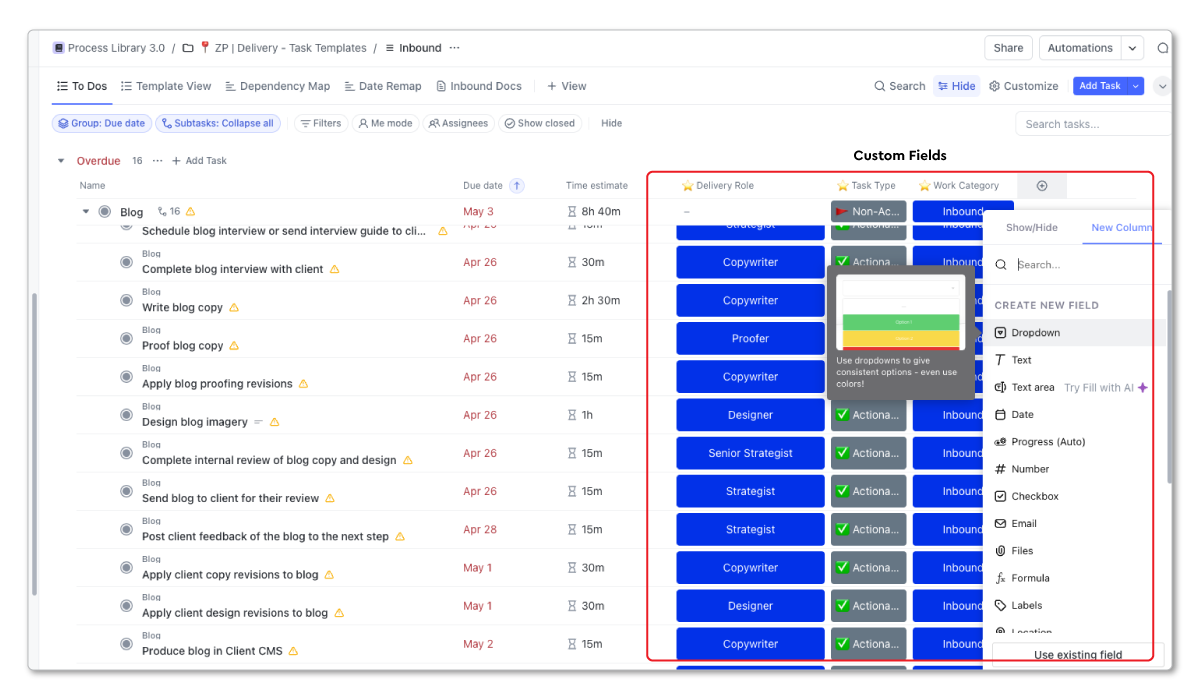
Custom Fields add different data types to ClickUp Tasks, enabling Workspace customization. They:
- Enable data segmentation for Views and Dashboards
- Add information to Tasks
- Provide Automation capabilities
Where Are Custom Fields Located?
Custom Fields can exist at any Hierarchy level. Access the Custom Field Manager through Quick Actions Menu (top right corner) or by clicking +/Add a Column in any View.
Critical caution: Adding Custom Fields at Workspace level applies them to every Task in your Workspace. Avoid this typically.
Keep Custom Fields at Space level maximum. Navigate to a Space, pull up a View, click +/Add a Column, add the new field. This applies the Custom Field to every Task in that Space only.
Why Custom Fields Matter
Custom Fields unlock future custom Views and Dashboards.
Example 1 - Role Field: Create a dropdown Custom Field listing team roles (copywriter, admin, proofer, strategist, account manager, designer, engineer). Every Template Task includes this field. When deploying Templates, group all Tasks with “Copywriter” role, then assign in bulk using the Bulk Action Toolbar.
This saves minutes per deployment but accumulates to days or weeks of annual admin time savings.
Example 2 - Account Manager Field: Create a dropdown Custom Field for account managers. An account manager managing 10 clients with 4-5 deliverables each and 5-person teams can create one View showing all Tasks assigned to them across all clients, eliminating navigation through multiple folders and lists.
Custom Field Best Practices
Start with three basic Custom Fields, then expand as needed:
- Role: Dropdown Custom Field listing business roles. Apply to every Task for work assignment and hiring decisions.
- Work Category: Dropdown Custom Field labeling work categories. Essential for future profitability reporting showing most profitable services and time allocation.
- Task Type: Dropdown Custom Field labeling Task types. Not every Task is traditional - some are records, non-actionable, meeting-related, etc., requiring proper labeling.
These fundamental fields work for most ClickUp-using businesses. Always develop strategy before creating Custom Fields, knowing your Hierarchy and identifying fields enabling visibility and reporting capabilities.
How Healthy Is Your Project Management Setup?
Take our free benchmark assessment to see how your current PM setup compares to best practices from 3,100+ implementations.
Take the Assessment →Step 9: Leveraging ClickUp Views
ClickUp Views could be discussed directly after the ClickUp Hierarchy. They are one of the most important features within ClickUp.
However, it’s important that you understand the ClickUp Hierarchy, Custom Fields, and Templates (mainly because now you know that you can turn your Views into Templates) first.
Most teams will start by setting up a bunch of random Views in their Workspace. This is fine, but as you build and build and build in ClickUp, an overabundance of Views with no distinct purpose can overcrowd your Workspace and lead to confusion across your team.
And confusion isn’t going to help get your team bought in to the platform. This is a big reason why teams fail to successfully implement their project management system.
We recommend only building the Views you need, and standardizing them across your Workspace.
This is exactly why you need to know about View Templates.
Plus, you can build Views into your Space, Folder, and List Templates. This will save you hours of hard work and headaches if you get your desired Views built into your Templates. That way you don’t have to go and set up every View from scratch!
If you’re looking for a more thorough guide on Views, I recommend you read our article, “Everything You Need to Know About ClickUp Views”.
But since you’re here, let me give you a few pointers.
Top Tips for ClickUp Views
Tip #1 - Public vs. Private Views
This may not be a tip as much as it is a warning.
When Views are created, they’ll be set as public, unless you choose to make them private (or if you have the Default Private Views ClickApp turned on then just disregard that).
If a View is public, this means that everyone in your ClickUp Workspace will see this View, and can make changes to this View. If a change is made to the View, everyone will see the changes.
However, if you want to restrict people from changing a View, you can click on that View, select More settings and toggle on Protect view. This will restrict anyone from editing your beautiful Views you created and keep your Workspace in check.
If a View is private, this means that only you can see it. You’ll know it’s a private View when it has a little Lock icon next to the View.
You can edit, change, and adjust this View without anyone else seeing the changes.
Tip #2 - Identify Roles Before Creating Views
When you’re creating Views, you need to go in with some sort of strategy. Think about the main roles within your business. This will vary by business type, business size, etc., but for most businesses this will include 5 main roles:
- Individual Contributors: Need to know what’s on their agenda and what they need to prioritize.
- Account Managers (or Team Leads): Need to see how their clients projects are progressing, how the contract is pacing, what the results are, and what they need to discuss at their meetings.
- Project Managers: Need to see team workload (with ClickUp’s Workload View) and be able to easily reassign and remap due dates if necessary, while also keeping ClickUp up-to-date.
- Leadership: Need visibility into client health, team health, and overall agency health (profitability, workload, utilization, etc.)
- Clients: Need to know what’s happening, what’s completed, and what the results are.
Each of these roles should have Views created specifically for them.
When you identify the roles before creating Views, you’ll be able to ask your team sitting in those roles, “what do you need to see and why?”. You can then build Views around those answers.
And when you start thinking about how you can create those Views, you’ll begin to think about how it relates to your ClickUp Hierarchy, and you’ll start identifying Custom Fields that can be used to segment certain tasks to give your roles a View that shows them only what they need to see.
Tip #3 - Use “Default for everyone” On Important Views
As mentioned, it’s important to keep your Views standardized and strategic.
But, you can have dozens of Views at any location which can be confusing.
If there is one particular View that you want everyone to see when they click on to a Space, Folder, or List, use the Default for everyone setting.
This can be found in the Views settings, and when toggled on, it’ll force everyone to that particular View when they navigate to that location.
Tip #4 - Three ClickUp Views You Absolutely Need
This list could obviously be a bit longer, but I’ll narrow this down to three Views that are 100% necessary.
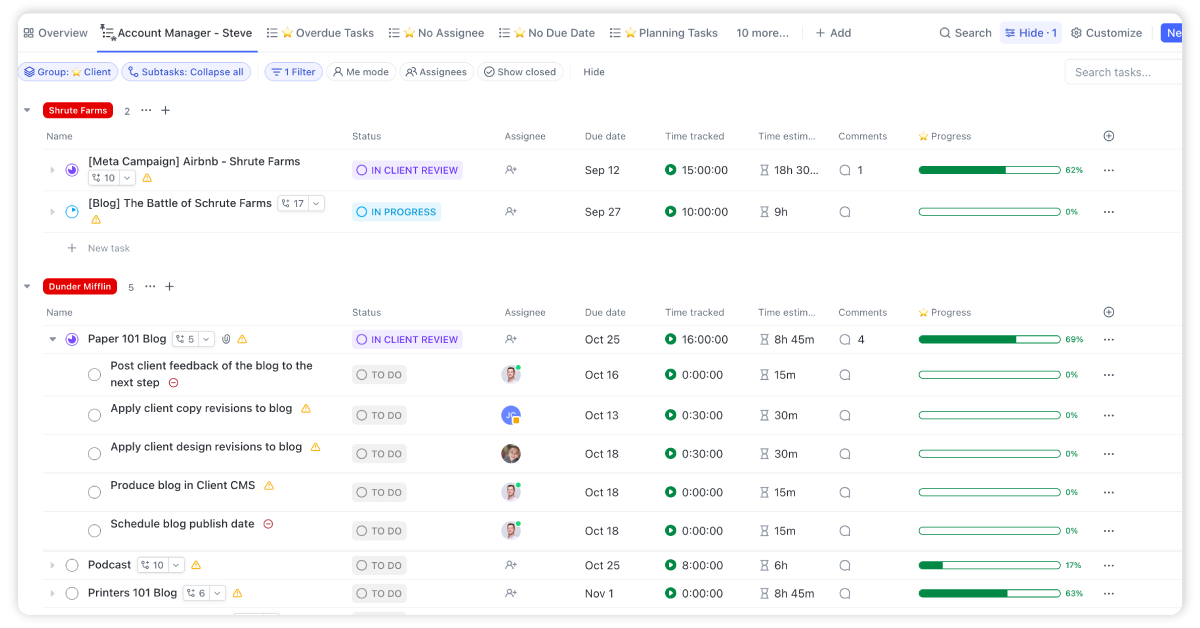
1) “My Tasks” View
This View should be built and customized for everyone in your Workspace.
The “My Tasks” View is designed to create a View of everyone’s tasks. Everyone should start and end their day in this View. They shouldn’t need to look anywhere else for their work.
This View can be customized to everyone’s liking and be turned into a Private View so only they can see it and access it.
Here’s how to build it:
- Navigate to the Everything or Workspace level
- Create a new List View
- Group the Tasks by Due Date
- Subtasks should be shown as separate tasks
- Filters should be set to only show tasks assigned to you
- And you can add columns like Time Estimate, Time Tracked, Comments, Priority, and Due Date!
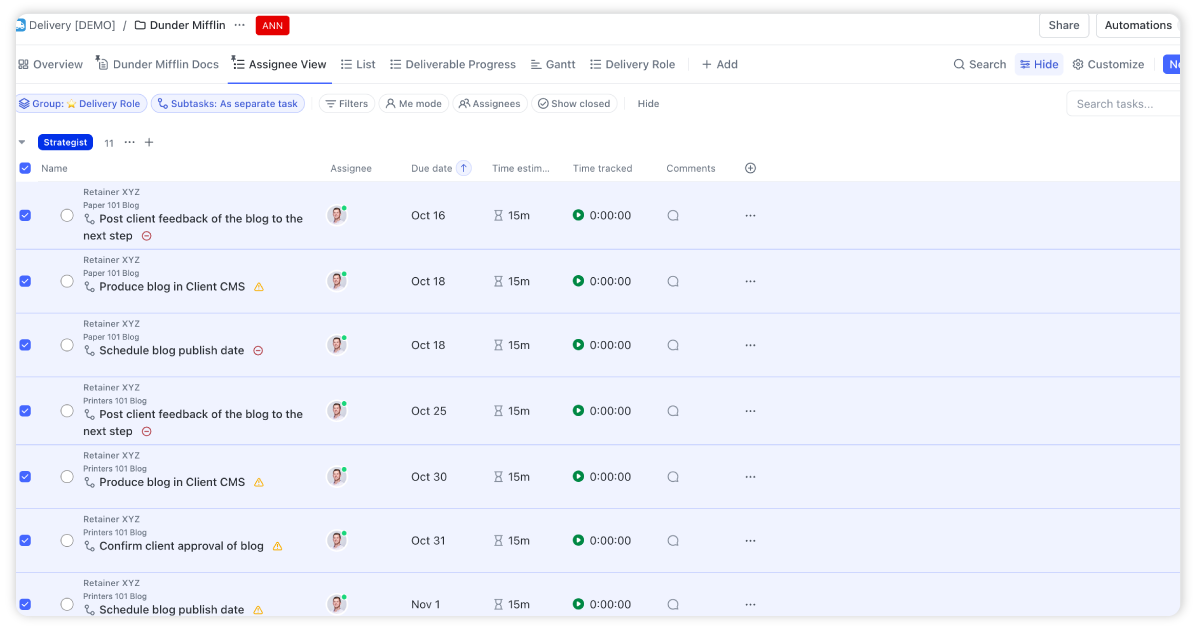
2) “Assignee” View
This View relies heavily on the “Role” or “Delivery Role” Dropdown Custom Field we discussed earlier.
If you leverage ClickUp Templates and add a “Role” Dropdown Custom Field to every Task, you’ll be able to easily assign those Tasks with this View.
Here’s how to build it:
- Navigate to either a Folder or List
- Add a new List View
- Group the tasks by your “Role” Custom Field
- Subtasks should be shown as separate tasks
You can use the ClickUp Bulk Action Toolbar to select all tasks for a specific “Role” and assign them with a few clicks.
This is perfect when you’re beginning a project and need to assign a bunch of tasks all at once!
3) “Date Remap” View
This View is actually a Gantt View. So for those who are Gantt lovers, this one is for you!
When you have a larger workflow built in ClickUp, you can leverage the Gantt View to remap a whole project or deliverable all at once. You’ll leverage Dependencies to make this happen.
Again, this is why Templates are super important. If you build your processes and save them as Templates in ClickUp, you can build Dependencies into your tasks, making it 10x easier to leverage this View.
Here’s how to build it:
- Navigate to either a Folder or List
- Add a new Gantt View
- Click on the Customize button in the far right
- Select Gantt options
- Toggle on Hide and skip weekends and Reschedule dependencies
Now, when you have the Task structure I mentioned earlier (Parent Tasks = deliverables and Subtasks = actionable tasks to complete that deliverable), you can leverage the Dependencies to grab one task, change the due date, and move the whole workflow with it!
Tip #5 - “Favorite” Your Favorite Views
Lastly, you may have a few Views that you use on a regular basis.
For me, that’s obviously my “My Tasks” View. This is where I start and end my day.
Favoriting a View allows you to pin them to the top of your screen like a bookmark.
Here’s how to do this:
- Navigate to your View and click on it
- Click on the Add to favorites button
- Find your Favorites in the Sidebar menu above your Spaces
- Hover over the Favorites section and click on the Pin to favorites icon
You’ll now be able to easily navigate from View to View with only a few clicks!
Step 10: Training Your Team and Launching
This is a key part of the ClickUp implementation process that most teams miss.
After you’ve carefully designed out your ClickUp Workspace with the proper Hierarchy, Views, and Custom Fields, and you’ve built all of your processes and saved them as ClickUp Templates, you’re ready to invite your team.
If you’ve already invited your team, that’s fine, but I’d highly recommend you wait to get everything set up correctly first. You don’t want your team jumping in, getting confused, and losing momentum right off the bat.
But beyond the right framework and setup, setting your business up for success while using ClickUp boils down to also having clear rules of engagement, educating everyone on why and how to follow those rules, and then disciplined accountability in your execution.
When you train your team, your training should revolve around 2 types of education:
- Your expectations and ground rules around project management as a whole.
- Orientation to ClickUp itself, your tool, and how to use it.
For example, we put everyone that works with us through a Project Management in ClickUp Certification program.
The first thing they learn is the 10 Commandments. These basic expectations are detailed and applied to real-world situations.
Commandment #1 is: If it’s not in ClickUp, it didn’t happen.
There’s little value in doing things halfway. If you want the ability to accurately forecast workload, follow a trail to figure out where things went off track for a project, or reward team members who deliver the best work, you need that work to be centralized in ClickUp.
Explain that expectation and show your team what that looks like. If you’re not working with us, build your own list of expectations and turn it into a training product for new hires.
Add in detailed walkthroughs of how you want the tool to be used and the daily habits each team member needs to adopt.
Then keep that training up to date.
You will have better data to improve your decision making and your team will be more productive, aligned, and grateful.
Step 11: Working in ClickUp
After your team is invited and working in ClickUp, what are the best ways for everyone to collaborate, communicate, and complete their work?
For starters, everyone should have their Notifications and My Settings all set up correctly. After that, they should have their “My Tasks” View set up and ready to go.
Creating Work
Creating work is fairly straightforward in ClickUp. Well, to be honest, it’s only straightforward if you’ve built your Hierarchy correctly and are leveraging Templates.
A proper Hierarchy will ensure that every Task has a clear home, and Templates will help you set up Tasks, assign them out, and bring necessary information as well (Dependencies, Custom Fields, Time Estimates, etc.).
I’d recommend you have certain people on your team that are in charge of deploying and assigning work.
At ZenPilot, we use our Workload-Driven Project Management Methodology which clearly defines roles across our team for creating, deploying, assigning, and remapping work in ClickUp.
Most often, account managers are the ones deploying work and project managers are assigning work, but that may vary team to team.
And yes, obviously not every Task will be created from a Template. You can create adhoc Tasks in your Workspace, just make sure they are put into the right location and they have the proper information on them.
At minimum, if you want accurate workload visibility in ClickUp, every Task needs to have a Time Estimate, Due Date, and Assignee. For more ways to speed up how you create and assign work, read our guide on how to create tasks faster in ClickUp.
Completing Work and Communicating
After work is deployed and everyone has work assigned to them, they can start working on their Tasks.
Again, everyone should live out of their “My Tasks” View. This is where they will find their work, complete their work, track their time, and communicate.
Parent Task = Communication Hub
The Parent Task and Subtask structure I recommended earlier will serve you well here.
Each person will be assigned to Subtasks. The Parent Task will NOT be assigned.
The Parent Task will serve as your communication hub for that specific deliverable. All communication needs to live in that Parent Task.
Additionally, all drafts for that deliverable - document, image, video, or whatever it is - needs to live in the Parent Task. This is your source of truth for that deliverable.
If you follow this framework, your team will have a much easier time getting all the context they need when completing their work.
Inbox
The other pro to this method is that your ClickUp Inbox will be clean and have everything you need to get your work done!
Everyone on your team needs to live in their ClickUp Inbox and “My Tasks” View.
If these are the two places they go to complete their work, you’ll find it much easier to get better work done, faster. And, work won’t slip through the cracks!
Adjusting Due Dates
Sadly, work doesn’t always get done on time. Things may fall behind because priorities have shifted, someone went on PTO, or the team just fell behind.
If work does fall behind, you’ll want to have your project managers use the “Date Remap” Gantt View to remap Due Dates. This will keep all of the dates in your workflow together.
If you just adjust a Due Date in your “My Tasks” View, this won’t affect any of the other tasks. Gantt Views allow you to leverage your Dependencies for remapping work.
Additionally, you also want to make sure that your team is always leaving a paper trail. If they do have to move a Due Date because they fell behind, have them leave a comment on that Task @mentioning stakeholders and giving a reason.
Communicating like this will help your team build healthy habits, and ensure everyone knows what’s happening.
Running Meetings
Additionally, you can run all of your meetings in ClickUp. You can run both client meetings and internal meetings inside of ClickUp.
Leverage ClickUp Docs to help you build agendas, store notes, and assign work out to your team.
This will help store all of your information in one system and help you keep a nice running log of everything you’ve talked about in your meetings.
Step 12: Optimizing, Optimizing, Optimizing
Once you’ve launched and your team has started working in ClickUp, there are a handful of specific things you should do to help your team get up to speed quickly and then hold everyone accountable to the standards you’ve set.
Specifically, within the first 2 weeks, you should set up a 1-on-1 meeting with each team member to assess their usage and spot any issues as early as possible.
Look at obvious things like their time tracked and time estimated totals, overdue tasks, completed tasks, and profile set up.
You can create ClickUp Dashboards to track this kind of data. I’d recommend you build out a Time Reporting and ClickUp Champion Dashboard to track this.
Assign a ClickUp Champion
Additionally, to help optimize your ClickUp Workspace, we recommend you assign someone internally to act as your ClickUp Champion.
This person will execute the consistent checks, address minor issues, escalate major issues as needed, and surface insights and aggregated data to the management team.
To build healthy habits across your team, you should be following clear cadences for accountability, analysis, and improvement.
What Does Your ClickUp Champion Do?
The ClickUp Champion is responsible for the following tasks:
- The Daily Spot Check - a 10-30 minute (depending on firm size) audit at the end of each work day
- The Weekly Roundup - a slightly deeper dive on a weekly basis that leads to a short aggregated report to management
- The Monthly Review - a monthly review that pulls data for management that should impact resource allocation, project scoping, pricing, etc.
- The Quarterly Analysis - a comprehensive analysis that impacts time estimates, project planning, recruiting and hiring, client relationships, etc.
Ensure that you prioritize these tasks. Develop a comprehensive and well-documented process and assign it to a team member who will follow the process.
This will enable them to provide valuable insights and maintain accountability, maximizing your investment in process development and ClickUp.
Create Advanced Views, Dashboards, and Automations
As you continue to grow in ClickUp and your team gains momentum, you can start to look into more advanced features (like Automations) in the platform or build out some pretty rad solutions.
Here’s a few I’d recommend:
- Create an internal wiki or knowledgebase in ClickUp to keep your processes and tasks in one system
- Run EOS (Entrepreneurial Operating System) in ClickUp
- Leverage the HubSpot to ClickUp integration to streamline onboarding
- Build a CRM directly in ClickUp
- Build client portals for your clients in ClickUp or communicate with clients directly in ClickUp
- Start leveraging ClickUp forms
- Build a client tracker to start tracking client health, NPS scores, and contract data directly in ClickUp
- Explore ClickUp Brain and how to put ClickUp AI to work once your foundation is solid
In summary, there’s a lot that you can build in ClickUp. As I’ve said 100 times, it comes as a blank canvas and it’s extremely customizable.
Start simple, gain momentum, and then explore what else is out there.
Or just hire a Verified ClickUp Consultant like ZenPilot, to help you make the most out of your ClickUp investment.
Step 13: Experience a More Productive, Profitable, and Healthy Team
Congrats! You made it to the end and have set up ClickUp correctly for your team. Hopefully you’re now experiencing a more productive, profitable, and healthy team in ClickUp.
But, if you’re not, book a call with our team and we can change that.
As I’ve mentioned a few times, we’ve helped 3,100+ clients streamline their operations in ClickUp. You can read and watch some of our reviews and case studies here.
Otherwise, what questions do you have? We’re rooting for you!